


Reguladores de intensidade luminosa LED revolucionaram a forma como controlamos a iluminação em vários ambientes, desde casas e escritórios a espaços comerciais e industriais. Oferecem a flexibilidade de ajustar o nível de brilho das luzes LED, melhorando assim o ambiente, melhorando a eficiência energética e até contribuindo para o bem-estar. Neste artigo, vamos explicar-lhe os passos para ligar um regulador de intensidade luminosa LED, com um diagrama para melhor compreensão.
Tipos de reguladores de intensidade luminosa LED
Antes de mergulhar no processo de cablagem, é importante compreender os tipos de reguladores de intensidade luminosa LED disponíveis:
- Dimmers de corte de fase: Adequados para aplicações residenciais, estes são os tipos mais comuns de reguladores de intensidade luminosa.
- Dimmers TRIAC de bordo de ataque e de fuga: Adequados para iluminação LED regulável ou iluminação tradicional, estes são os tipos de reguladores de intensidade altamente compatíveis.
- Reguladores de intensidade 0-10V: Utilizados habitualmente em ambientes comerciais e industriais, oferecem um controlo preciso.
- Reguladores de fluxo luminoso DALI: São normalmente o painel e são controlados pelo mestre DALI, adequado para sistemas inteligentes e iluminação centrada no ser humano.
- Reguladores de fluxo luminoso inteligentes: Trata-se de reguladores de intensidade luminosa com Wi-Fi ou Bluetooth que podem ser controlados através de smartphones ou comandos de voz.

Trabalhos comuns de cablagem de reguladores de intensidade
Componentes preparados
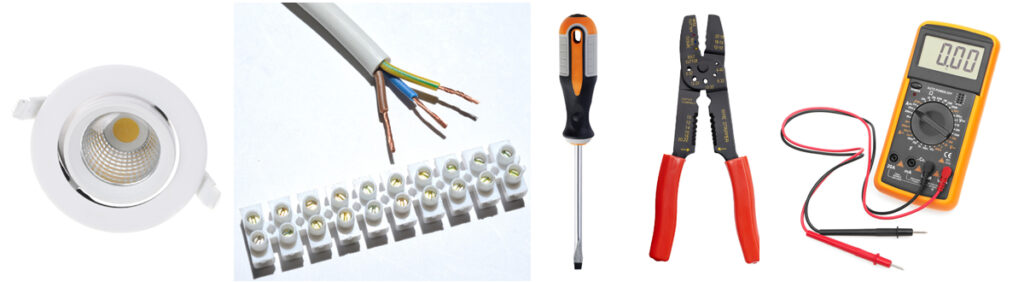
- Luminária ou lâmpada LED
- Interruptor com regulação de intensidade compatível com LED
- Fio elétrico (normalmente de calibre 14 ou 12)
- Porcas ou conectores de fios
- Chave de fendas
- Descascador de fios
- Verificador de tensão
- Opcional: Caixa de junção
Precauções de segurança
- Desligue sempre a corrente no disjuntor antes de iniciar qualquer trabalho elétrico.
- Utilize um aparelho de teste de tensão para se certificar de que a alimentação está desligada.
- Cumpra os códigos e regulamentos eléctricos locais.
- Se não tiver a certeza de algum passo, consulte um eletricista qualificado.
Diagrama
  +----------------+ +-------------------+
  | | | |
  | LED Dimmer |------| LED Driver |
  | | | |
  +----------------+ +-------------------+
                             |
                             |
                             |
                     +----------------+
                     | |
                     | Luz LED |
                     | |
                     +----------------+
Breve guia comum passo a passo
Passo 1: Desligar a alimentação
Desligue a alimentação no disjuntor e utilize um verificador de tensão para confirmar que a alimentação está desligada.
Passo 2: Preparar os fios
Utilize um descascador de fios para retirar cerca de meio centímetro de isolamento das extremidades dos fios eléctricos que vão ser ligados.
Passo 3: Identificar os fios
Normalmente, tem os seguintes fios:
- Castanho / Preto: Fio quente
- Azul / Branco: Fio neutro
- Verde / Amarelo ou Cobre nu: Fio terra

Passo 4: Ligar o regulador de intensidade
- Fio de terra: Ligue o fio de terra do regulador de intensidade luminosa ao fio de terra na caixa eléctrica utilizando uma porca de fio.
- Fio neutro: Se o regulador de intensidade tiver um fio neutro (normalmente branco), ligue-o ao fio neutro na caixa eléctrica.
- Fio quente: Ligue o fio preto do regulador de intensidade ao fio preto (quente) na caixa eléctrica.
Passo 5: Ligar a luz LED
- Ligue a outra extremidade do fio preto (quente) ao fio preto da luz LED.
- Ligue a outra extremidade do fio branco (neutro) ao fio branco da luz LED.
- Ligue a outra extremidade do fio de terra ao fio de terra da luz LED.
Passo 6: Proteger todas as ligações
Utilize porcas de fio ou conectores adequados para fixar todas as ligações. Certifique-se de que nenhum fio desencapado fica exposto.
Etapa 7: Teste
Volte a ligar a corrente no disjuntor e teste o regulador de intensidade para garantir que está a funcionar como esperado.
Guias detalhados para 5 tipos de reguladores de intensidade de luz
Dimmers de corte de fase
A ligação de um regulador de intensidade de corte de fase pode ser uma tarefa complexa que envolve trabalhar com circuitos eléctricos de alta tensão. Uma cablagem incorrecta pode resultar em choque elétrico, incêndio ou danos no regulador de intensidade e noutros componentes eléctricos. Se não tiver experiência em trabalhos eléctricos, recomenda-se vivamente que consulte ou contrate um eletricista qualificado para efetuar a instalação.
Dito isto, se se sentir confortável com trabalhos eléctricos e tiver tomado todas as precauções de segurança necessárias, eis um guia geral sobre como ligar um regulador de intensidade de corte de fase:
Ferramentas e materiais necessários
- Chaves de fendas
- Decapadores de fios
- Fita eléctrica
- Porcas de arame
- Multímetro
- Interruptor regulador de intensidade de corte de fase
- Caixa eléctrica e placa de cobertura adequadas

Precauções de segurança
- Desligue a alimentação do circuito em que vai trabalhar no disjuntor.
- Utilize um multímetro para confirmar que a alimentação está desligada.
- Usar equipamento de segurança adequado, incluindo luvas e proteção ocular.
Passos
- Identificar os fios: Abra a caixa eléctrica e identifique os fios. Deve ver um fio preto (quente), um fio branco (neutro) e, possivelmente, um fio verde ou de cobre nu (terra).
- Preparar o regulador de intensidade: Desembale o regulador de intensidade de corte de fase e leia atentamente as instruções do fabricante. Identifique os fios ou terminais do dimmer. Normalmente, verá cores semelhantes: preto (ou vermelho) para o fio quente, branco para o neutro e verde para a terra.
- Desligar o interrutor antigo: Se estiver a substituir um interrutor antigo, desligue-o desaparafusando as porcas dos fios e separando os fios.
- Ligar o regulador de intensidade com o aparelho de iluminação (controlador de led regulável): ① Conecte o fio da porta #4 do Dimmer da porta INPUT -L do driver de LED. ② Conecte os terminais de saída do driver de LED (LED+/LED-) aos terminais de entrada das luminárias ③ Conecte o L2 do dimmer à linha L de eletricidade e o N do driver de LED à linha N de eletricidade. (linha com AC marcada no diagrama)
- Ligar o fio neutro: Se o regulador de intensidade requerer uma ligação neutra, ligue o fio branco da caixa eléctrica ao fio ou terminal branco no regulador de intensidade. Utilize uma porca de fio para fixar a ligação.
- Ligar o fio quente: Ligue o fio preto (quente) da caixa eléctrica ao fio ou terminal preto (ou vermelho) do regulador de intensidade. Utilize uma porca de fio para fixar a ligação.
- Enfiar e fixar: Volte a colocar cuidadosamente os fios na caixa eléctrica, certificando-se de que todas as porcas dos fios estão bem fixas.
- Fixar o regulador de intensidade: Aparafusar o regulador de intensidade luminosa na caixa eléctrica, seguindo as instruções do fabricante.
- Instalar a placa de cobertura: Colocar a placa de cobertura sobre o regulador de intensidade.
- Teste: Volte a ligar a corrente no disjuntor e teste o regulador de intensidade para se certificar de que está a funcionar como esperado.


Lembre-se que este é um guia geral. Siga sempre as instruções do fabricante e os códigos eléctricos locais. Se não tiver a certeza sobre qualquer passo, consulte um eletricista qualificado.

Dimmers TRIAC de bordo de ataque e de fuga
Os reguladores de intensidade luminosa de borda de ataque e de borda de fuga são tipos de reguladores de intensidade luminosa de corte de fase utilizados para controlar o brilho das luzes. Os reguladores de intensidade luminosa de ponta cortam a fase inicial de cada ciclo CA, enquanto os reguladores de intensidade luminosa de ponta cortam a fase final. Estes reguladores são normalmente utilizados com lâmpadas incandescentes, de halogéneo e alguns tipos de lâmpadas LED e CFL.
Nota: Trabalhar com circuitos eléctricos pode ser perigoso. Se não tiver experiência, recomenda-se vivamente que consulte ou contrate um eletricista qualificado. Uma cablagem incorrecta pode provocar choques eléctricos, incêndios ou danos no regulador de intensidade e noutros componentes eléctricos.
Ferramentas e materiais necessários
- Chaves de fendas
- Decapadores de fios
- Fita eléctrica
- Porcas de arame
- Multímetro
- Interruptor de regulação da intensidade da luz na extremidade dianteira ou na extremidade traseira
- Caixa eléctrica e placa de cobertura
- Equipamento de segurança (luvas, proteção ocular)

Precauções de segurança
- Desligue a alimentação do circuito em que vai trabalhar no disjuntor.
- Utilize um multímetro para confirmar que a alimentação está desligada.
- Usar equipamento de segurança adequado, incluindo luvas e proteção ocular.
Passos gerais da cablagem
- Identificar os fios: Abra a caixa eléctrica e identifique os fios. Normalmente, verá um fio preto (quente), um fio branco (neutro) e, possivelmente, um fio verde ou de cobre nu (terra).
- Preparar o regulador de intensidade: Desembale o regulador e leia atentamente as instruções do fabricante. Identifique os fios ou terminais do regulador de intensidade. Normalmente, verá cores semelhantes: preto (ou vermelho) para o fio quente, branco para o neutro e verde para a terra.
- Desligar o interrutor antigo: Se estiver a substituir um interrutor antigo, desligue-o desaparafusando as porcas dos fios e separando os fios.
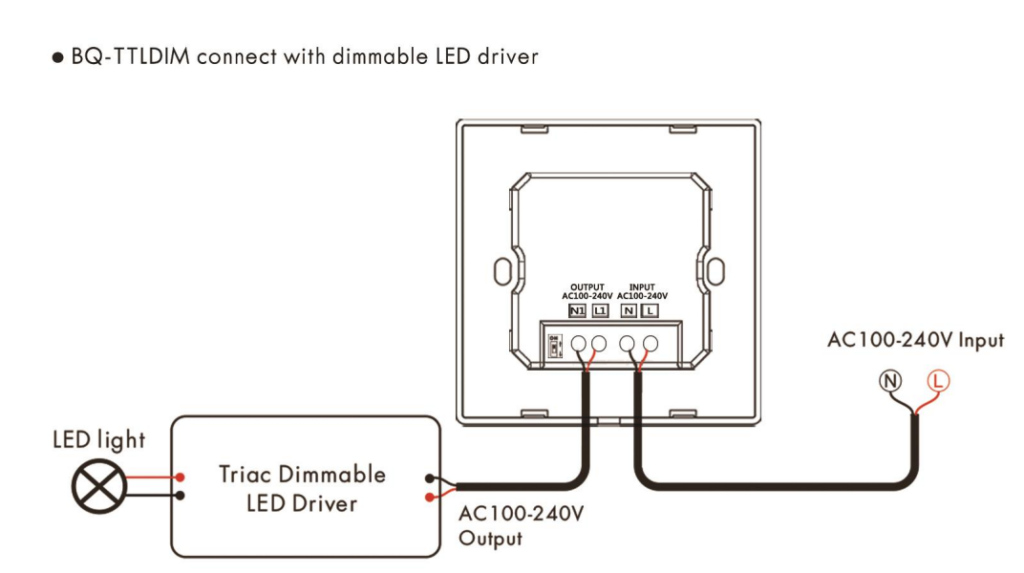
- Ligar o regulador de intensidade com o aparelho de iluminação (controlador de led regulável): ① Conecte os fios OUTPUT do Dimmer (AC100-240V) da entrada AC do driver de LED (N, L). ② Ligue os terminais de saída do controlador de LED (LED+/LED-) aos terminais de entrada das luminárias. ③ Ligue o regulador de intensidade INPUT (AC100-240V) à eletricidade (linha com AC marcada no diagrama)
- Ligar o fio neutro: Se o regulador de intensidade requerer uma ligação neutra, ligue o fio branco da caixa eléctrica ao fio ou terminal branco no regulador de intensidade. Utilize uma porca de fio para fixar a ligação.
- Ligar o fio quente: Ligue o fio preto (quente) da caixa eléctrica ao fio ou terminal preto (ou vermelho) do regulador de intensidade. Utilize uma porca de fio para fixar a ligação.
- Enfiar e fixar: Volte a colocar cuidadosamente os fios na caixa eléctrica, certificando-se de que todas as porcas dos fios estão bem fixas.
- Fixar o regulador de intensidade: Aparafusar o regulador de intensidade luminosa na caixa eléctrica, seguindo as instruções do fabricante.
- Instalar a placa de cobertura: Colocar a placa de cobertura sobre o regulador de intensidade.
- Teste: Volte a ligar a corrente no disjuntor e teste o regulador de intensidade para se certificar de que está a funcionar como esperado.

Considerações adicionais
- Compatibilidade: Certifique-se de que o regulador de intensidade é compatível com o tipo de luzes que está a utilizar (por exemplo, LED, incandescente, halogéneo).
- Requisitos de carga: Verifique os requisitos de carga do regulador e certifique-se de que corresponde à potência total das luzes que está a controlar.
- Comutação multidirecional: Se estiver a instalar um regulador de intensidade luminosa num sistema de comutação multidirecional (por exemplo, um interrutor de 3 vias), certifique-se de que obtém um regulador de intensidade luminosa compatível e siga as instruções de cablagem específicas para configurações multidireccionais.
Siga sempre as instruções do fabricante e os códigos eléctricos locais. Se não tiver a certeza de algum passo, consulte um eletricista qualificado.
0-10V dimmer
O método de controlo de regulação de fluxo luminoso de 0-10V é um padrão em aplicações de controlo de iluminação, particularmente em ambientes comerciais e industriais. Este sistema utiliza um sinal de baixa tensão para controlar o nível de regulação da luminária. O sinal de tensão pode variar de 0V (luz apagada) a 10V (brilho total), com níveis variáveis de brilho no meio.
Componentes básicos:
- Luminária com capacidade de regulação de 0-10V
- Regulador de intensidade ou controlador 0-10V
- Fios de controlo de baixa tensão (normalmente 18-22 AWG)
- Fonte de alimentação (conforme exigido pelo aparelho de iluminação)
- Opcional: Sistema de automatização ou sistema de gestão de edifícios (BMS)
Passos de cablagem:
- Drivers de LED: Certifique-se de que a luminária e o regulador de intensidade 0-10V estão corretamente ligados às respectivas fontes de alimentação, seguindo todas as directrizes de segurança e códigos eléctricos locais.
- Fios de controlo: São utilizados dois fios adicionais para o sinal de controlo de 0-10V. Um fio é para o sinal de controlo positivo (+) e o outro é para a terra do sinal de controlo (-).
- Ligação ao aparelho de iluminação: Ligue os fios de controlo aos terminais apropriados no aparelho de iluminação, muitas vezes rotulados como "DIM+" e "DIM-" ou semelhante.
- Ligação ao regulador de intensidade: Ligue as outras extremidades dos fios de controlo aos terminais correspondentes no regulador ou controlador 0-10V.
- Polaridade: Certifique-se de que mantém a polaridade correcta ao ligar os fios de controlo. O fio positivo deve ser ligado aos terminais "DIM+" no aparelho e no regulador de intensidade, e o fio negativo deve ser ligado aos terminais "DIM-".
- Automatização opcional: Se estiver a integrar o sistema de regulação de 0-10V numa automação maior ou num BMS, certifique-se de que os fios de controlo estão corretamente ligados à interface do sistema.
- Ensaios: Quando todas as ligações estiverem feitas, ligue o sistema e teste a funcionalidade de regulação da intensidade da luz para garantir que está a funcionar como esperado.

Precauções de segurança:
- Desligue sempre a corrente antes de trabalhar em qualquer cablagem eléctrica.
- Utilize porcas de fio ou conectores adequados para fixar todas as ligações.
- Cumpra todos os códigos e regulamentos eléctricos locais.
- Se tiver dúvidas sobre algum passo, consulte um eletricista qualificado.
O sistema de regulação de fluxo 0-10V é conhecido pela sua fiabilidade e é amplamente utilizado em aplicações que requerem um controlo preciso dos níveis de luz, como edifícios comerciais, ambientes industriais e, cada vez mais, em casas inteligentes com sistemas avançados de controlo de iluminação.
Regulador de intensidade DALI
O Digital Addressable Lighting Interface (DALI) é um protocolo para o controlo da iluminação em edifícios e é conhecido pela sua simplicidade e robustez. Os reguladores de fluxo luminoso DALI são utilizados para controlar os aparelhos de iluminação compatíveis com DALI. Ao contrário dos reguladores tradicionais, os reguladores DALI comunicam digitalmente com os aparelhos de iluminação, permitindo um controlo mais preciso e características adicionais como o agrupamento e a definição de cenas.
Precauções de segurança
- Desligue sempre a alimentação do circuito em que vai trabalhar no disjuntor.
- Utilize um multímetro para confirmar que a alimentação está desligada.
- Usar equipamento de segurança adequado, incluindo luvas e proteção ocular.
- Se não tiver experiência em trabalhos eléctricos, consulte ou contrate um eletricista qualificado.
Ferramentas e materiais necessários
- Chaves de fendas
- Decapadores de fios
- Fita eléctrica ou tubo termoretráctil
- Porcas de fio ou conectores adequados
- Multímetro
- Regulador de intensidade DALI
- Aparelhos de iluminação compatíveis com DALI
- Cabos de controlo DALI (normalmente de 2 fios, sem polaridade)
Passos gerais para a ligação de reguladores de intensidade luminosa DALI
- Ler os manuais: Antes de começar, leia os manuais de instalação do regulador de intensidade DALI e dos aparelhos de iluminação compatíveis com DALI para compreender os requisitos e características específicos.
- Planear a rede: As redes DALI são normalmente ligadas numa topologia em cadeia, embora também sejam possíveis topologias em estrela e em árvore. Planeie a disposição da sua rede em conformidade.
- Desligar a alimentação: Certifique-se de que desliga toda a energia dos circuitos em que vai trabalhar.
- Ligar a alimentação ao regulador de intensidade: Ligue os fios de alimentação eléctrica ao regulador de intensidade DALI de acordo com as instruções do fabricante. Isto normalmente envolve a ligação de um fio ativo (quente), neutro e possivelmente um fio terra.
- Ligar as linhas DALI: O DALI utiliza uma linha de controlo de 2 fios separada para comunicação. Ligue os fios de controlo DALI do regulador de intensidade luminosa aos aparelhos de iluminação compatíveis com DALI. O DALI é geralmente isento de polaridade, o que significa que não tem de se preocupar em ligar os fios ao contrário.
- Configuração em cadeia ou em estrela: Dependendo do seu plano de disposição, ligue os fios de controlo DALI a cada aparelho numa configuração em cadeia ou em estrela. Se estiver a utilizar uma cadeia em série, as linhas DALI irão do regulador de intensidade luminosa para o primeiro aparelho, depois do primeiro aparelho para o segundo, e assim sucessivamente.
- Endereçamento: Alguns sistemas DALI exigem a definição de endereços para cada aparelho de iluminação. Normalmente, isto pode ser efectuado utilizando um controlador DALI separado ou software fornecido pelo fabricante.
- Testar as ligações: Antes de restabelecer a alimentação, verifique novamente todas as suas ligações para se certificar de que estão seguras.
- Restabelecer a alimentação e testar: Volte a ligar a alimentação e teste o sistema para se certificar de que o regulador de intensidade pode controlar os aparelhos de iluminação como esperado.
- Configurar cenas ou grupos: Se o seu sistema DALI suportar funcionalidades avançadas como a definição de cenas ou o agrupamento de aparelhos, pode configurar estas definições de acordo com as instruções do fabricante.

Lembre-se que os sistemas DALI podem variar significativamente nas suas características e requisitos, por isso consulte sempre a documentação do fabricante para obter as informações mais exactas e detalhadas.
Conclusão
A ligação de um regulador de intensidade luminosa LED é um processo simples se seguir os passos cuidadosamente e tomar as precauções de segurança necessárias. Quer pretenda melhorar o ambiente da sua casa ou melhorar a eficiência energética num ambiente comercial, um regulador de intensidade luminosa LED é uma adição valiosa ao seu sistema de iluminação.
