Il cablaggio delle strisce LED può sembrare scoraggiante. Ma, con le giuste indicazioni, si tratta di un processo semplice. Può migliorare il vostro spazio in modo meraviglioso. È per gli amanti del fai-da-te, per i proprietari di case che vogliono aggiungere atmosfera e per gli elettricisti alle prese con un nuovo progetto. Questa guida vi semplificherà il cablaggio.
Per cablare le strisce LED, iniziare a identificare il tipo di striscia (monocolore, RGB o RGBW). Collegare i fili positivi e negativi ai terminali corrispondenti dell'alimentatore o del controller. Per le strisce RGB, far corrispondere i colori (rosso, verde, blu) ai terminali appropriati. Assicurarsi che tutti i collegamenti siano saldi e seguire lo schema di cablaggio incluso per istruzioni precise.
Approfondiamo i dettagli del cablaggio dei vari tipi di strisce LED. In questo modo avrete le conoscenze e la sicurezza necessarie per farlo correttamente.
Comprendere il collegamento in parallelo: Semplificato
I collegamenti in parallelo sono fondamentali nell'illuminazione a strisce LED. Ogni segmento della striscia è cablato in serie, il che significa che le tensioni di funzionamento si sommano, fornendo la tensione superiore necessaria. Tutti i segmenti sono cablati in parallelo e ricevono la stessa tensione, ma l'assorbimento di corrente aumenta con la lunghezza della striscia. Utilizzare collegamenti in parallelo. Assicurano che ogni segmento della striscia riceva una tensione costante. In questo modo si evitano problemi come la luminosità non uniforme o lo sfarfallio. Questa configurazione è fondamentale per le strisce LED di lunga durata. Mantiene la luce stabile e uniforme. La comprensione delle basi del cablaggio in parallelo può migliorare notevolmente l'efficacia e l'affidabilità della vostra installazione di illuminazione a LED.


Caduta di tensione: una semplice spiegazione
La caduta di tensione si verifica quando la tensione alla fine della striscia è inferiore a quella dell'inizio. Questo può causare la diminuzione della luminosità dei LED all'estremità. Per ridurre la caduta di tensione, è possibile utilizzare fili più spessi, strisce più corte o iniettare l'alimentazione in più punti lungo la striscia. È essenziale pianificare attentamente l'installazione per ridurre al minimo la caduta di tensione, soprattutto nei tratti più lunghi. Un buon metodo è quello di utilizzare amplificatori o booster di potenza. Utilizzateli a intervalli regolari. Essi contribuiscono a mantenere una tensione costante sulla striscia. Inoltre, la scelta di un alimentatore migliore con una capacità sufficiente può ridurre il rischio di caduta di tensione. Comprendendo e correggendo la caduta di tensione, è possibile garantire il buon funzionamento delle strisce LED. Forniranno una luce uniforme su tutta l'installazione.
Amplificatore PWM: Trasformare il complesso in semplice
Un amplificatore a modulazione di larghezza di impulso (PWM) potenzia il segnale alle strisce LED, consentendo una luminosità costante su strisce lunghe. Garantisce che il segnale di alimentazione rimanga forte, impedendo l'oscuramento o lo sfarfallio. Gli amplificatori PWM sono utili nelle installazioni di grandi dimensioni. Mantengono uniforme l'emissione luminosa, un aspetto fondamentale. Questi amplificatori rigenerano il segnale PWM. Estendono la portata effettiva delle strisce LED. In questo modo si garantisce che ogni sezione riceva la giusta tensione e corrente. L'installazione degli amplificatori PWM è semplice. È possibile aggiungerli alla propria configurazione. Se installati e configurati correttamente, gli amplificatori PWM possono migliorare notevolmente l'illuminazione delle strisce LED. Possono aumentare le prestazioni e la longevità.
Tipi di strisce luminose a LED
Le strisce LED sono disponibili in vari tipi, tra cui monocolore, RGB (rosso, verde, blu), RGBW (rosso, verde, blu, bianco) e bianco sintonizzabile. Ogni tipo richiede cablaggi e controller diversi. Le strisce monocolore sono le più semplici, con solo due fili per i collegamenti positivi e negativi. Le strisce RGB aggiungono tre canali di colore e richiedono un controller per miscelare i colori. Le strisce RGBW includono un canale bianco aggiuntivo per opzioni di illuminazione più sfumate. Le strisce bianche sintonizzabili consentono di regolare la temperatura del colore, offrendo una gamma di luce bianca da calda a fredda. Conoscere le differenze tra questi tipi di strisce LED può aiutare a scegliere il prodotto giusto per le proprie esigenze. Inoltre, garantirà un'impostazione e un utilizzo corretti.
Come cablare le strisce LED monocolore
Cablaggio di strisce LED monocolore con driver LED non dimmerabili
Per i driver LED non dimmerabili, collegare il filo positivo della striscia al terminale positivo del driver. Quindi, collegare il filo negativo della striscia al terminale negativo del driver. Fissare tutti i collegamenti e accendere. Questo semplice metodo di cablaggio è ottimo per le installazioni di base. Non richiedono la dimmerazione. I driver non dimmerabili forniscono un'uscita costante. Questo garantisce che le strisce LED brillino al meglio. Quando si cablano più strisce, è importante assicurarsi che la potenza totale non superi la capacità del driver. È fondamentale fissare tutti i collegamenti. Seguite le istruzioni del produttore. In questo modo si evitano problemi elettrici e si garantisce un'installazione sicura e affidabile.
Cablaggio di strisce luminose LED monocolore con driver LED dimmerabiles
I driver LED dimmerabili consentono di regolare la luminosità. Collegare la striscia al driver come descritto sopra. Seguire lo schema di cablaggio specifico per il tipo di dimmer:
– Schema di collegamento del driver LED dimmerabile 0-10V
Un driver dimmerabile 0-10V utilizza un segnale di controllo a bassa tensione per regolare la luminosità. Collegare il dimmer 0-10V ai terminali di controllo del driver, assicurando la corretta polarità. Questa configurazione consente una regolazione uniforme dell'intera gamma.


– Schema di collegamento del driver LED dimmerabile a triac
I dimmer a triac funzionano con dimmer a taglio di fase CA. Collegare il driver a un interruttore dimmer a triac compatibile, assicurandosi che l'ingresso del driver corrisponda all'uscita del dimmer. Questo metodo consente di ottenere un'esperienza di dimmerazione simile a quella delle lampadine a incandescenza tradizionali.
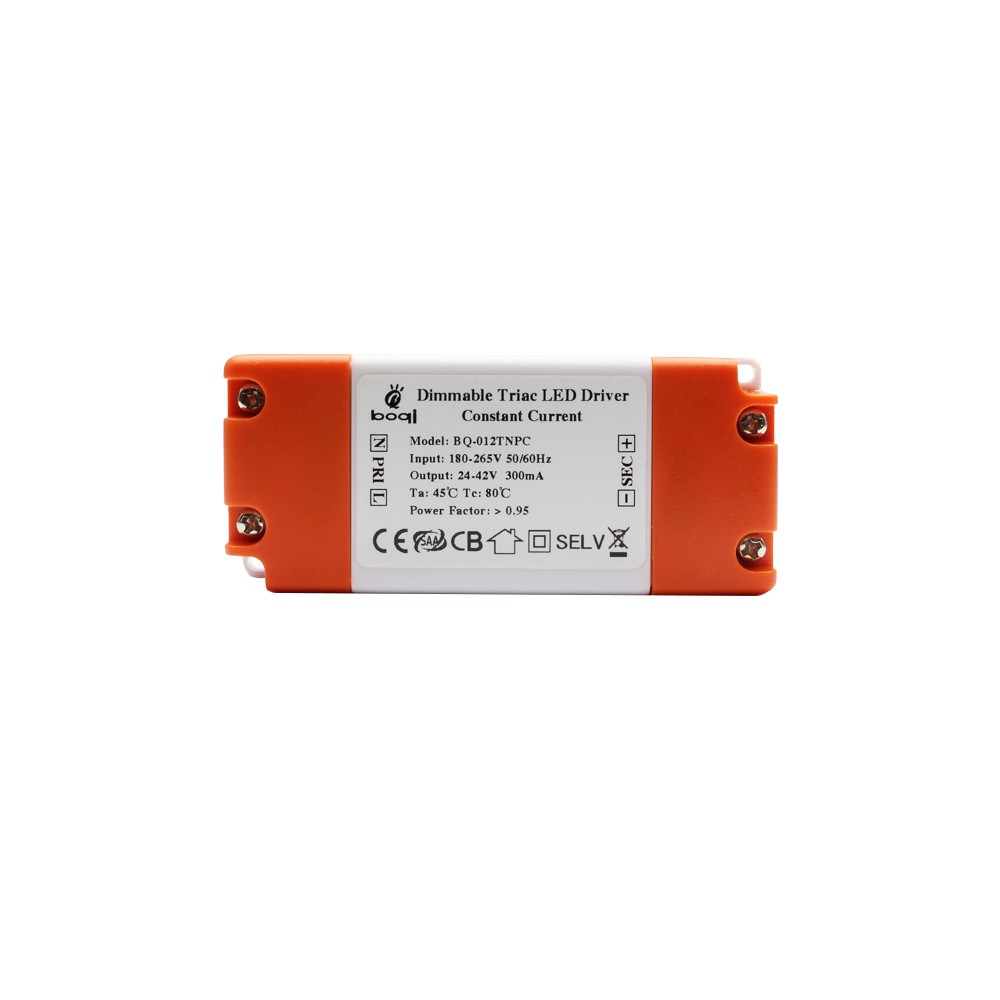

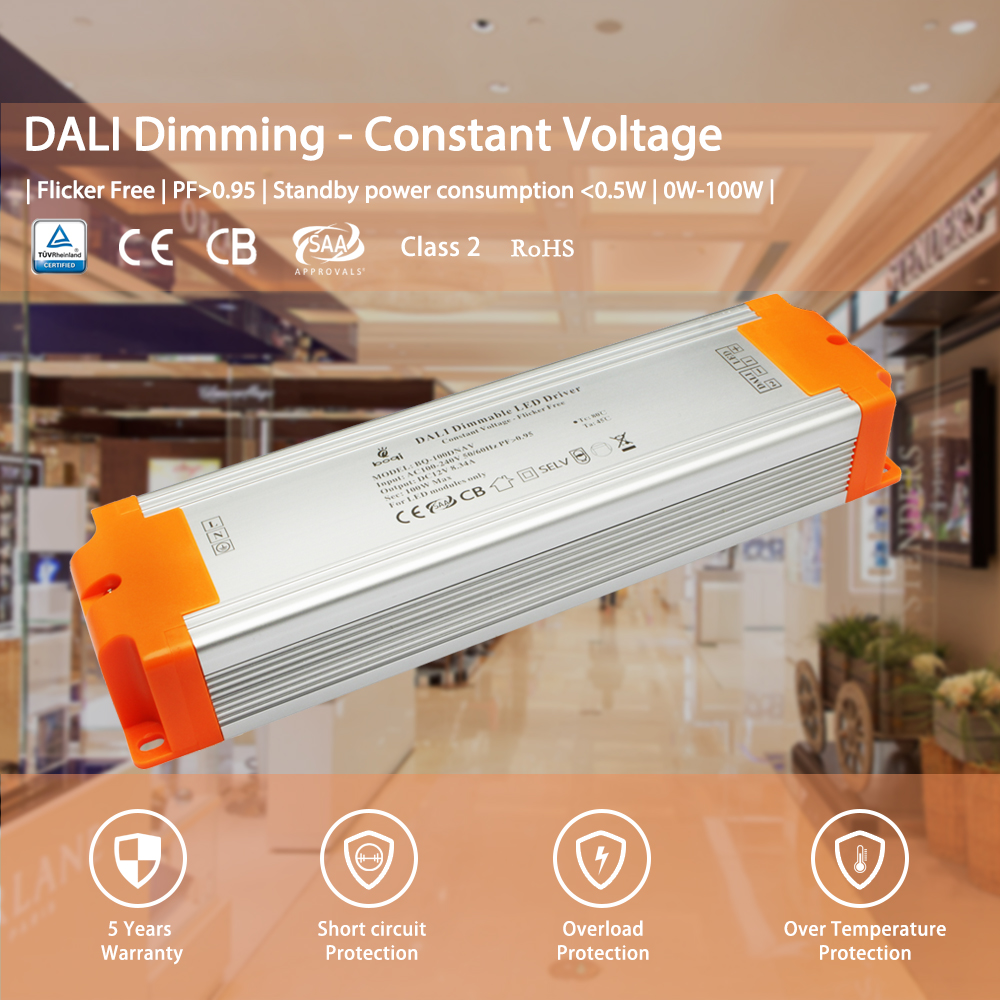
– Schema di collegamento del driver LED dimmerabile DALI
I dimmer DALI (Digital Addressable Lighting Interface) offrono controllo e programmabilità precisi. Collegare le linee di controllo DALI ai terminali di ingresso DALI del driver. Questa configurazione è ideale per sistemi di illuminazione complessi che richiedono funzioni di controllo avanzate.

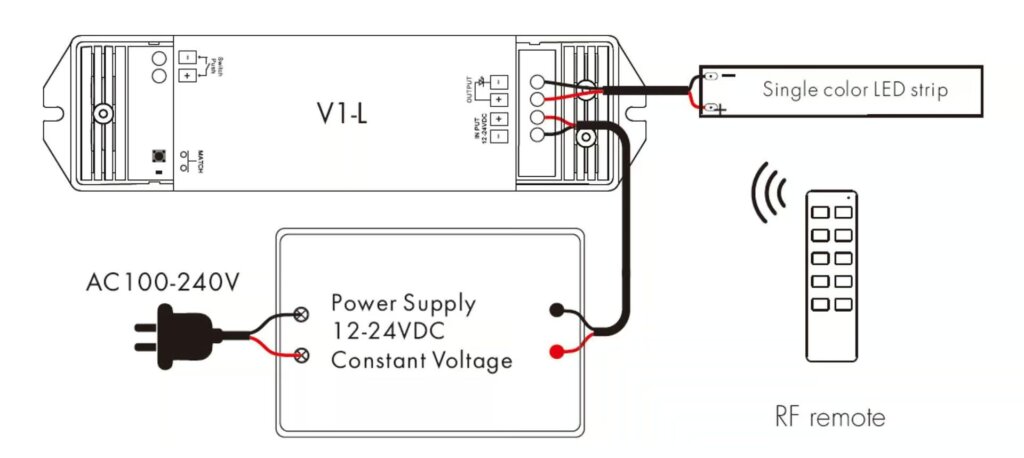
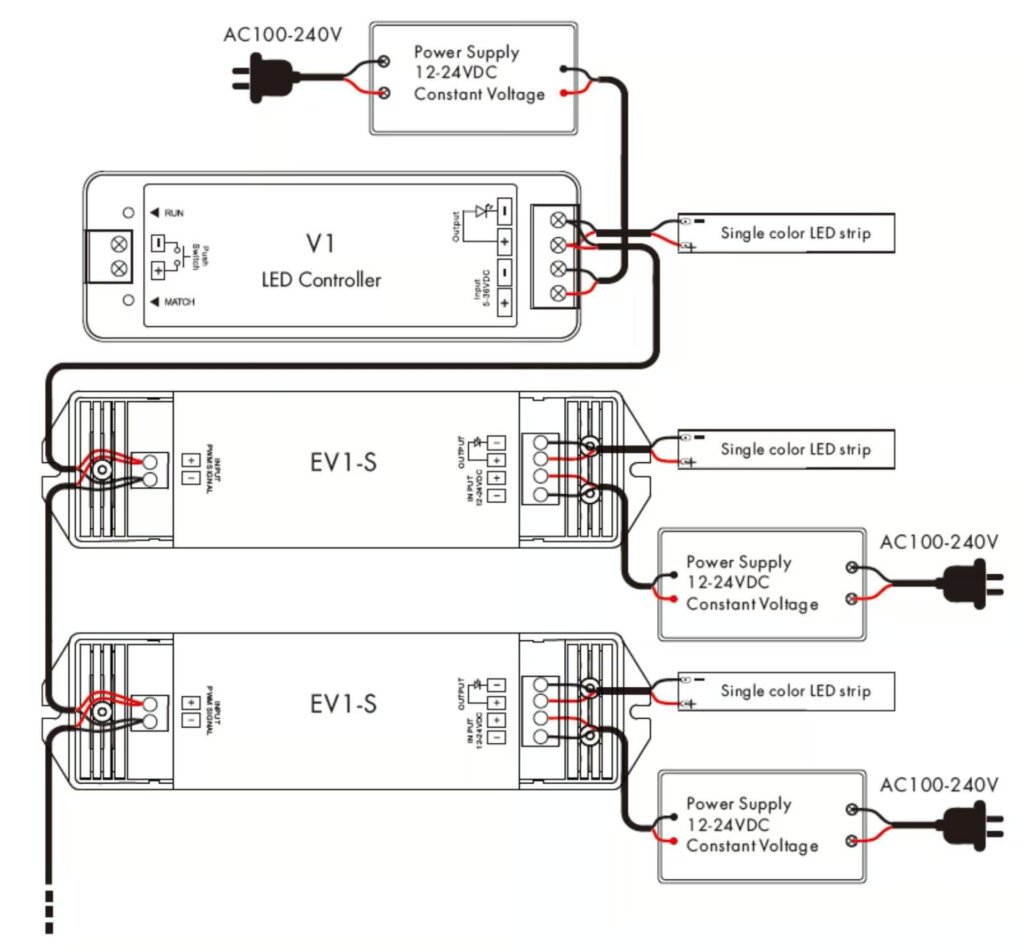
Cablaggio di strisce luminose LED monocolore con controller LED
I controller LED offrono una maggiore flessibilità nel controllo delle luci. Collegare la striscia al controller. Assicuratevi che i fili positivi e negativi corrispondano ai terminali del controller. I controller consentono di ottenere vari effetti, come l'oscuramento, il lampeggiamento e schemi di illuminazione personalizzati. Assicurarsi che il controller sia compatibile con la striscia LED e l'alimentatore. È fondamentale fissare correttamente i collegamenti. Seguire le linee guida del produttore garantisce un funzionamento affidabile e previene potenziali problemi.
Senza amplificatore PWM
Con amplificatore PWM
Cablaggio di strisce luminose LED monocolore con decoder DMX512
I decoder DMX512 sono utilizzati per le configurazioni di illuminazione avanzate. Collegare la striscia al decoder, facendo corrispondere i fili positivi e negativi ai terminali corretti. Il DMX512 è un protocollo di comunicazione digitale. È utilizzato per il controllo dell'illuminazione e fornisce un controllo preciso su molti canali. Questa configurazione è comune nell'illuminazione dei palcoscenici. Si usa anche nell'illuminazione architetturale e in altre applicazioni professionali. Assicuratevi che il decoder DMX512 sia configurato correttamente. Collegatelo al controller DMX per ottenere le migliori prestazioni.

Come cablare le strisce LED bianche sintonizzabili
Cablaggio di strisce LED bianche sintonizzabili con driver LED dimmerabili
Le strisce LED bianche sintonizzabili consentono di regolare la temperatura del colore. Collegare i fili secondo le istruzioni del driver, assicurandosi che i collegamenti siano corretti sia per la temperatura del colore che per il controllo della luminosità. Le strisce bianche sintonizzabili sono in genere dotate di linee di controllo aggiuntive per la regolazione della temperatura del colore. Queste strisce possono passare dal bianco caldo al bianco freddo, offrendo opzioni di illuminazione versatili. Assicuratevi che il vostro driver LED dimmerabile sia compatibile con le strisce bianche regolabili e che tutti i collegamenti siano sicuri per un funzionamento affidabile.
Driver per LED bianchi sintonizzabili DALI DT8
I driver DALI DT8 sono utilizzati per il controllo preciso delle strisce bianche sintonizzabili. Seguire lo schema di cablaggio fornito dal produttore. I driver DALI DT8 supportano le strisce LED bianche sintonizzabili. Consentono il controllo indipendente della luminosità e della temperatura di colore. Questa capacità di controllo avanzata è ideale per le applicazioni che richiedono ambienti di illuminazione dinamici. Il cablaggio e la configurazione corretti del driver DALI DT8 garantiscono un funzionamento regolare e prestazioni ottimali delle strisce LED bianche sintonizzabili.

Cablaggio di strisce LED bianche sintonizzabili con controller LED
Collegare la striscia bianca sintonizzabile al regolatore, facendo corrispondere i terminali positivo e negativo. Assicurare collegamenti sicuri per un funzionamento affidabile. I controller LED per le strisce bianche sintonizzabili consentono di regolare con precisione la temperatura di colore e la luminosità. Questi regolatori sono spesso dotati di telecomando o possono essere integrati nei sistemi smart home per una maggiore comodità. Una corretta installazione e configurazione del controller garantisce un funzionamento costante e affidabile.
Senza amplificatore PWM

Cablaggio di strisce LED bianche sintonizzabili con decoder DMX512

Utilizzate un decoder DMX512 per le strisce bianche sintonizzabili in configurazioni avanzate. Collegare la striscia al decoder, seguendo lo schema di cablaggio per una corretta installazione. I decoder DMX512 consentono un controllo preciso della temperatura del colore e della luminosità. Sono ideali per l'illuminazione professionale. Assicurarsi che il decoder sia collegato correttamente al controller DMX e che tutte le connessioni siano sicure per ottenere prestazioni ottimali.
Striscia LED bianca a due fili sintonizzabile
Le strisce bianche sintonizzabili più semplici utilizzano due fili per il controllo della temperatura del colore. Collegare questi fili ai terminali appropriati del controller o del driver. Questo tipo di strisce bianche sintonizzabili ha in genere una configurazione di cablaggio più semplice, che ne facilita l'installazione. Tuttavia, può offrire meno opzioni di controllo rispetto ai sistemi bianchi sintonizzabili più avanzati. Per un funzionamento affidabile, assicurarsi che il controller o il driver siano compatibili con la configurazione a due fili.

Come cablare le strisce LED RGB
Cablaggio di strisce LED RGB con driver LED dimmerabili
Collegare la striscia RGB al driver dimmerabile, facendo corrispondere i fili rosso, verde e blu ai terminali corrispondenti. Utilizzare lo schema di cablaggio fornito. I driver dimmerabili per le strisce RGB consentono di regolare la luminosità dell'intera striscia. Tuttavia, il controllo del colore richiede un controller RGB aggiuntivo. Assicurarsi che tutti i collegamenti siano sicuri e che il driver sia compatibile con la striscia RGB per un funzionamento affidabile.
Driver LED RGB DALI DT8
Per un controllo RGB avanzato, utilizzare un driver DALI DT8. Per un'installazione precisa, seguire lo schema di cablaggio del produttore. I driver DALI DT8 consentono di controllare separatamente ciascun colore. Ciò consente di ottenere un'illuminazione complessa e una miscelazione precisa dei colori. Questo controllo avanzato è ideale per le applicazioni che richiedono un'illuminazione dinamica. Hanno bisogno di un'illuminazione che possa essere personalizzata. L'installazione e la configurazione corretta del driver DALI DT8 assicurano il buon funzionamento delle strisce LED RGB. Le prestazioni saranno ottimali.

Cablaggio delle strisce LED RGB con i controller LED
Collegare la striscia RGB all'unità di controllo, assicurandosi che ogni filo colorato sia collegato al colore appropriato.
terminale. I controller RGB consentono di ottenere vari effetti di illuminazione, come il cambio di colore, il lampeggiamento e i modelli personalizzati. Assicurarsi che il controller sia compatibile con la striscia RGB e l'alimentatore. Fissare correttamente i collegamenti e seguire le linee guida del produttore contribuirà a garantire un funzionamento affidabile e a prevenire potenziali problemi.
Senza amplificatore PWM
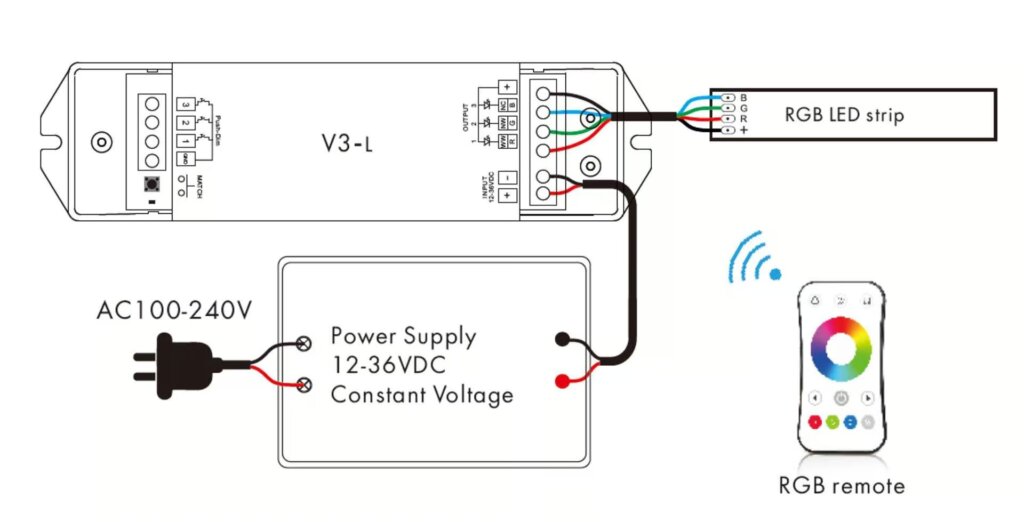
Con amplificatore PWM

Cablaggio di strisce luminose LED RGB con decoder DMX512
Utilizzare un decoder DMX512 per le strisce RGB in configurazioni complesse. Seguire lo schema di cablaggio per garantire la corretta installazione. I decoder DMX512 forniscono un controllo preciso su ciascun canale di colore, consentendo effetti di illuminazione complessi e una miscelazione precisa dei colori. Questa configurazione è comunemente utilizzata nelle applicazioni di illuminazione professionale, come l'illuminazione di palcoscenici e l'illuminazione architetturale. Assicuratevi che il decoder DMX512 sia configurato correttamente. Collegatelo al controller DMX per ottenere le migliori prestazioni.

Come cablare le strisce LED RGBW
Cablaggio di strisce luminose LED RGBW con driver LED dimmerabili
Collegare la striscia RGBW al driver dimmerabile, assicurandosi che tutti i fili di colore (rosso, verde, blu, bianco) siano collegati correttamente. I driver dimmerabili per le strisce RGBW consentono di regolare la luminosità dell'intera striscia. Tuttavia, il controllo del colore richiede un controller RGBW aggiuntivo. Assicurarsi che tutti i collegamenti siano sicuri e che il driver sia compatibile con la striscia RGBW per un funzionamento affidabile.
Driver LED DALI DT8 RGBW
Per un controllo RGBW avanzato, utilizzare un driver DALI DT8. Seguire le istruzioni di cablaggio del produttore. I driver DALI DT8 consentono di controllare separatamente ciascun colore. Ciò consente di ottenere effetti di luce complessi e una miscelazione precisa dei colori. Questo controllo avanzato è ideale per le applicazioni. Queste hanno bisogno di un'illuminazione dinamica e personalizzabile. Il driver DT8 deve essere installato e configurato correttamente. Ciò garantisce prestazioni ottimali e uniformi delle strisce LED RGBW.

Cablaggio delle strisce LED RGBW con i controllori LED
Collegare la striscia RGBW al controller, facendo corrispondere tutti i fili colorati ai terminali corretti. I controller RGBW consentono di ottenere vari effetti di illuminazione, come il cambio di colore, il lampeggiamento e i modelli personalizzati. Assicurarsi che il controller sia compatibile con la striscia RGBW e l'alimentatore. Assicurare i collegamenti in modo corretto e seguire le linee guida del produttore è di grande aiuto. In questo modo si garantisce un funzionamento affidabile e si prevengono i problemi.
Senza amplificatore PWM
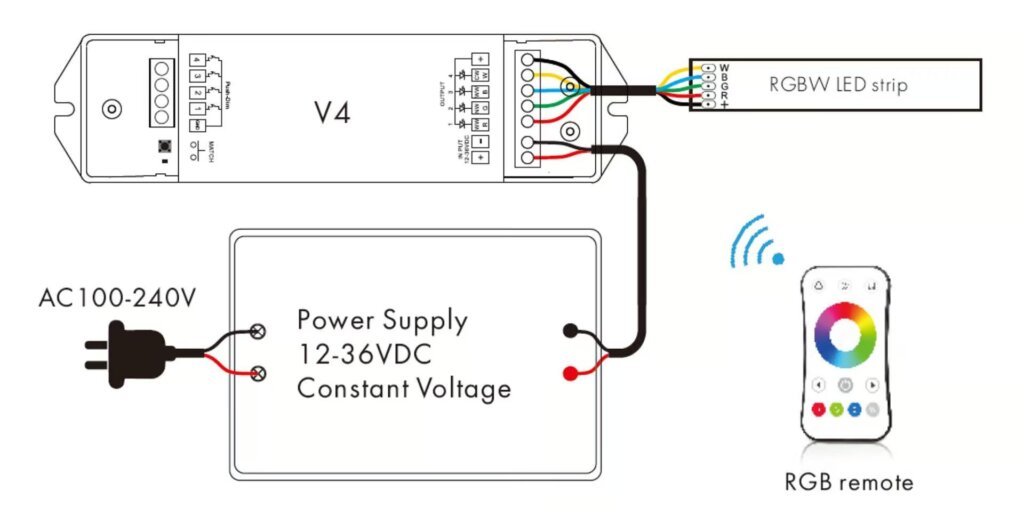
Con amplificatore PWM

Cablaggio di strisce luminose LED RGBW con decoder DMX512
Utilizzare un decoder DMX512 per le strisce RGBW in configurazioni avanzate. Seguire lo schema di cablaggio per una corretta installazione. I decoder DMX512 offrono un controllo preciso su ciascun canale di colore. Consentono di ottenere effetti di luce complessi e di miscelare con precisione i colori. Questa configurazione è comune nell'illuminazione professionale. Viene utilizzata per l'illuminazione di palcoscenici e architetture. Assicuratevi che il decoder DMX512 sia impostato e collegato al controller DMX. Questo è necessario per ottenere le migliori prestazioni.

Come cablare le strisce LED RGB e CCT
Cablaggio di strisce luminose LED RGBW con driver LED dimmerabili
Seguire lo schema di cablaggio per collegare la striscia RGBW a un driver dimmerabile, assicurandosi che tutti i collegamenti siano sicuri. I driver dimmerabili per le strisce RGBW consentono di regolare la luminosità dell'intera striscia. Tuttavia, il controllo del colore richiede un controller RGBW aggiuntivo. Assicurarsi che tutti i collegamenti siano sicuri e che il driver sia compatibile con la striscia RGBW per un funzionamento affidabile.
Cablaggio delle strisce LED RGBW con i controllori LED
Collegare la striscia al controller, facendo corrispondere i fili ai terminali appropriati. I controller RGBW consentono di ottenere vari effetti di illuminazione, come il cambio di colore, il lampeggiamento e i modelli personalizzati. Assicurarsi che il controller sia compatibile con la striscia RGBW e l'alimentatore. Fissare correttamente i collegamenti e seguire le linee guida del produttore contribuirà a garantire un funzionamento affidabile e a prevenire potenziali problemi.
Senza amplificatore PWM

Con amplificatore PWM

Cablaggio di strisce luminose LED RGBW con decoder DMX512
Per configurazioni complesse, utilizzare un decoder DMX512. Seguire lo schema di cablaggio per garantire una corretta installazione. I decoder DMX512 forniscono un controllo preciso su ciascun canale di colore. Consentono di ottenere effetti di illuminazione complessi e un'esatta miscelazione dei colori. Questa configurazione è comunemente utilizzata nelle applicazioni di illuminazione professionale, come l'illuminazione di palcoscenici e l'illuminazione architetturale. Assicuratevi che il decoder DMX512 sia configurato correttamente. Collegarlo al controller DMX per ottenere le migliori prestazioni.

Come cablare le strisce LED indirizzabili
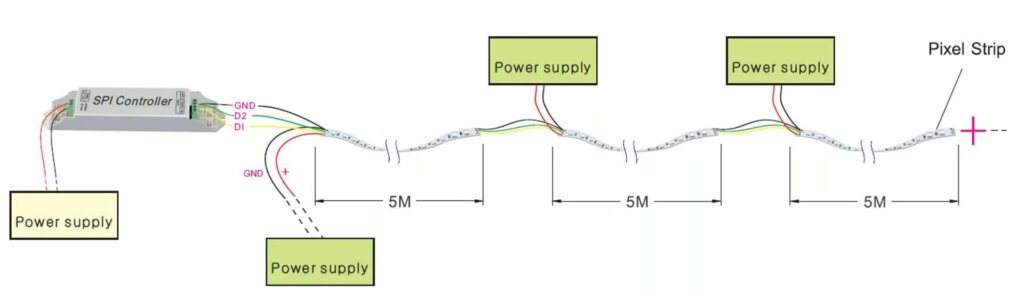
Come cablare le strisce luminose a LED indirizzabili SPI
Collegare i cavi di dati e di alimentazione della striscia indirizzabile SPI al controller, seguendo lo schema di cablaggio fornito. Le strisce LED indirizzabili consentono il controllo individuale di ciascun LED, permettendo di ottenere effetti e modelli di illuminazione complessi. Assicurarsi che il controller sia compatibile con la striscia indirizzabile SPI e che tutti i collegamenti siano sicuri. La corretta configurazione del controller e l'osservanza delle istruzioni del produttore contribuiranno a garantire un funzionamento affidabile e a prevenire potenziali problemi.
Strisce luminose a LED indirizzabili SPI con il solo canale dati
Assicurarsi che il cavo dati sia collegato saldamente al controllore. Questa configurazione consente il controllo di base dei LED indirizzabili. Consente di creare effetti di luce personalizzati. Il corretto fissaggio del cavo dati e l'osservanza dello schema di cablaggio contribuiscono a garantire un funzionamento affidabile e a prevenire potenziali problemi.

Strisce luminose a LED indirizzabili SPI con canali di dati e orologio
Collegare al controller sia i cavi dei dati che quelli dell'orologio, assicurando connessioni sicure. Questa configurazione consente un controllo più preciso dei LED indirizzabili, permettendo di ottenere effetti e modelli di illuminazione complessi. Una corretta configurazione del controller e il rispetto delle istruzioni del produttore contribuiscono a garantire un funzionamento affidabile e a prevenire potenziali problemi.

Strisce luminose a LED indirizzabili SPI con canali dati e dati di backup
Seguire lo schema di cablaggio per collegare i fili dei dati, dell'orologio e dei dati di backup al controllore. Questa configurazione offre ridondanza, garantendo un funzionamento affidabile anche in caso di guasto di un canale dati. È fondamentale fissare correttamente tutti i collegamenti. È utile seguire le istruzioni del produttore. In questo modo si garantisce un funzionamento affidabile e si prevengono potenziali problemi.
Come cablare le strisce LED indirizzabili DMX512
Utilizzare un decoder DMX512 per le strisce indirizzabili. Seguire lo schema di cablaggio per una corretta installazione. I decoder DMX512 forniscono un controllo preciso su ciascun LED, consentendo di ottenere effetti e schemi di illuminazione complessi. Questa configurazione è comunemente utilizzata nelle applicazioni di illuminazione professionale, come l'illuminazione di palcoscenici e l'illuminazione architetturale. Assicuratevi che il decoder DMX512 sia configurato correttamente. Collegatelo al controller DMX. Questo è fondamentale per ottenere le massime prestazioni.

Domande frequenti
- Come vengono cablati i LED a striscia?
- Per ogni segmento, i LED sono cablati in serie, il che significa che le tensioni di funzionamento vengono sommate, fornendo la tensione più alta necessaria. Tutti i segmenti sono cablati in parallelo, quindi ricevono la stessa tensione, ma l'assorbimento di corrente aumenta con la lunghezza della striscia. La comprensione di questo metodo di cablaggio consente di mantenere una luminosità costante e di evitare problemi come l'illuminazione non uniforme o lo sfarfallio.
- Quali sono i colori dei fili delle strisce luminose a LED?
- Le strisce luminose RGB hanno un collegamento a 4 fili: verde, rosso, blu per i LED e nero/bianco per il collegamento comune a +12V. Il corretto abbinamento di questi fili ai terminali corrispondenti sul controller o sull'alimentatore garantisce il corretto funzionamento e la miscelazione dei colori.
- Quali sono i 4 fili di una striscia luminosa a LED?
- Per le strisce RGB sono necessari 4 fili: uno neutro (giallo) e gli altri per controllare i 3 colori dei LED (rosso, verde e blu). Il collegamento corretto di questi fili garantisce il controllo del colore e il funzionamento corretto della striscia.
- Quanti fili per una striscia LED?
- La striscia LED RGBW ha cinque fili: rosso, verde, blu, bianco e positivo. Collegare la striscia LED al segno corrispondente sul controller RGBW LED. Assicurarsi che tutti i collegamenti siano sicuri e seguire lo schema di cablaggio fornito dal produttore aiuterà a prevenire potenziali problemi e a garantire un funzionamento affidabile.
Conclusione
Il cablaggio delle strisce luminose a LED non deve intimidire. Grazie a questa guida, ora avete le conoscenze per affrontare i vari tipi di strisce LED, assicurandovi un'installazione sicura e di successo. Buona illuminazione!
Chiusura
La scelta dei driver LED dimmerabili Flicker-Free più adatti è fondamentale per ottimizzare l'illuminazione, migliorando così il benessere e il comfort generale. L'assenza di sfarfallio è fondamentale per il livello di comfort percepito negli spazi abitativi.
In questo articolo, approfondiamo i seguenti aspetti per guidarvi nella scelta dei driver LED dimmerabili senza sfarfallio ideali:
Esploreremo le caratteristiche essenziali come le specifiche, la compatibilità e l'efficienza per evitare lo sfarfallio dell'illuminazione. Inoltre, discuteremo l'importanza dell'alta frequenza PWM per ottenere risultati privi di sfarfallio nella serie di driver LED dimmerabili.
Acquista Driver LED dimmerabili da boqi
Essere informati sulle cause prevalenti dello sfarfallio della luce è essenziale, ma il compito di selezionare il driver LED dimmerabile adatto è ancora a portata di mano. Per ottenere gli effetti di illuminazione e dimmerazione desiderati, è indispensabile rivolgersi a un produttore di driver LED affidabile. boqi si distingue come rinomato produttore di driver LED dimmerabili, offrendo una serie di driver, dimmer e controller privi di sfarfallio. La gamma di prodotti comprende driver LED TRIAC, 0-10V e DALI, dimmer e controller.
Con basi produttive in Cina, l'azienda è in grado di soddisfare le esigenze e le specifiche dei suoi clienti. Per richieste relative alle vostre esigenze di driver o controller per LED, non esitate a contattarci, per permetterci di assistervi nel perfezionamento delle vostre scelte.