Att dra kablar till LED-lampor kan verka skrämmande. Men med rätt vägledning är det en enkel process. Det kan förbättra ditt utrymme på ett vackert sätt. Det är för DIY-entusiaster, husägare som vill skapa atmosfär och elektriker som har ett nytt projekt på gång. Den här guiden förenklar kabeldragningen åt dig.
För att koppla LED-lampor börjar du med att identifiera typen av remsa (enfärgad, RGB eller RGBW). Anslut de positiva och negativa ledningarna till motsvarande terminaler på din strömförsörjning eller styrenhet. För RGB-remsor ska du matcha färgerna (röd, grön, blå) till lämpliga terminaler. Se till att alla anslutningar är säkra och följ det medföljande kopplingsschemat för exakta instruktioner.
Låt oss dyka in i detaljerna för kabeldragning av olika typer av LED-lampor. Detta kommer att säkerställa att du har kunskapen och självförtroendet att göra det rätt.
Förstå parallellkoppling: Förenklat
Parallellkopplingar är avgörande i LED-lampor. Varje segment av remsan är seriekopplat, vilket innebär att driftspänningarna läggs ihop och ger den nödvändiga högre spänningen. Alla segment är parallellkopplade och får samma spänning, men strömuttaget ökar med längden på remsan. Använd parallella anslutningar. De säkerställer att varje bandsegment får en jämn spänning. Detta stoppar problem som ojämn ljusstyrka eller flimmer. Denna inställning är nyckeln till långa LED-remsor. Det håller ljuset stabilt och jämnt. Att förstå grunderna för parallella ledningar kan avsevärt förbättra effektiviteten och tillförlitligheten i din LED-belysningsinstallation.


Spänningsfall: En enkel förklaring
Spänningsfall uppstår när spänningen i slutet av remsan är lägre än i början. Detta kan leda till att lysdioderna i slutet blir svagare. För att minska spänningsfallet kan du använda tjockare kablar, kortare remsor eller injicera ström på flera ställen längs remsan. Det är viktigt att planera installationen noggrant för att minimera spänningsfallet, särskilt vid längre sträckor. En bra metod är att använda effekthöjare eller förstärkare. Använd dem med regelbundna intervall. De hjälper till att upprätthålla en jämn spänning över remsan. Att välja en bättre strömförsörjning med tillräcklig kapacitet kan också minska risken för spänningsfall. Genom att förstå och åtgärda spänningsfall kan du se till att dina LED-lampor fungerar bra. De kommer att ge jämnt ljus över hela installationen.
PWM-förstärkare: Från komplext till enkelt
En PWM-förstärkare (Pulse Width Modulation) förstärker signalen till LED-remsorna, vilket ger en jämn ljusstyrka över långa remsor. Den säkerställer att strömsignalen förblir stark, vilket förhindrar dimning eller flimmer. PWM-förstärkare är användbara i stora installationer. De håller ljusutgången enhetlig, vilket är avgörande. Dessa förstärkare regenererar PWM-signalen. De förlänger det effektiva området för dina LED-remsor. Detta säkerställer att varje sektion får rätt spänning och ström. Det är enkelt att installera PWM-förstärkare. Du kan lägga till dem i din installation. Genom att placera och ställa in dem rätt kan PWM-förstärkare avsevärt förbättra LED-remsbelysningen. De kan öka prestanda och livslängd.
Olika typer av LED-lampor
LED-lampor finns i olika typer, bland annat enfärgade, RGB (röd, grön, blå), RGBW (röd, grön, blå, vit) och tunable white. Varje typ kräver olika ledningar och styrenheter. Enfärgade remsor är de enklaste, med bara två ledningar för positiva och negativa anslutningar. RGB-remsor lägger till tre färgkanaler, vilket kräver en styrenhet för att blanda färger. RGBW-remsor inkluderar en extra vit kanal för mer nyanserade belysningsalternativ. Tunable white strips möjliggör justeringar i färgtemperatur och erbjuder ett vitt ljus från varmt till kallt. Att känna till skillnaderna mellan dessa LED-remsor kan hjälpa dig att välja rätt produkt för dina behov. Det kommer också att säkerställa korrekt installation och användning.
Så här kopplar du enfärgade LED-lampor
Kabeldragning av enfärgade LED-lampor med icke-dimbara LED-drivrutiner
För icke-dimbara LED-drivdon, anslut remsans positiva kabel till drivdonets positiva terminal. Anslut sedan remsans negativa kabel till drivdonets negativa terminal. Säkra alla anslutningar och slå på strömmen. Den här enkla kopplingsmetoden är perfekt för grundläggande installationer. De kräver inte dimning. Icke-dimbara drivrutiner ger en konstant utgång. Detta säkerställer att dina LED-remsor lyser på bästa sätt. När du kopplar in flera remsor är det viktigt att se till att den totala effekten inte överstiger drivdonets kapacitet. Det är viktigt att säkra alla anslutningar. Följ tillverkarens anvisningar. Detta förhindrar elektriska problem och säkerställer en säker och tillförlitlig installation.
Kabeldragning av enfärgade LED-lampor med dimbar LED-drivrutins
Med dimbara LED-drivdon kan du justera ljusstyrkan. Anslut remsan till drivdonet enligt beskrivningen ovan. Följ det specifika kopplingsschemat för din dimmertyp:
– Anslutningsschema för 0-10V dimbar LED-drivrutin
Ett 0-10V dimbart drivdon använder en lågspänningsstyrsignal för att justera ljusstyrkan. Anslut 0-10V-dimmern till drivdonets kontrollterminaler och se till att polariteten är korrekt. Denna inställning ger en jämn dimning över hela området.


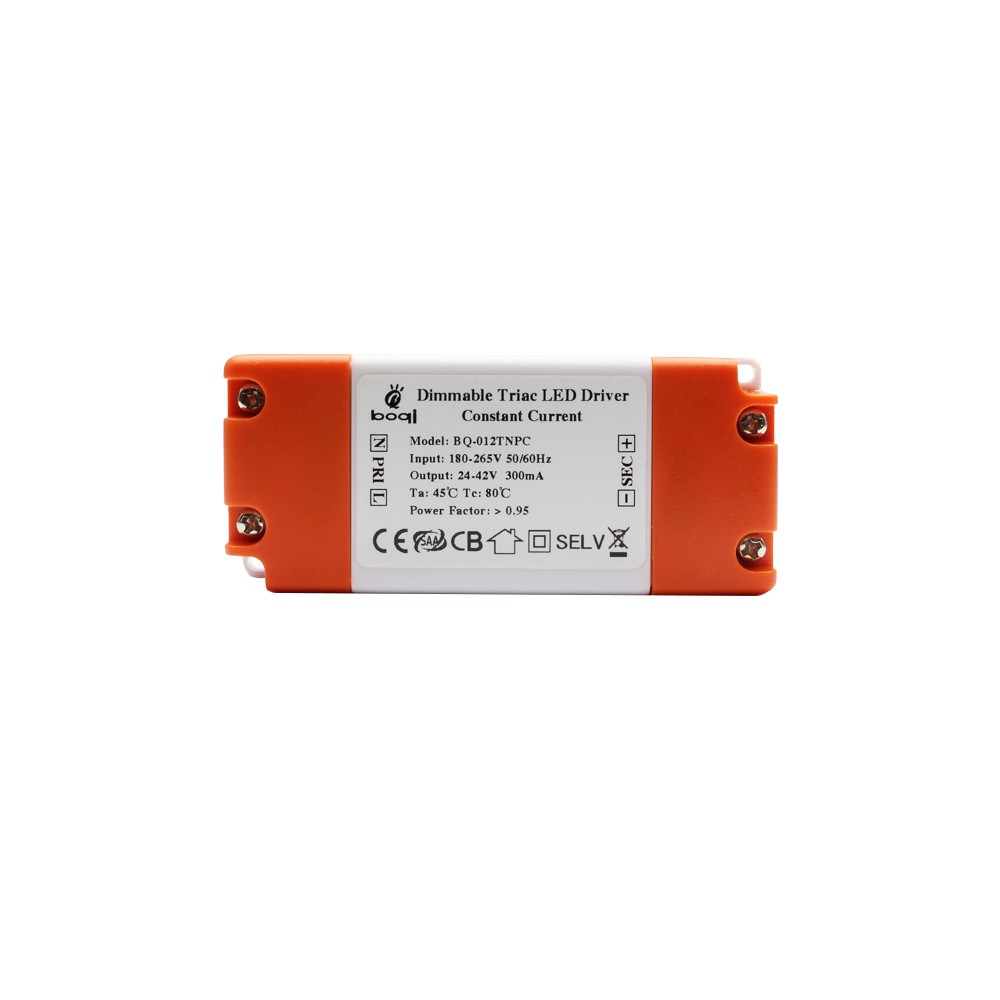
– Triac Dimmable LED Driver Connection Diagram
Triac dimmers work with AC phase-cut dimming. Connect the driver to a compatible triac dimmer switch, ensuring that the driver’s input matches the dimmer’s output. This method provides a familiar dimming experience similar to traditional incandescent bulbs.

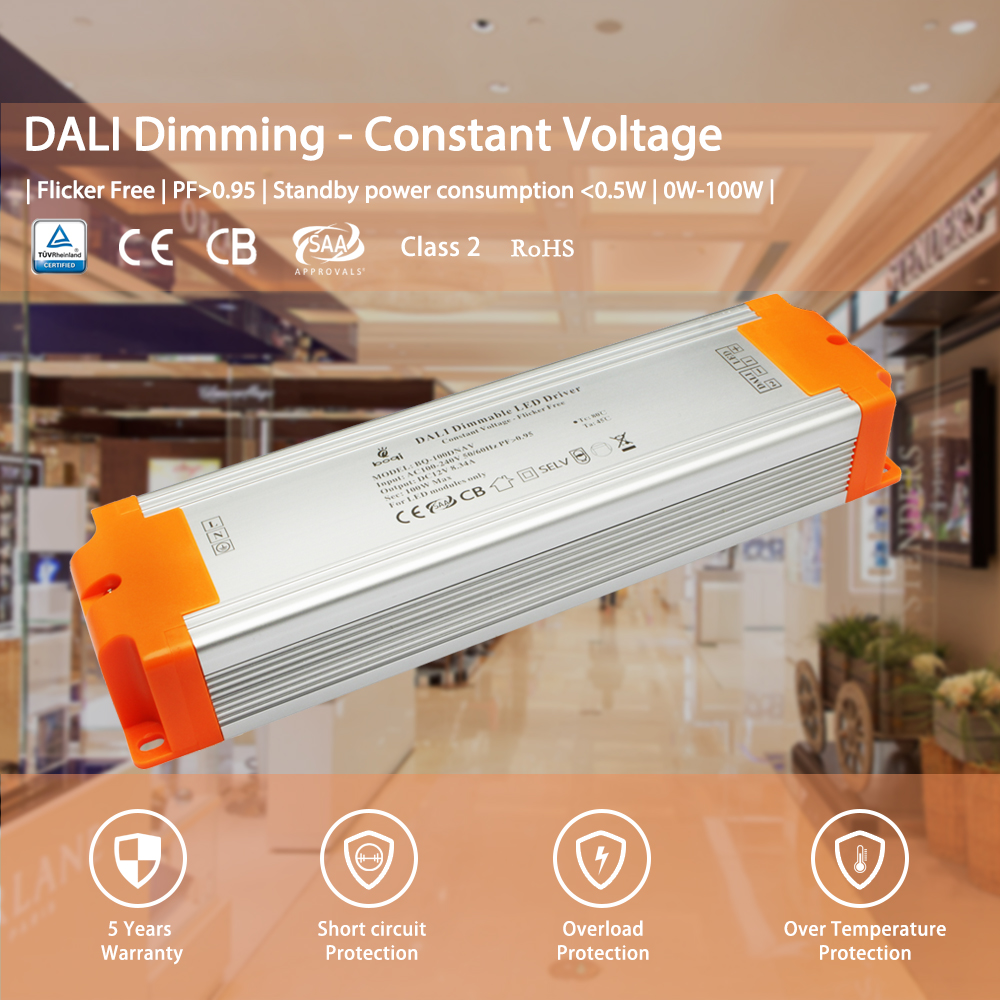
– DALI Dimmable LED Driver Connection Diagram
DALI (Digital Addressable Lighting Interface) dimmers offer precise control and programmability. Connect the DALI control lines to the driver’s DALI input terminals. This setup is ideal for complex lighting systems requiring advanced control features.

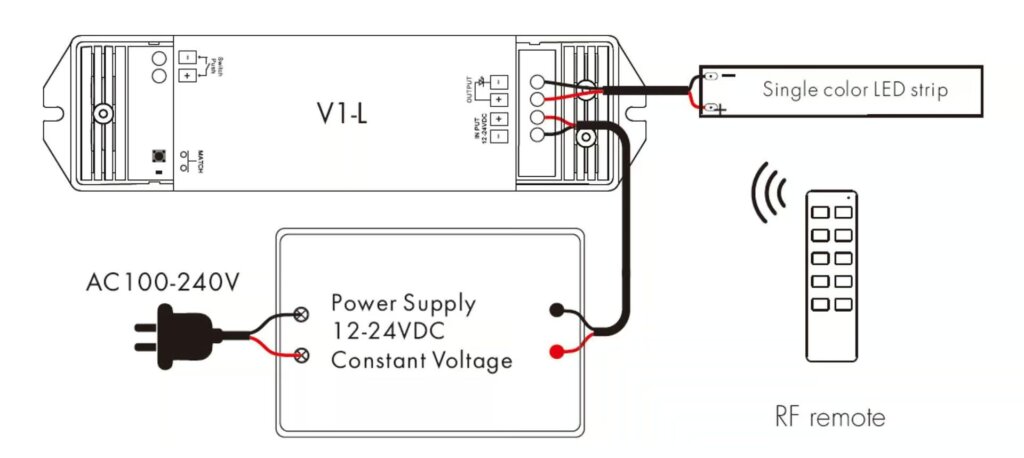
Koppling av enfärgade LED-lampor med LED-kontroller
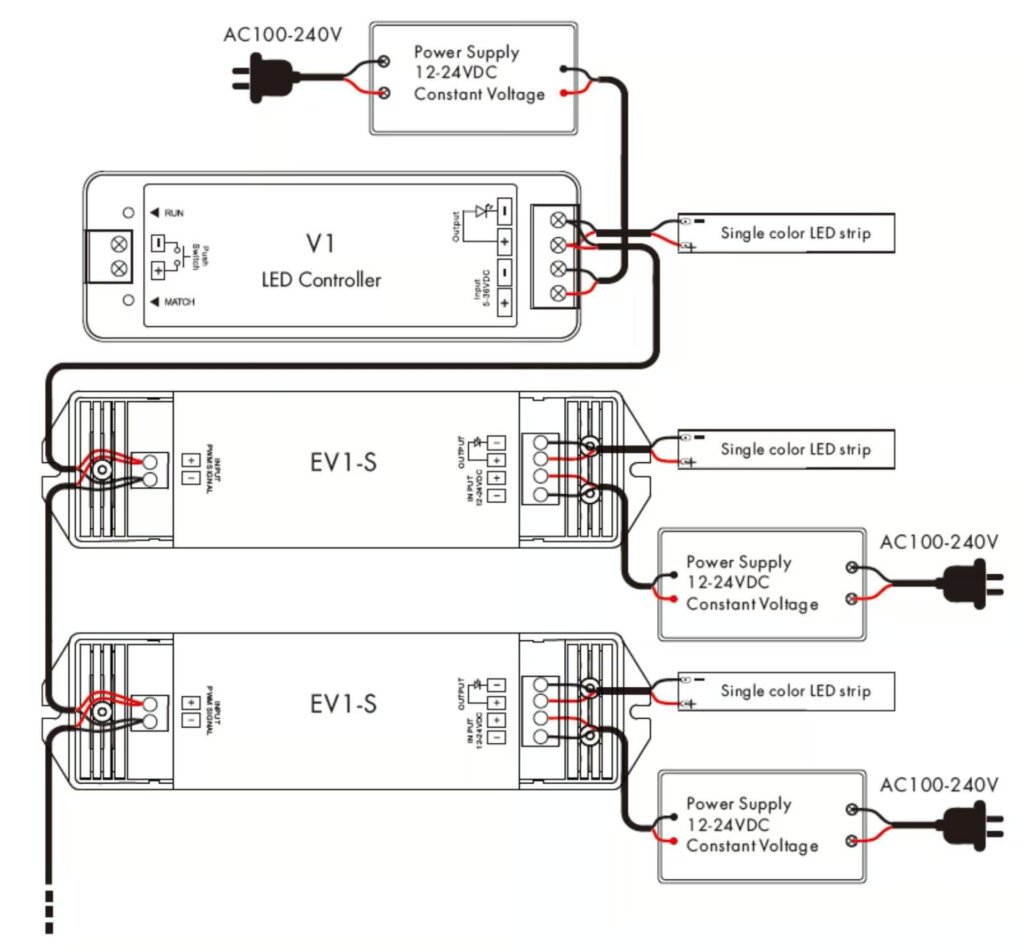
LED controllers provide more flexibility in controlling the lights. Connect the strip to the controller. Make sure the positive and negative wires match the controller’s terminals. Controllers allow for various effects, such as dimming, flashing, and custom lighting patterns. Ensure that the controller is compatible with your LED strip and power supply. Securing the connections properly is key. Following the manufacturer’s guidelines will ensure reliable operation and prevent potential issues.
Without PWM amplifier
With PWM amplifier
Ledningar för enfärgade LED-remsor med DMX512-dekoder
DMX512 decoders are used for advanced lighting setups. Connect the strip to the decoder, matching the positive and negative wires to the correct terminals. DMX512 is a digital communication protocol. It is used for lighting control and provides precise control over many channels. This setup is common in stage lighting. It is also used in architectural lighting and other pro applications. Ensure the DMX512 decoder is set up right. Connect it to the DMX controller for best performance.

Hur man kopplar in avstämbara vita LED-lampor
Kabeldragning Tunable White LED Strip Lights med dimbara LED-drivrutiner
Tunable white LED strips allow for color temperature adjustments. Connect the wires as per the driver’s instructions, ensuring proper connections for both color temperature and brightness control. Tunable white strips typically have additional control lines for adjusting the color temperature. These strips can transition from warm white to cool white, providing versatile lighting options. Ensure that your dimmable LED driver is compatible with tunable white strips and that all connections are secure for reliable operation.
DALI DT8 Tunable White LED Driver
DALI DT8 drivers are used for precise control of tunable white strips. Follow the wiring diagram provided by the manufacturer. DALI DT8 drivers support tunable white LED strips. They allow independent control of brightness and color temperature. This advanced control capability is ideal for applications requiring dynamic lighting environments. Properly wiring and configuring the DALI DT8 driver ensures smooth operation and optimal performance of your tunable white LED strips.

Kabeldragning Tunable White LED Strip Lights med LED-kontroller
Connect the tunable white strip to the controller, matching the positive and negative terminals. Ensure secure connections for reliable operation. LED controllers for tunable white strips allow for precise adjustments in color temperature and brightness. These controllers often come with remote controls or can be integrated into smart home systems for added convenience. Proper installation and configuration of the controller ensure consistent and reliable operation.
Without PWM amplifier

Kabeldragning Tunable White LED Strip Lights med DMX512-dekoder

Use a DMX512 decoder for tunable white strips in advanced setups. Connect the strip to the decoder, following the wiring diagram for proper installation. DMX512 decoders provide fine control over color temperature and brightness. They are ideal for professional lighting. Ensure that the decoder is correctly connected to the DMX controller and that all connections are secure for optimal performance.
Tunable White LED Strip Lights med två ledningar
Simpler tunable white strips use two wires for color temperature control. Connect these wires to the appropriate terminals on your controller or driver. This type of tunable white strip typically has a simpler wiring configuration, making it easier to install. However, it may offer fewer control options compared to more advanced tunable white systems. Ensure that your controller or driver is compatible with the two-wire configuration for reliable operation.

Hur man kopplar RGB LED Strip Lights
Kabeldragning av RGB LED-lampor med dimbara LED-drivrutiner
Connect the RGB strip to the dimmable driver, matching the red, green, and blue wires to the corresponding terminals. Use the wiring diagram provided. Dimmable drivers for RGB strips allow you to adjust the brightness of the entire strip. However, color control will require an additional RGB controller. Ensure that all connections are secure and that the driver is compatible with your RGB strip for reliable operation.
DALI DT8 RGB LED Driver
For advanced RGB control, use a DALI DT8 driver. Follow the manufacturer’s wiring diagram for precise installation. DALI DT8 drivers provide separate control over each color. This allows for complex lighting and precise color mixing. This advanced control is great for apps that need dynamic lighting. They need lighting that can be customized. Proper installation and setup of the DALI DT8 driver make sure your RGB LED strips work well. They will have the best performance.

Koppling av RGB LED-lampor med LED-kontroller
Connect the RGB strip to the controller, ensuring each color wire is connected to the appropriate
terminal. RGB controllers allow for various lighting effects, such as color changing, flashing, and custom patterns. Ensure that the controller is compatible with your RGB strip and power supply. Properly securing the connections and following the manufacturer’s guidelines will help ensure reliable operation and prevent potential issues.
Without PWM amplifier
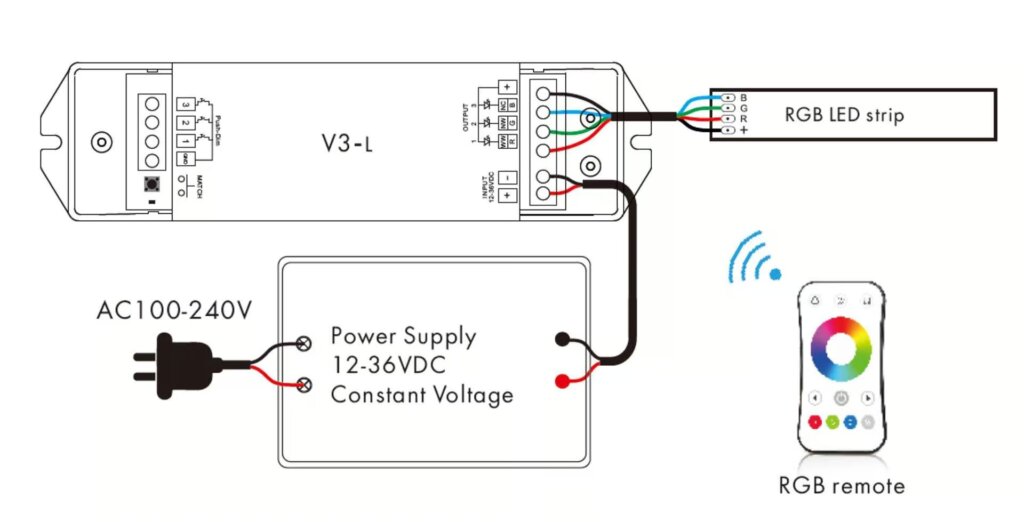
With PWM amplifier

Kabeldragning av RGB LED-lampor med DMX512-dekoder
Use a DMX512 decoder for RGB strips in complex setups. Follow the wiring diagram to ensure correct installation. DMX512 decoders provide precise control over each color channel, allowing for intricate lighting effects and precise color mixing. This setup is commonly used in professional lighting applications, such as stage lighting and architectural lighting. Make sure the DMX512 decoder is set up right. Connect it to the DMX controller for the best performance.

Hur man kopplar RGBW LED Strip Lights
Kabeldragning av RGBW LED-lampor med dimbara LED-drivrutiner
Connect the RGBW strip to the dimmable driver, ensuring all color wires (red, green, blue, white) are connected correctly. Dimmable drivers for RGBW strips allow you to adjust the brightness of the entire strip. However, color control will require an additional RGBW controller. Ensure that all connections are secure and that the driver is compatible with your RGBW strip for reliable operation.
DALI DT8 RGBW LED Driver
For advanced RGBW control, use a DALI DT8 driver. Follow the manufacturer’s wiring instructions. DALI DT8 drivers provide separate control over each color. This allows for complex lighting effects and precise color mixing. This advanced control is great for applications. They need dynamic and customizable lighting. The DT8 driver must be properly installed and configured. This ensures smooth and optimal performance of your RGBW LED strips.

Koppling av RGBW LED-lampor med LED-kontroller
Connect the RGBW strip to the controller, matching all color wires to the correct terminals. RGBW controllers allow for various lighting effects, such as color changing, flashing, and custom patterns. Ensure that the controller is compatible with your RGBW strip and power supply. Securing the connections properly and following the manufacturer’s guidelines will help. It will ensure reliable operation and prevent issues.
Without PWM amplifier
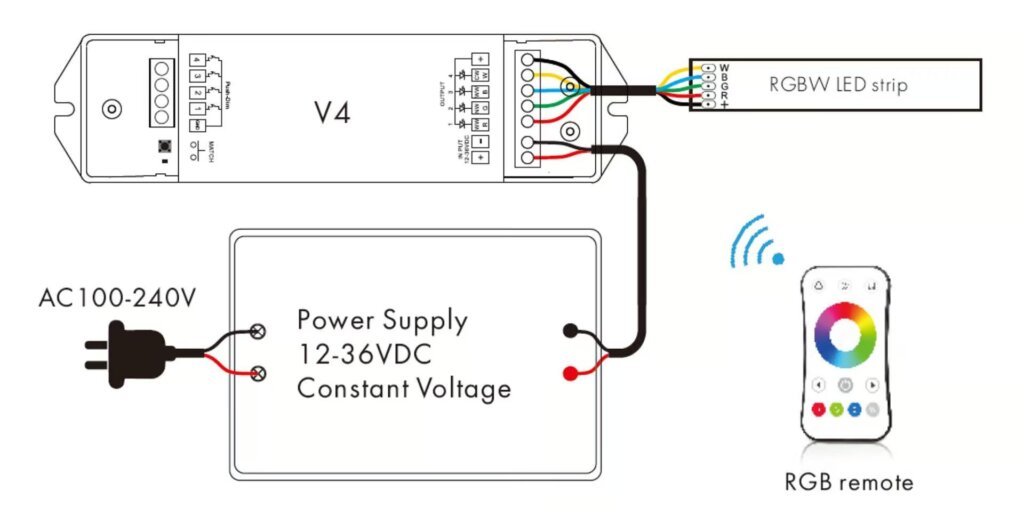
With PWM amplifier

Kabeldragning RGBW LED-lampor med DMX512-dekoder
Use a DMX512 decoder for RGBW strips in advanced setups. Follow the wiring diagram for proper installation. DMX512 decoders give precise control over each color channel. They allow for complex lighting effects and exact color mixing. This setup is common in professional lighting. It is used for stage and architectural lighting. Make sure the DMX512 decoder is set up and connected to the DMX controller. This is needed for best performance.

Så här kopplar du RGB & CCT LED-lampor
Kabeldragning av RGBW LED-lampor med dimbara LED-drivrutiner
Follow the wiring diagram to connect the RGBW strip to a dimmable driver, ensuring all connections are secure. Dimmable drivers for RGBW strips allow you to adjust the brightness of the entire strip. However, color control will require an additional RGBW controller. Ensure that all connections are secure and that the driver is compatible with your RGBW strip for reliable operation.
Koppling av RGBW LED-lampor med LED-kontroller
Connect the strip to the controller, matching the wires to the appropriate terminals. RGBW controllers allow for various lighting effects, such as color changing, flashing, and custom patterns. Ensure that the controller is compatible with your RGBW strip and power supply. Properly securing the connections and following the manufacturer’s guidelines will help ensure reliable operation and prevent potential issues.
Without PWM amplifier

With PWM amplifier

Kabeldragning RGBW LED-lampor med DMX512-dekoder
Use a DMX512 decoder for complex setups. Follow the wiring diagram to ensure proper installation. DMX512 decoders provide precise control over each color channel. They allow for complex lighting effects and exact color mixing. This setup is commonly used in professional lighting applications, such as stage lighting and architectural lighting. Ensure the DMX512 decoder is properly configured. Connect it to the DMX controller for best performance.

Hur man kopplar in adresserbara LED-lampor
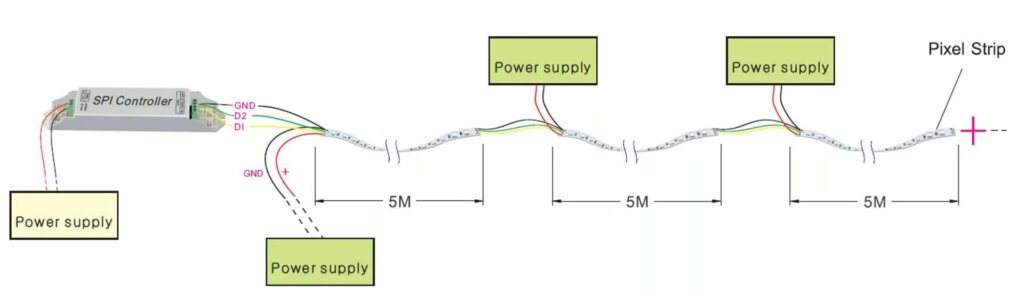
Hur man kopplar SPI-adresserbara LED-lampor
Connect the data and power wires of the SPI addressable strip to the controller, following the wiring diagram provided. Addressable LED strips allow for individual control of each LED, enabling complex lighting effects and patterns. Ensure that the controller is compatible with your SPI addressable strip and that all connections are secure. Properly configuring the controller and following the manufacturer’s instructions will help ensure reliable operation and prevent potential issues.
SPI-adresserbara LED-lampor med endast datakanal
Ensure the data wire is connected securely to the controller. This setup allows for basic control of addressable LEDs. It lets you make custom lighting effects. Properly securing the data wire and following the wiring diagram will help ensure reliable operation and prevent potential issues.

SPI-adresserbara LED-lampor med data- och klockkanaler
Connect both data and clock wires to the controller, ensuring secure connections. This setup allows for more precise control of the addressable LEDs, enabling complex lighting effects and patterns. Properly configuring the controller and following the manufacturer’s instructions will help ensure reliable operation and prevent potential issues.

SPI-adresserbara LED-lampor med data- och reservdatakanaler
Follow the wiring diagram to connect data, clock, and backup data wires to the controller. This configuration provides redundancy, ensuring reliable operation even if one data channel fails. Securing all connections properly is key. Following the manufacturer’s instructions will help. It ensures reliable operation and prevents potential issues.
Hur man kopplar DMX512 adresserbara LED-lampor
Use a DMX512 decoder for addressable strips. Follow the wiring diagram for proper installation. DMX512 decoders provide precise control over each LED, enabling complex lighting effects and patterns. This setup is commonly used in professional lighting applications, such as stage lighting and architectural lighting. Ensure the DMX512 decoder is set up right. Connect it to the DMX controller. This is key for top performance.

Vanliga frågor
- How are strip LEDs wired?
- For each segment, the LEDs are wired in series, which means the operating voltages are added up, giving the higher voltage needed. All segments are wired in parallel, so they receive the same voltage, but the current draw increases with the length of the strip. Understanding this wiring method helps maintain consistent brightness and prevents issues such as uneven lighting or flickering.
- What are the colors of the wires on LED light strips?
- RGB strip light has a 4-wire connection: green, red, blue for the LEDs, and black/white for the common +12V connection. Properly matching these wires to the corresponding terminals on the controller or power supply ensures correct operation and color mixing.
- What are 4 wires in LED strip light?
- For RGB strips, you need 4 wires: one neutral (yellow) and the rest control the 3 LED colors (Red, Green, Blue). Connecting these wires correctly ensures proper color control and operation of the strip.
- How many wires for an LED strip?
- The RGBW LED strip has five wires: red, green, blue, white, and positive. Connect the LED light strip to the corresponding mark on the RGBW LED light controller. Ensuring all connections are secure and following the wiring diagram provided by the manufacturer will help prevent potential issues and ensure reliable operation.
Slutsats
Wiring LED strip lights don’t have to be intimidating. With this guide, you now have the knowledge to tackle various types of LED strip lights, ensuring a successful and safe installation. Happy lighting!
Avslutning
Att välja rätt flimmerfria dimbara LED-drivdon är avgörande för att optimera din belysning och därmed förbättra ditt allmänna välbefinnande och din komfort. Frånvaron av flimmer är avgörande för den komfortnivå som upplevs i dina bostadsområden.
I den här artikeln fördjupar vi oss i följande aspekter för att vägleda dig i valet av de perfekta LED-drivrutinerna för flimmerfri dimning:
Vi kommer att utforska viktiga funktioner som specifikationer, kompatibilitet och effektivitet för att undvika flimmer i belysningen. Dessutom kommer vi att diskutera vikten av hög PWM-frekvens för att uppnå flimmerfria resultat i den dimbara LED Driver-serien.
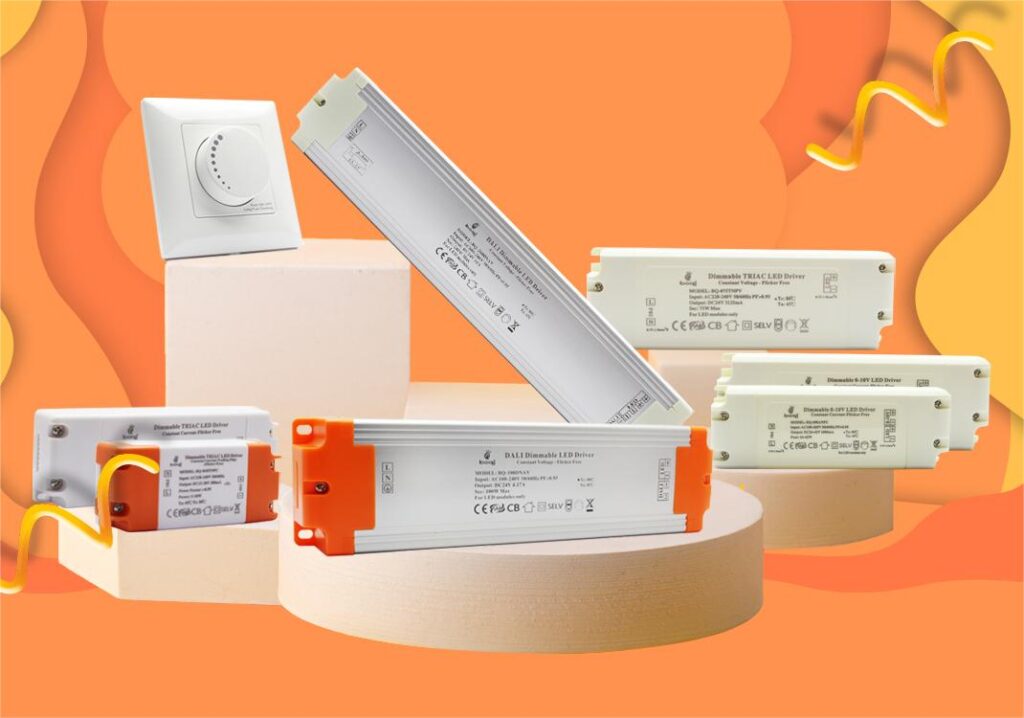
Köp Dimbara LED-drivrutiner från Boqi
Att vara informerad om de vanligaste orsakerna till ljusflimmer är viktigt, men uppgiften att välja ett lämpligt dimbart LED-drivdon kvarstår. För att uppnå önskade belysnings- och dimringseffekter är det viktigt att kontakta en välrenommerad tillverkare av LED-drivdon. boqi är en välkänd tillverkare av dimbara LED-drivdon och erbjuder en rad flimmerfria dimrar och styrenheter. Produktsortimentet omfattar TRIAC, 0-10V och DALI LED-drivdon, dimmers och styrenheter.
Med tillverkning i Kina är företaget väl anpassat till sina kunders särskilda behov och specifikationer. Om du har frågor om dina behov av LED-drivrutiner eller styrenheter, tveka inte att kontakta oss så hjälper vi dig att förfina dina val.