Det kan virke uoverskueligt at tilslutte LED-strips. Men med den rette vejledning er det en enkel proces. Det kan forbedre dit rum på en smuk måde. Det er for gør-det-selv-entusiaster, husejere, der ønsker at tilføje stemning, og elektrikere, der er i gang med et nyt projekt. Denne guide vil forenkle ledningsføringen for dig.
For at tilslutte LED-strips skal du starte med at identificere typen af strip (enkeltfarve, RGB eller RGBW). Tilslut de positive og negative ledninger til de tilsvarende terminaler på din strømforsyning eller controller. For RGB-strips skal du matche farverne (rød, grøn, blå) til de relevante terminaler. Sørg for, at alle forbindelser er sikre, og følg det medfølgende ledningsdiagram for at få præcise instruktioner.
Lad os dykke ned i detaljerne omkring tilslutning af forskellige typer LED-strips. Det vil sikre, at du har viden og selvtillid til at gøre det rigtigt.
Forståelse af parallelforbindelse: Simplificeret
Parallelle forbindelser er afgørende i LED-stripbelysning. Hvert segment af strimlen er forbundet i serie, hvilket betyder, at driftsspændingerne lægges sammen og giver den nødvendige højere spænding. Alle segmenter er forbundet parallelt og modtager den samme spænding, men strømforbruget stiger med længden af strimlen. Brug parallelle forbindelser. De sikrer, at hvert stripsegment får en stabil spænding. Det forhindrer problemer som ujævn lysstyrke eller flimmer. Denne opsætning er nøglen til lange LED-strips. Det holder lyset stabilt og jævnt. Hvis du forstår det grundlæggende i parallelle ledninger, kan du i høj grad forbedre effektiviteten og pålideligheden af din LED-belysningsinstallation.


Spændingsfald: En enkel forklaring
Spændingsfald opstår, når spændingen i slutningen af strimlen er lavere end i begyndelsen. Det kan medføre, at lysdioderne i enden bliver svagere. For at mindske spændingsfaldet skal du bruge tykkere ledninger eller kortere strimler eller tilføre strøm flere steder langs strimlen. Det er vigtigt at planlægge installationen omhyggeligt for at minimere spændingsfaldet, især på længere strækninger. En god metode er at bruge effektforstærkere eller forstærkere. Brug dem med regelmæssige intervaller. De hjælper med at opretholde en stabil spænding på tværs af strimlen. Hvis du vælger en bedre strømforsyning med tilstrækkelig kapacitet, kan du også reducere risikoen for spændingsfald. Ved at forstå og afhjælpe spændingsfald kan du sikre, at dine LED-strips fungerer godt. De vil give et jævnt lys over hele installationen.
PWM-forstærker: Gør kompleks til enkel
En PWM-forstærker (Pulse Width Modulation) forstærker signalet til LED-strips, hvilket giver en ensartet lysstyrke på tværs af lange strips. Den sikrer, at strømsignalet forbliver stærkt og forhindrer dæmpning eller flimmer. PWM-forstærkere er nyttige i store installationer. De holder lysudbyttet ensartet, hvilket er afgørende. Disse forstærkere regenererer PWM-signalet. De udvider den effektive rækkevidde af dine LED-strips. Det sikrer, at hver sektion får den rigtige spænding og strøm. Det er nemt at installere PWM-forstærkere. Du kan tilføje dem til din opsætning. Hvis du placerer og opsætter dem rigtigt, kan PWM-forstærkere i høj grad forbedre LED-stripbelysningen. De kan øge ydeevnen og levetiden.
Typer af LED-strips
LED-strips findes i forskellige typer, herunder enkeltfarvet, RGB (rød, grøn, blå), RGBW (rød, grøn, blå, hvid) og tunable white. Hver type kræver forskellige ledninger og controllere. Enkeltfarvede strips er de enkleste med kun to ledninger til positive og negative forbindelser. RGB-strips tilføjer tre farvekanaler og kræver en controller til at blande farverne. RGBW-strips inkluderer en ekstra hvid kanal for mere nuancerede belysningsmuligheder. Tunable white strips giver mulighed for at justere farvetemperaturen og tilbyder en række hvide lys fra varmt til køligt. Hvis du kender forskellene mellem disse LED-strip-typer, kan du vælge det rigtige produkt til dine behov. Det vil også sikre korrekt opsætning og brug.
Sådan tilslutter du enkeltfarvede LED-strips
Ledningsføring af enkeltfarvede LED-strips med ikke-dæmpbare LED-drivere
For ikke-dæmpbare LED-drivere tilsluttes stripens positive ledning til driverens positive terminal. Tilslut derefter strimlens negative ledning til driverens negative terminal. Fastgør alle forbindelser, og tænd for strømmen. Denne enkle ledningsføring er god til grundlæggende installationer. De kræver ikke dæmpning. Ikke-dæmpbare drivere giver et konstant output. Det sikrer, at dine LED-strips skinner bedst muligt. Når du tilslutter flere strips, er det vigtigt at sikre, at den samlede effekt ikke overstiger driverens kapacitet. Det er vigtigt at sikre alle forbindelser. Følg producentens anvisninger. Det forebygger elektriske problemer og sikrer en sikker og pålidelig installation.
Ledningsføring af enkeltfarvede LED-strips med dæmpbar LED-drivers
Dæmpbare LED-drivere giver dig mulighed for at justere lysstyrken. Tilslut strimlen til driveren som beskrevet ovenfor. Følg det specifikke ledningsdiagram for din lysdæmpertype:
– 0-10V dæmpbar LED-driver Forbindelsesdiagram
En 0-10V dæmpbar driver bruger et lavspændingsstyringssignal til at justere lysstyrken. Tilslut 0-10V-dæmperen til driverens kontrolterminaler, og sørg for korrekt polaritet. Denne opsætning giver mulighed for jævn dæmpning over hele området.


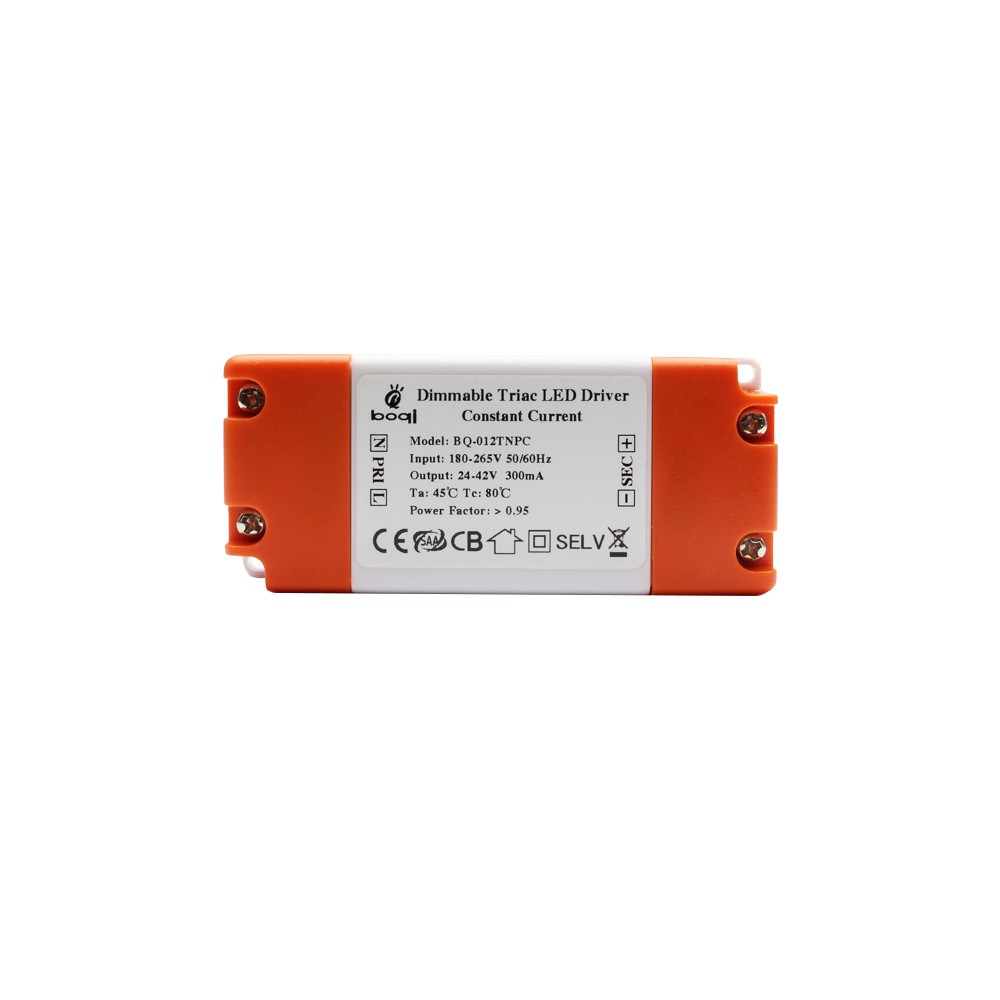
– Triac-dæmpbar LED-driver Forbindelsesdiagram
Triac-dæmpere fungerer med AC-faseskæringsdæmpning. Tilslut driveren til en kompatibel triac-dæmperkontakt, og sørg for, at driverens input matcher dæmperens output. Denne metode giver en velkendt dæmpningsoplevelse, der ligner traditionelle glødepærer.

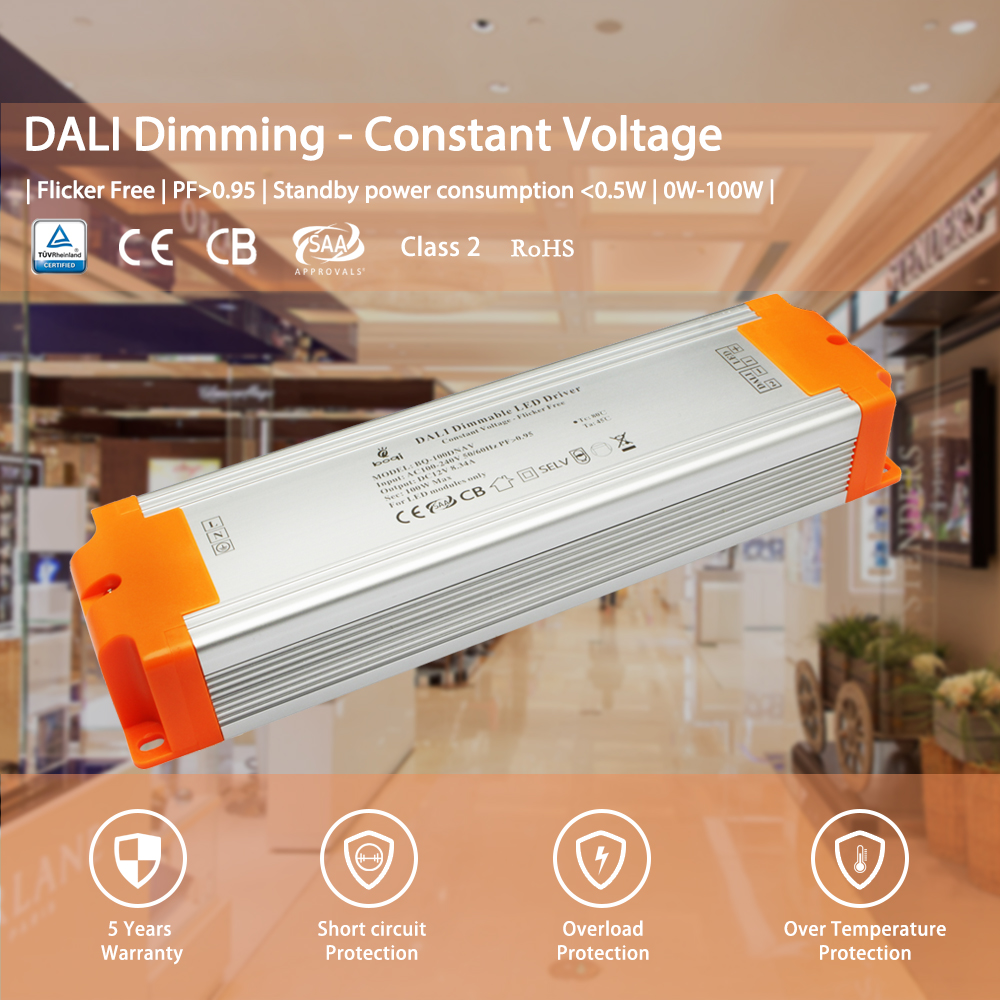
– DALI-dæmpbar LED-driver Forbindelsesdiagram
DALI-dæmpere (Digital Addressable Lighting Interface) giver præcis styring og programmerbarhed. Tilslut DALI-kontrollinjerne til driverens DALI-indgangsterminaler. Denne opsætning er ideel til komplekse belysningssystemer, der kræver avancerede kontrolfunktioner.

Ledningsføring af enkeltfarvede LED-strips med LED-controllere
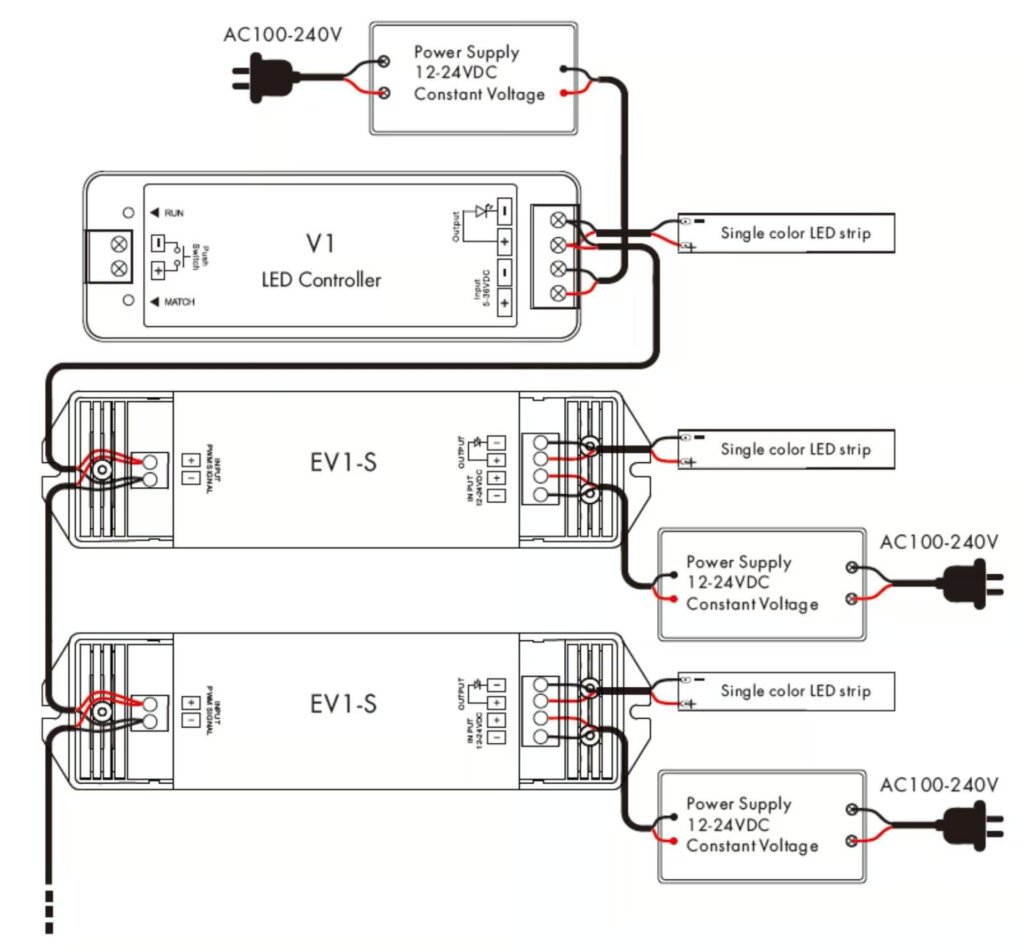
LED-controllere giver mere fleksibilitet i styringen af lyset. Tilslut strimlen til controlleren. Sørg for, at de positive og negative ledninger matcher controllerens terminaler. Controllere giver mulighed for forskellige effekter, f.eks. dæmpning, blink og brugerdefinerede lysmønstre. Sørg for, at controlleren er kompatibel med din LED-strip og strømforsyning. Det er vigtigt at sikre forbindelserne ordentligt. Hvis du følger producentens retningslinjer, sikrer du pålidelig drift og forebygger potentielle problemer.
Uden PWM-forstærker
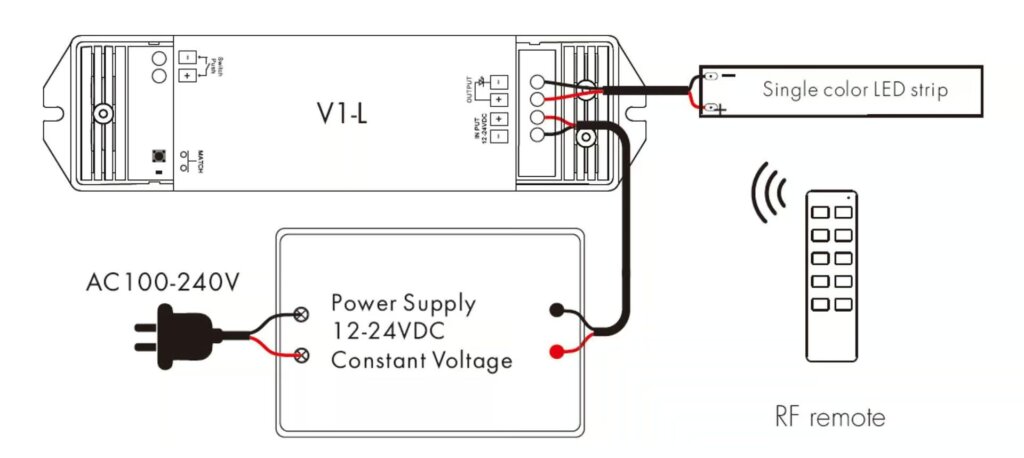
Med PWM-forstærker
Ledningsføring af enkeltfarvede LED-strips med DMX512-dekoder
DMX512-dekodere bruges til avancerede lysopsætninger. Tilslut strimlen til dekoderen, og match de positive og negative ledninger til de korrekte terminaler. DMX512 er en digital kommunikationsprotokol. Den bruges til lysstyring og giver præcis kontrol over mange kanaler. Denne opsætning er almindelig i scenebelysning. Det bruges også til arkitektonisk belysning og andre professionelle anvendelser. Sørg for, at DMX512-dekoderen er sat rigtigt op. Tilslut den til DMX-controlleren for at få den bedste ydelse.

Sådan tilslutter du afstemmelige hvide LED-strips
Ledningsføring af afstemmelige hvide LED-strips med dæmpbare LED-drivere
Tunable white LED strips giver mulighed for at justere farvetemperaturen. Tilslut ledningerne i henhold til driverens instruktioner, og sørg for korrekte forbindelser til både farvetemperatur og lysstyrkekontrol. Tunable white strips har typisk ekstra kontrollinjer til justering af farvetemperaturen. Disse strips kan skifte fra varm hvid til kølig hvid, hvilket giver alsidige belysningsmuligheder. Sørg for, at din dæmpbare LED-driver er kompatibel med tunable white strips, og at alle tilslutninger er sikre for pålidelig drift.
DALI DT8 Tunable White LED Driver
DALI DT8-drivere bruges til præcis styring af indstillelige hvide strips. Følg ledningsdiagrammet fra producenten. DALI DT8-drivere understøtter indstillelige hvide LED-strips. De giver mulighed for uafhængig styring af lysstyrke og farvetemperatur. Denne avancerede kontrolfunktion er ideel til applikationer, der kræver dynamiske belysningsmiljøer. Korrekt ledningsføring og konfiguration af DALI DT8-driveren sikrer problemfri drift og optimal ydelse af dine tunable white LED-strips.

Tilslutning af afstemmelige hvide LED-strips med LED-controllere
Tilslut den afstemmelige hvide strimmel til controlleren, og match de positive og negative terminaler. Sørg for sikre forbindelser for pålidelig drift. LED-controllere til tunable white strips giver mulighed for præcise justeringer af farvetemperatur og lysstyrke. Disse controllere leveres ofte med fjernbetjeninger eller kan integreres i smart home-systemer for ekstra bekvemmelighed. Korrekt installation og konfiguration af controlleren sikrer ensartet og pålidelig drift.
Uden PWM-forstærker

Ledningsføring Tunable White LED Strip Lights med DMX512-dekoder

Brug en DMX512-dekoder til tunable white strips i avancerede opsætninger. Tilslut strimlen til dekoderen ved at følge ledningsdiagrammet for korrekt installation. DMX512-dekodere giver fin kontrol over farvetemperatur og lysstyrke. De er ideelle til professionel belysning. Sørg for, at dekoderen er korrekt forbundet til DMX-controlleren, og at alle forbindelser er sikre for at opnå optimal ydelse.
Tunable White LED Strip Lights med to ledninger
Enklere tunable white strips bruger to ledninger til styring af farvetemperaturen. Tilslut disse ledninger til de relevante terminaler på din controller eller driver. Denne type tunable white strip har typisk en enklere ledningskonfiguration, hvilket gør den nemmere at installere. Den kan dog tilbyde færre kontrolmuligheder sammenlignet med mere avancerede tunable white-systemer. Sørg for, at din controller eller driver er kompatibel med totrådskonfigurationen for at sikre pålidelig drift.

Sådan tilslutter du RGB LED-strips
Ledningsføring af RGB LED-strips med dæmpbare LED-drivere
Tilslut RGB-strippen til den dæmpbare driver, så de røde, grønne og blå ledninger passer til de tilsvarende terminaler. Brug det medfølgende ledningsdiagram. Dæmpbare drivere til RGB-strips giver dig mulighed for at justere lysstyrken på hele strippen. Farvestyring kræver dog en ekstra RGB-controller. Sørg for, at alle forbindelser er sikre, og at driveren er kompatibel med din RGB-strip for at sikre pålidelig drift.
DALI DT8 RGB LED-driver
Brug en DALI DT8-driver til avanceret RGB-styring. Følg producentens ledningsdiagram for præcis installation. DALI DT8-drivere giver separat kontrol over hver farve. Det giver mulighed for kompleks belysning og præcis farveblanding. Denne avancerede kontrol er fantastisk til apps, der har brug for dynamisk belysning. De har brug for belysning, der kan tilpasses. Korrekt installation og opsætning af DALI DT8-driveren sikrer, at dine RGB LED-strips fungerer godt. De vil have den bedste ydeevne.

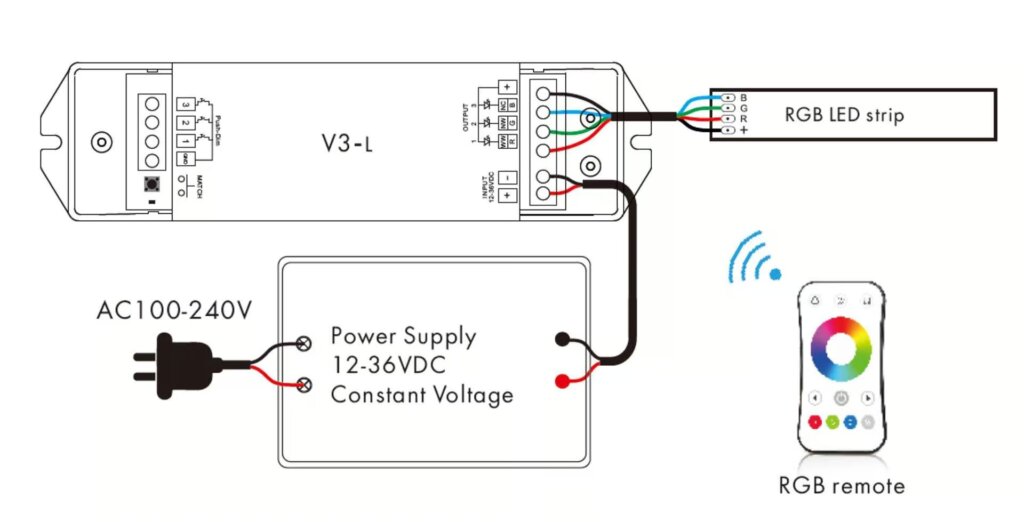
Ledningsføring af RGB LED-strips med LED-controllere
Tilslut RGB-strimlen til controlleren, og sørg for, at hver farvetråd er forbundet til den relevante
terminal. RGB-controllere giver mulighed for forskellige lyseffekter, f.eks. farveskift, blink og brugerdefinerede mønstre. Sørg for, at controlleren er kompatibel med din RGB-strip og strømforsyning. Hvis du sikrer forbindelserne korrekt og følger producentens retningslinjer, er det med til at sikre pålidelig drift og forhindre potentielle problemer.
Uden PWM-forstærker
Med PWM-forstærker

Ledningsføring af RGB LED-strips med DMX512-dekoder
Brug en DMX512-dekoder til RGB-strips i komplekse opsætninger. Følg ledningsdiagrammet for at sikre korrekt installation. DMX512-dekodere giver præcis kontrol over hver farvekanal, hvilket giver mulighed for indviklede lyseffekter og præcis farveblanding. Denne opsætning bruges ofte til professionel belysning, f.eks. scenebelysning og arkitektonisk belysning. Sørg for, at DMX512-dekoderen er sat rigtigt op. Tilslut den til DMX-controlleren for at få den bedste ydelse.

Sådan tilslutter du RGBW LED-strips
Ledningsføring af RGBW LED-strips med dæmpbare LED-drivere
Tilslut RGBW-strippen til den dæmpbare driver, og sørg for, at alle farvetråde (rød, grøn, blå, hvid) er tilsluttet korrekt. Dæmpbare drivere til RGBW-strips giver dig mulighed for at justere lysstyrken på hele strippen. Farvestyring kræver dog en ekstra RGBW-controller. Sørg for, at alle forbindelser er sikre, og at driveren er kompatibel med din RGBW-strip for at sikre pålidelig drift.
DALI DT8 RGBW LED-driver
Brug en DALI DT8-driver til avanceret RGBW-styring. Følg producentens ledningsvejledning. DALI DT8-drivere giver separat kontrol over hver farve. Det giver mulighed for komplekse lyseffekter og præcis farveblanding. Denne avancerede kontrol er fantastisk til applikationer. De har brug for dynamisk belysning, der kan tilpasses. DT8-driveren skal installeres og konfigureres korrekt. Det sikrer en jævn og optimal ydelse af dine RGBW LED-strips.

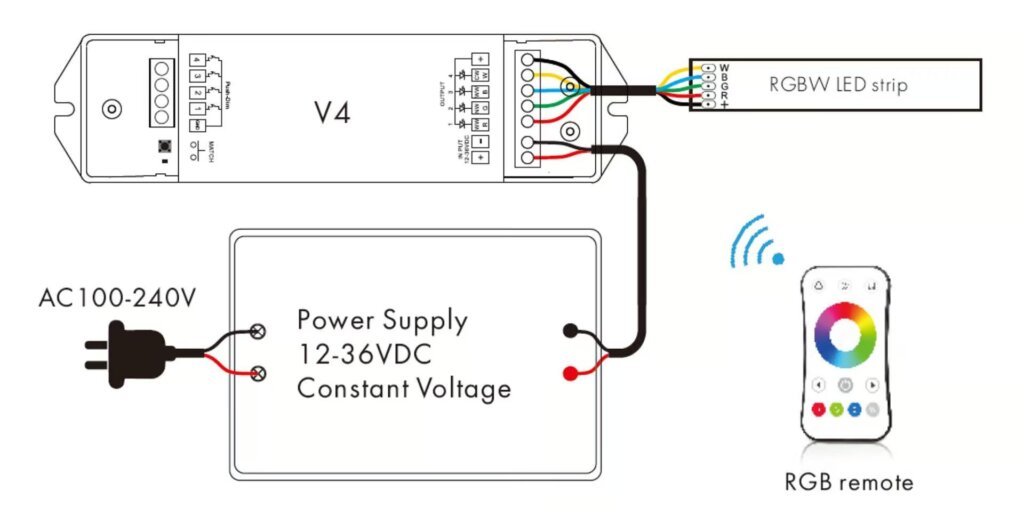
Ledningsføring af RGBW LED-strips med LED-controllere
Tilslut RGBW-strimlen til controlleren, så alle farvede ledninger passer til de rigtige terminaler. RGBW-controllere giver mulighed for forskellige lyseffekter, f.eks. farveskift, blink og brugerdefinerede mønstre. Sørg for, at controlleren er kompatibel med din RGBW-strip og strømforsyning. Det hjælper at sikre forbindelserne korrekt og følge producentens retningslinjer. Det vil sikre pålidelig drift og forebygge problemer.
Uden PWM-forstærker
Med PWM-forstærker

Ledningsføring af RGBW LED-striplys med DMX512-dekoder
Brug en DMX512-dekoder til RGBW-strips i avancerede opsætninger. Følg ledningsdiagrammet for korrekt installation. DMX512-dekodere giver præcis kontrol over hver farvekanal. De giver mulighed for komplekse lyseffekter og præcis farveblanding. Denne opsætning er almindelig i professionel belysning. Det bruges til scene- og arkitektonisk belysning. Sørg for, at DMX512-dekoderen er sat op og forbundet til DMX-controlleren. Det er nødvendigt for at opnå den bedste ydeevne.

Sådan tilslutter du RGB- og CCT-LED-strips
Ledningsføring af RGBW LED-strips med dæmpbare LED-drivere
Følg ledningsdiagrammet for at tilslutte RGBW-strippen til en dæmpbar driver, og sørg for, at alle tilslutninger er sikre. Dæmpbare drivere til RGBW-strips giver dig mulighed for at justere lysstyrken på hele strippen. Farvestyring kræver dog en ekstra RGBW-controller. Sørg for, at alle forbindelser er sikre, og at driveren er kompatibel med din RGBW-strip for at sikre pålidelig drift.
Ledningsføring af RGBW LED-strips med LED-controllere
Tilslut strimlen til controlleren, så ledningerne passer til de relevante terminaler. RGBW-controllere giver mulighed for forskellige lyseffekter, f.eks. farveskift, blink og brugerdefinerede mønstre. Sørg for, at controlleren er kompatibel med din RGBW-strip og strømforsyning. Hvis du sikrer forbindelserne korrekt og følger producentens retningslinjer, er det med til at sikre pålidelig drift og forhindre potentielle problemer.
Uden PWM-forstærker

Med PWM-forstærker

Ledningsføring af RGBW LED-striplys med DMX512-dekoder
Brug en DMX512-dekoder til komplekse opsætninger. Følg ledningsdiagrammet for at sikre korrekt installation. DMX512-dekodere giver præcis kontrol over hver farvekanal. De giver mulighed for komplekse lyseffekter og nøjagtig farveblanding. Denne opsætning bruges ofte i professionelle belysningsapplikationer, f.eks. scenebelysning og arkitektonisk belysning. Sørg for, at DMX512-dekoderen er korrekt konfigureret. Tilslut den til DMX-controlleren for at få den bedste ydelse.

Sådan tilslutter du adresserbare LED-strips
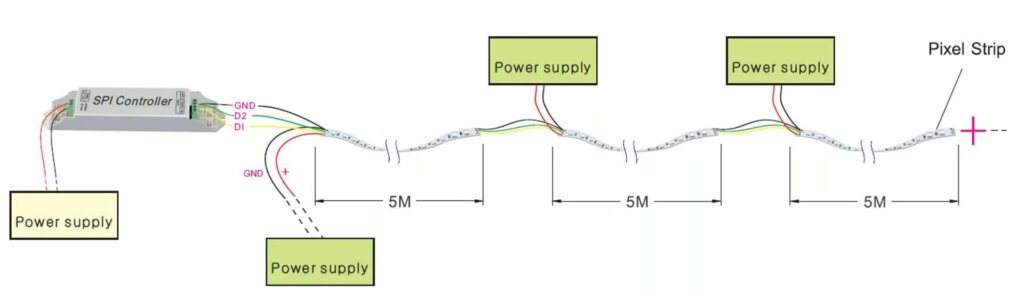
Sådan tilslutter du SPI-adressérbare LED-strips
Tilslut data- og strømledningerne fra den SPI-adressérbare strimmel til controlleren i henhold til det medfølgende ledningsdiagram. Adressérbare LED-strips giver mulighed for individuel styring af hver LED, hvilket muliggør komplekse lyseffekter og mønstre. Sørg for, at controlleren er kompatibel med din SPI-adresserede strimmel, og at alle forbindelser er sikre. Korrekt konfiguration af controlleren og overholdelse af producentens anvisninger er med til at sikre pålidelig drift og forhindre potentielle problemer.
SPI-adressérbare LED-strips med kun datakanal
Sørg for, at dataledningen er sikkert forbundet til controlleren. Denne opsætning giver mulighed for grundlæggende styring af adresserbare LED'er. Det giver dig mulighed for at lave tilpassede lyseffekter. Korrekt sikring af dataledningen og overholdelse af ledningsdiagrammet er med til at sikre pålidelig drift og forhindre potentielle problemer.

SPI-adressérbare LED-strips med data- og clockkanaler
Tilslut både data- og klokkeledninger til controlleren, og sørg for sikre forbindelser. Denne opsætning giver mulighed for mere præcis styring af de adresserbare LED'er, hvilket muliggør komplekse lyseffekter og -mønstre. Korrekt konfiguration af controlleren og overholdelse af producentens anvisninger er med til at sikre pålidelig drift og forhindre potentielle problemer.

SPI-adressérbare LED-strips med data- og backup-datakanaler
Følg ledningsdiagrammet for at forbinde data-, ur- og backupdataledninger til controlleren. Denne konfiguration giver redundans og sikrer pålidelig drift, selv hvis en datakanal svigter. Det er vigtigt at sikre alle forbindelser korrekt. Det hjælper at følge producentens anvisninger. Det sikrer pålidelig drift og forebygger potentielle problemer.
Sådan tilslutter du DMX512 adresserbare LED-strips
Brug en DMX512-dekoder til adresserbare strips. Følg ledningsdiagrammet for korrekt installation. DMX512-dekodere giver præcis kontrol over hver enkelt LED og muliggør komplekse lyseffekter og -mønstre. Denne opsætning bruges ofte til professionel belysning, f.eks. scenebelysning og arkitektonisk belysning. Sørg for, at DMX512-dekoderen er sat rigtigt op. Tilslut den til DMX-controlleren. Det er nøglen til topydelse.

Ofte stillede spørgsmål
- Hvordan forbindes LED-strimler?
- For hvert segment er LED'erne forbundet i serie, hvilket betyder, at driftsspændingerne lægges sammen og giver den højere spænding, der er brug for. Alle segmenter er forbundet parallelt, så de får den samme spænding, men strømforbruget stiger med længden af strimlen. Forståelse af denne ledningsføring hjælper med at opretholde en ensartet lysstyrke og forhindrer problemer som ujævn belysning eller flimmer.
- Hvad er farverne på ledningerne på LED-lysstrimler?
- RGB-strips har en 4-leders forbindelse: grøn, rød, blå til lysdioderne og sort/hvid til den fælles +12V-forbindelse. Korrekt tilpasning af disse ledninger til de tilsvarende terminaler på controlleren eller strømforsyningen sikrer korrekt drift og farveblanding.
- Hvad er 4 ledninger i LED-strips?
- Til RGB-strips skal du bruge 4 ledninger: en neutral (gul), og resten styrer de 3 LED-farver (rød, grøn, blå). Ved at forbinde disse ledninger korrekt sikres korrekt farvestyring og drift af strimlen.
- Hvor mange ledninger til en LED-strip?
- RGBW LED-strippen har fem ledninger: rød, grøn, blå, hvid og positiv. Tilslut LED-lysstrimlen til det tilsvarende mærke på RGBW LED-lysregulatoren. Sørg for, at alle forbindelser er sikre, og følg ledningsdiagrammet fra producenten for at forhindre potentielle problemer og sikre pålidelig drift.
Konklusion
Ledningsføring af LED-strips behøver ikke at være skræmmende. Med denne vejledning har du nu den viden, der skal til for at håndtere forskellige typer LED-strips og sikre en vellykket og sikker installation. God fornøjelse med belysningen!
Lukning
At vælge de rigtige flimmerfri dæmpbare LED-drivere er afgørende for at optimere din belysning og dermed forbedre dit generelle velbefindende og din komfort. Fraværet af flimmer er afgørende for det komfortniveau, du oplever i din bolig.
I denne artikel dykker vi ned i følgende aspekter for at guide dig i valget af de ideelle flimmerfri dæmpende LED-drivere:
Vi vil udforske vigtige funktioner som specifikationer, kompatibilitet og effektivitet for at omgå enhver flimren i belysningen. Derudover vil vi diskutere vigtigheden af høj PWM-frekvens for at opnå flimmerfrie resultater i den dæmpbare LED-driverserie.
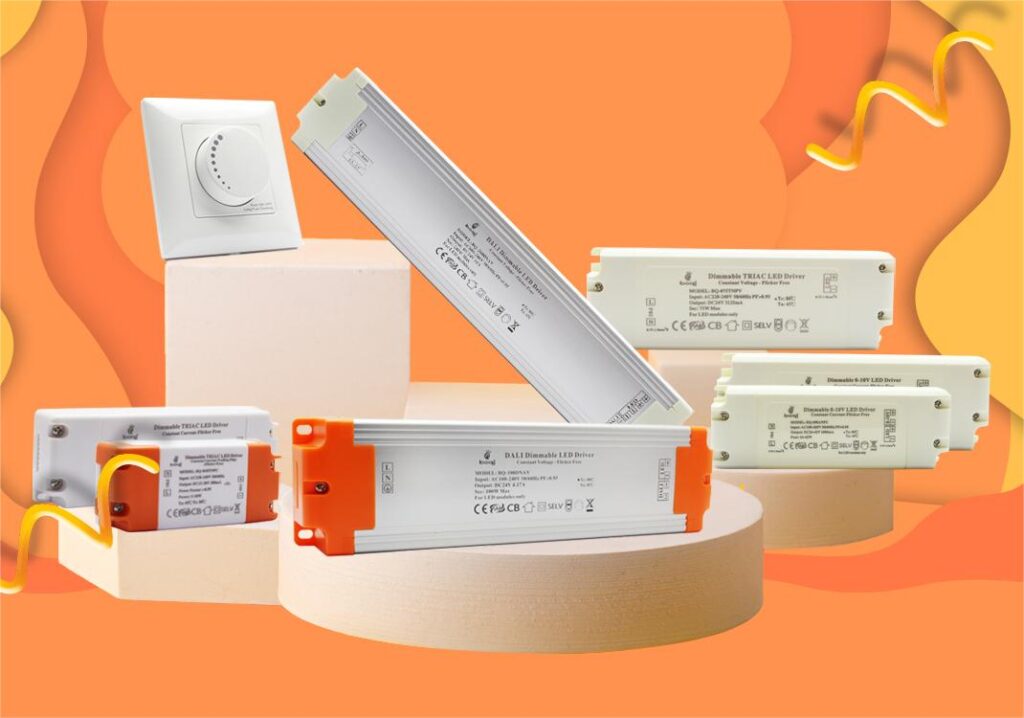
Køb Dæmpbare LED-drivere fra boqi
Det er vigtigt at kende årsagerne til lysflimmer, men opgaven med at vælge den passende dæmpbare LED-driver er stadig forestående. For at opnå de ønskede lys- og dæmpningseffekter er det vigtigt at kontakte en velrenommeret producent af LED-drivere. boqi er en anerkendt producent af dæmpbare LED-drivere, som tilbyder en række flimmerfrie dæmpere og controllere. Produktsortimentet omfatter TRIAC-, 0-10V- og DALI LED-drivere, lysdæmpere og controllere.
Virksomheden opererer med produktionsbaser i Kina og er indstillet på sine kunders forskellige behov og specifikationer. Hvis du har spørgsmål til din LED-driver eller controller, så tøv ikke med at kontakte os, så vi kan hjælpe dig med at finjustere dine valg.