Die Verkabelung von LED-Lichtbändern kann entmutigend wirken. Aber mit der richtigen Anleitung ist es ein einfacher Prozess. Es kann Ihren Raum wunderbar verschönern. Diese Anleitung ist für Heimwerker, Hausbesitzer, die für mehr Atmosphäre sorgen wollen, und Elektriker, die ein neues Projekt in Angriff nehmen. Dieser Leitfaden vereinfacht die Verkabelung für Sie.
Um LED-Leuchtbänder zu verdrahten, bestimmen Sie zunächst den Typ des Bandes (einfarbig, RGB oder RGBW). Schließen Sie die positiven und negativen Drähte an die entsprechenden Klemmen Ihres Netzteils oder Controllers an. Bei RGB-Streifen müssen Sie die Farben (rot, grün, blau) mit den entsprechenden Klemmen verbinden. Vergewissern Sie sich, dass alle Verbindungen sicher sind, und befolgen Sie den beiliegenden Verdrahtungsplan für genaue Anweisungen.
Lassen Sie uns in die Details der Verdrahtung verschiedener Arten von LED-Leuchtbändern eintauchen. So stellen Sie sicher, dass Sie das Wissen und das Vertrauen haben, es richtig zu machen.
Die Parallelschaltung verstehen: Vereinfacht
Parallelschaltungen sind bei LED-Leuchtbändern entscheidend. Jedes Segment des Streifens wird in Reihe geschaltet, d. h. die Betriebsspannungen werden addiert und liefern die erforderliche höhere Spannung. Alle Segmente sind parallel verdrahtet und erhalten die gleiche Spannung, aber die Stromaufnahme steigt mit der Länge des Streifens. Verwenden Sie Parallelschaltungen. Sie stellen sicher, dass jedes Streifensegment eine gleichmäßige Spannung erhält. Dadurch werden Probleme wie ungleichmäßige Helligkeit oder Flackern vermieden. Dieser Aufbau ist für lange LED-Streifen der Schlüssel zum Erfolg. So bleibt das Licht stabil und gleichmäßig. Wenn Sie die Grundlagen der Parallelverdrahtung verstehen, können Sie die Effektivität und Zuverlässigkeit Ihrer LED-Beleuchtungsinstallation erheblich verbessern.


Spannungsabfall: Eine einfache Erläuterung
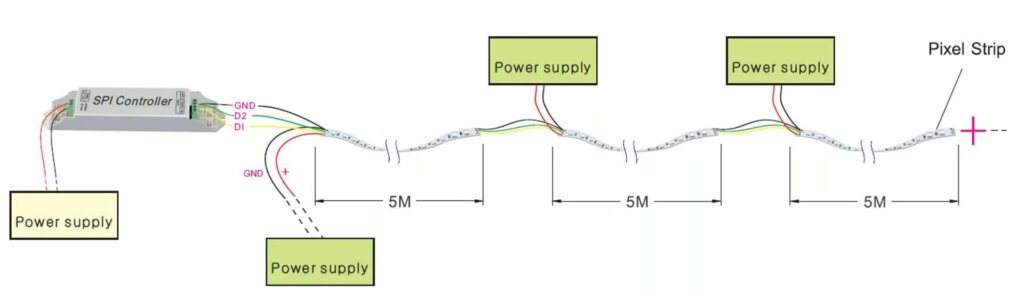
Ein Spannungsabfall tritt auf, wenn die Spannung am Ende des Streifens niedriger ist als am Anfang. Dies kann dazu führen, dass die LEDs am Ende schwächer leuchten. Um den Spannungsabfall zu verringern, sollten Sie dickere Drähte oder kürzere Streifen verwenden oder die Spannung an mehreren Stellen entlang des Streifens einspeisen. Es ist wichtig, die Installation sorgfältig zu planen, um den Spannungsabfall zu minimieren, insbesondere bei längeren Strecken. Eine gute Methode ist die Verwendung von Leistungsverstärkern oder Verstärkern. Verwenden Sie diese in regelmäßigen Abständen. Sie tragen dazu bei, eine gleichmäßige Spannung auf dem Band aufrechtzuerhalten. Auch die Wahl eines besseren Netzteils mit ausreichender Kapazität kann das Risiko eines Spannungsabfalls verringern. Wenn Sie den Spannungsabfall verstehen und beheben, können Sie sicherstellen, dass Ihre LED-Leuchtbänder gut funktionieren. Sie sorgen für gleichmäßiges Licht in der gesamten Installation.
PWM-Verstärker: Aus komplex wird einfach
Ein PWM-Verstärker (Pulse Width Modulation) verstärkt das Signal für die LED-Streifen und ermöglicht eine gleichmäßige Helligkeit über lange Streifen. Er sorgt dafür, dass das Stromsignal stark bleibt und ein Dimmen oder Flackern verhindert wird. PWM-Verstärker sind bei großen Installationen nützlich. Sie sorgen für eine gleichmäßige Lichtausbeute, was entscheidend ist. Diese Verstärker regenerieren das PWM-Signal. Sie erweitern den Wirkungsbereich Ihrer LED-Streifen. So wird sichergestellt, dass jeder Abschnitt die richtige Spannung und Stromstärke erhält. Die Installation von PWM-Verstärkern ist einfach. Sie können sie zu Ihrem Setup hinzufügen. Wenn sie richtig platziert und eingestellt werden, können PWM-Verstärker die LED-Beleuchtung erheblich verbessern. Sie können die Leistung und Langlebigkeit erhöhen.
Arten von LED-Leuchtbändern
LED-Leuchtbänder gibt es in verschiedenen Ausführungen, darunter einfarbig, RGB (Rot, Grün, Blau), RGBW (Rot, Grün, Blau, Weiß) und abstimmbares Weiß. Jeder Typ erfordert eine andere Verkabelung und ein anderes Steuergerät. Einfarbige Streifen sind die einfachsten, mit nur zwei Drähten für positive und negative Anschlüsse. RGB-Streifen verfügen über drei Farbkanäle und benötigen einen Controller, um die Farben zu mischen. RGBW-Streifen verfügen über einen zusätzlichen Weißkanal für nuanciertere Beleuchtungsoptionen. Tunable White Strips ermöglichen eine Anpassung der Farbtemperatur und bieten ein Spektrum an weißem Licht von warm bis kalt. Die Kenntnis der Unterschiede zwischen diesen LED-Streifentypen kann Ihnen helfen, das richtige Produkt für Ihre Bedürfnisse auszuwählen. Außerdem können Sie so die richtige Einrichtung und Verwendung sicherstellen.
Verdrahtung von einfarbigen LED-Leuchtbändern
Verdrahtung von einfarbigen LED-Leuchtbändern mit nicht dimmbaren LED-Treibern
Bei nicht dimmbaren LED-Treibern verbinden Sie das Pluskabel des Streifens mit dem Pluspol des Treibers. Verbinden Sie dann das Minuskabel des Streifens mit dem Minuspol des Treibers. Sichern Sie alle Verbindungen und schalten Sie das Gerät ein. Diese einfache Verdrahtungsmethode eignet sich hervorragend für einfache Installationen. Sie müssen nicht gedimmt werden. Nicht dimmbare Treiber liefern eine konstante Leistung. Dadurch wird sichergestellt, dass Ihre LED-Streifen in vollem Glanz erstrahlen. Bei der Verdrahtung mehrerer Streifen muss sichergestellt werden, dass die Gesamtwattzahl die Kapazität des Treibers nicht übersteigt. Die Sicherung aller Verbindungen ist entscheidend. Befolgen Sie die Anweisungen des Herstellers. Dies verhindert elektrische Probleme und gewährleistet eine sichere, zuverlässige Installation.
Verdrahtung von einfarbigen LED-Leuchtbändern mit dimmbaren LED-Treiberns
Mit dimmbaren LED-Treibern können Sie die Helligkeit einstellen. Schließen Sie den Streifen wie oben beschrieben an den Treiber an. Folgen Sie dem spezifischen Schaltplan für Ihren Dimmertyp:
– 0-10V dimmbarer LED-Treiber Anschlussschema
Ein dimmbarer 0-10V-Treiber verwendet ein Niederspannungs-Steuersignal, um die Helligkeit einzustellen. Schließen Sie den 0-10-V-Dimmer an die Steuerklemmen des Treibers an und achten Sie auf die richtige Polarität. Diese Einrichtung ermöglicht ein gleichmäßiges Dimmen über den gesamten Bereich.


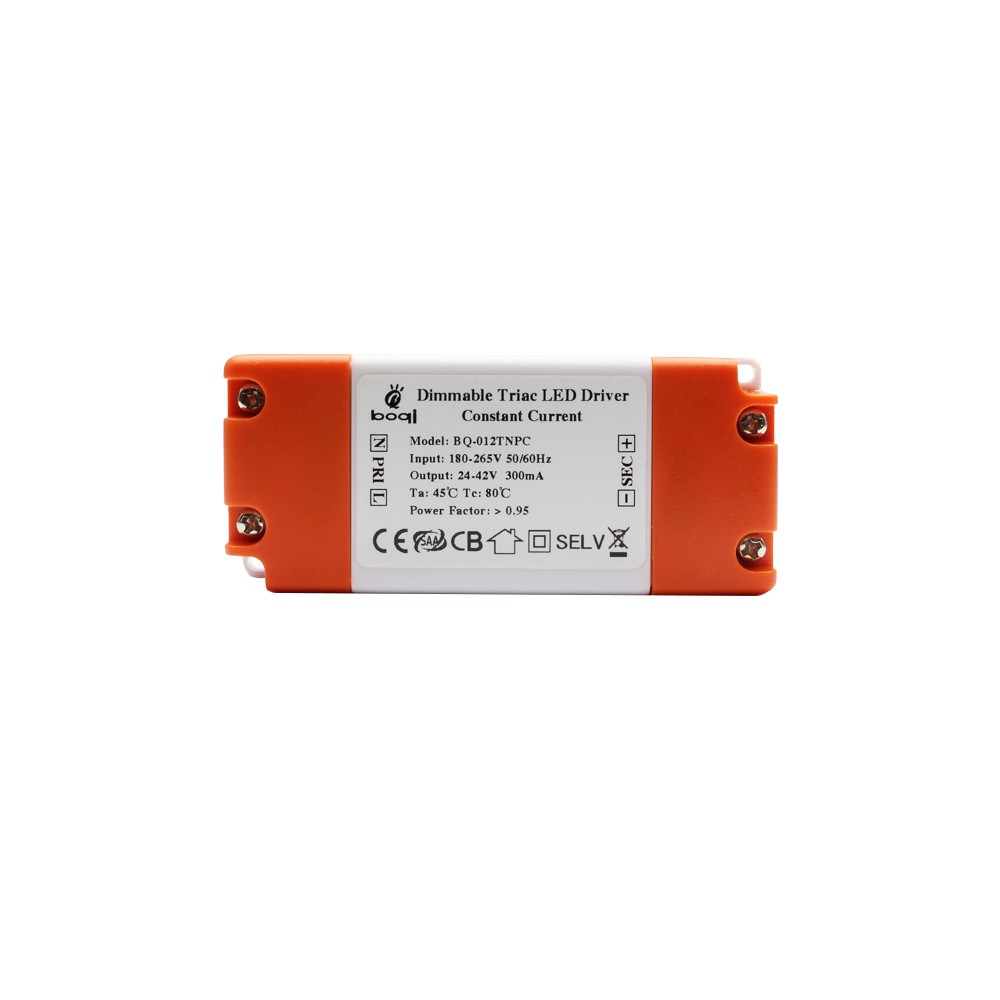
– Triac Dimmbarer LED-Treiber Anschlussplan
Triac-Dimmer arbeiten mit AC-Phasenanschnittdimmern. Schließen Sie den Treiber an einen kompatiblen Triac-Dimmschalter an und stellen Sie sicher, dass der Eingang des Treibers mit dem Ausgang des Dimmers übereinstimmt. Diese Methode bietet ein vertrautes Dimmererlebnis, ähnlich wie bei herkömmlichen Glühbirnen.

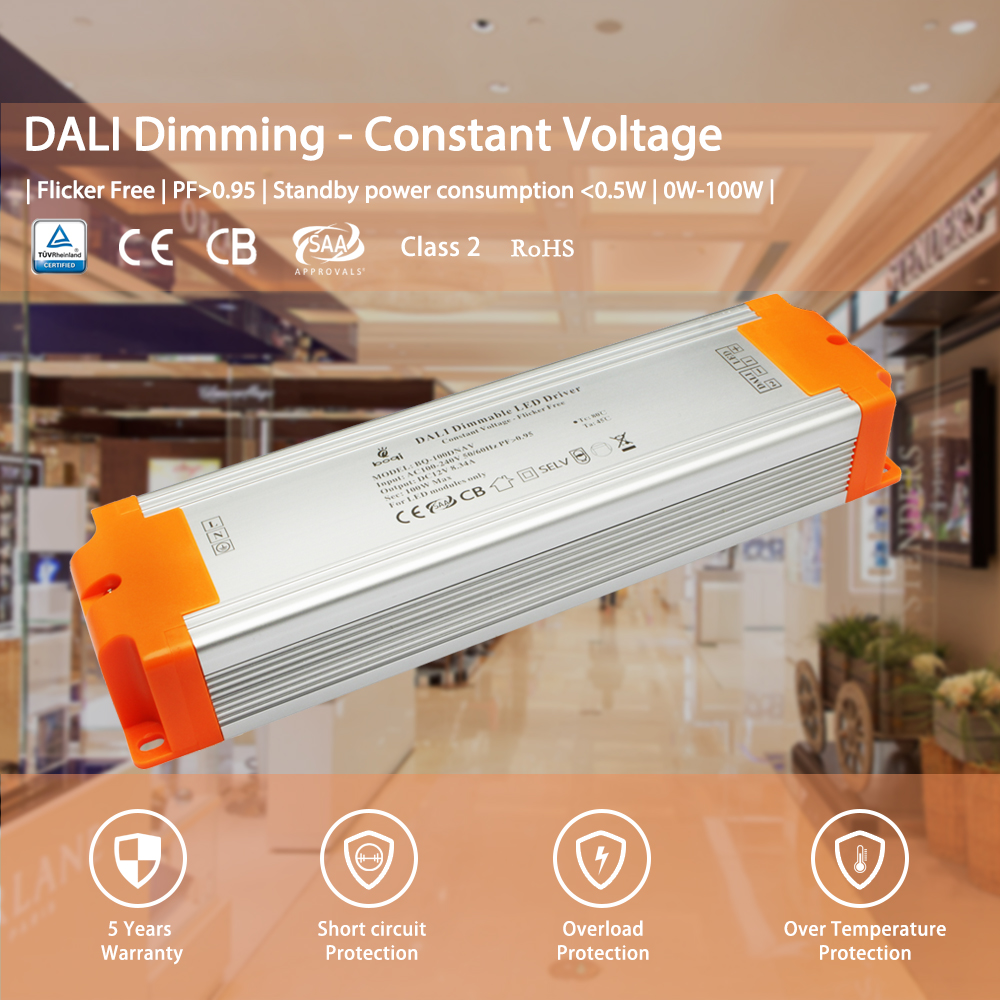
– DALI Dimmbarer LED-Treiber Anschlussschema
DALI-Dimmer (Digital Addressable Lighting Interface) bieten präzise Steuerung und Programmierbarkeit. Schließen Sie die DALI-Steuerleitungen an die DALI-Eingangsklemmen des Treibers an. Diese Konfiguration ist ideal für komplexe Beleuchtungssysteme, die erweiterte Steuerungsfunktionen erfordern.

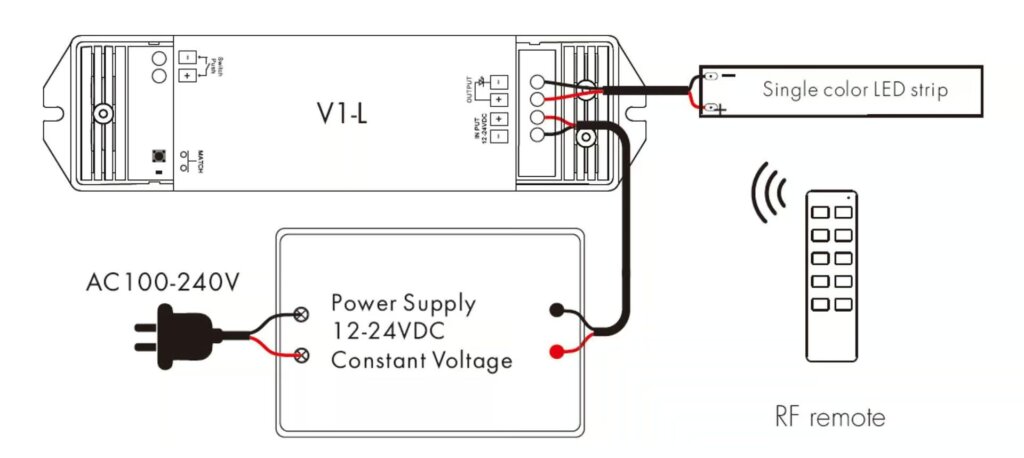
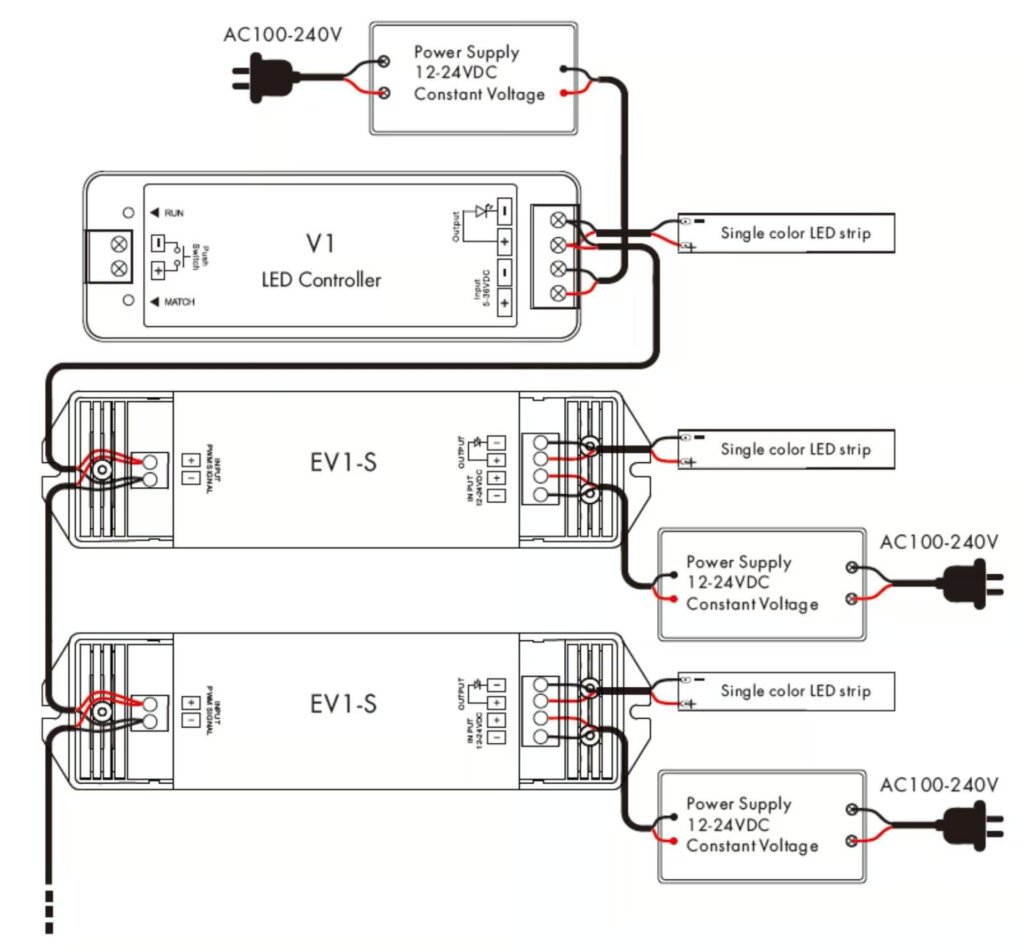
Verdrahtung von einfarbigen LED-Leuchtbändern mit LED-Controllern
LED-Controller bieten mehr Flexibilität bei der Steuerung der Beleuchtung. Schließen Sie den Streifen an das Steuergerät an. Vergewissern Sie sich, dass die positiven und negativen Drähte mit den Anschlüssen des Steuergeräts übereinstimmen. Controller ermöglichen verschiedene Effekte, wie Dimmen, Blinken und benutzerdefinierte Beleuchtungsmuster. Vergewissern Sie sich, dass das Steuergerät mit Ihrem LED-Streifen und Ihrer Stromversorgung kompatibel ist. Die ordnungsgemäße Sicherung der Anschlüsse ist entscheidend. Wenn Sie die Richtlinien des Herstellers befolgen, können Sie einen zuverlässigen Betrieb sicherstellen und mögliche Probleme vermeiden.
Ohne PWM-Verstärker
Mit PWM-Verstärker
Verdrahtung von einfarbigen LED-Streifenleuchten mit DMX512-Decoder
DMX512-Decoder werden für fortgeschrittene Beleuchtungs-Setups verwendet. Schließen Sie den Streifen an den Decoder an, indem Sie die positiven und negativen Drähte an die richtigen Klemmen anschließen. DMX512 ist ein digitales Kommunikationsprotokoll. Es wird zur Beleuchtungssteuerung verwendet und ermöglicht eine präzise Steuerung über viele Kanäle. Dieser Aufbau ist in der Bühnenbeleuchtung üblich. Es wird auch in der Architekturbeleuchtung und anderen professionellen Anwendungen eingesetzt. Stellen Sie sicher, dass der DMX512-Decoder richtig eingestellt ist. Schließen Sie ihn an den DMX-Controller an, um eine optimale Leistung zu erzielen.

Verdrahtung von abstimmbaren weißen LED-Leuchtbändern
Verdrahtung von abstimmbaren weißen LED-Leuchtbändern mit dimmbaren LED-Treibern
Abstimmbare weiße LED-Streifen ermöglichen die Einstellung der Farbtemperatur. Schließen Sie die Drähte gemäß den Anweisungen des Treibers an und stellen Sie sicher, dass sowohl die Farbtemperatur als auch die Helligkeit richtig eingestellt werden. Abstimmbare weiße Streifen haben in der Regel zusätzliche Steuerleitungen für die Einstellung der Farbtemperatur. Diese Streifen können von Warmweiß zu Kaltweiß wechseln und bieten so vielseitige Beleuchtungsoptionen. Vergewissern Sie sich, dass Ihr dimmbarer LED-Treiber mit abstimmbaren weißen Streifen kompatibel ist und dass alle Anschlüsse für einen zuverlässigen Betrieb sicher sind.
DALI DT8 Tunable White LED Treiber
DALI DT8-Treiber werden für die präzise Steuerung von abstimmbaren weißen Streifen verwendet. Folgen Sie dem vom Hersteller bereitgestellten Verdrahtungsplan. DALI DT8-Treiber unterstützen abstimmbare weiße LED-Streifen. Sie ermöglichen eine unabhängige Steuerung von Helligkeit und Farbtemperatur. Diese fortschrittliche Steuerungsmöglichkeit ist ideal für Anwendungen, die dynamische Beleuchtungsumgebungen erfordern. Die korrekte Verdrahtung und Konfiguration des DALI DT8-Treibers gewährleistet einen reibungslosen Betrieb und eine optimale Leistung Ihrer abstimmbaren weißen LED-Streifen.

Verdrahtung von abstimmbaren weißen LED-Leuchtbändern mit LED-Controllern
Schließen Sie den abstimmbaren weißen Streifen an das Steuergerät an, indem Sie die positiven und negativen Anschlüsse aufeinander abstimmen. Achten Sie auf sichere Verbindungen für einen zuverlässigen Betrieb. LED-Steuergeräte für durchstimmbare weiße Streifen ermöglichen eine präzise Einstellung von Farbtemperatur und Helligkeit. Diese Steuerungen werden oft mit Fernbedienungen geliefert oder können für zusätzlichen Komfort in Smart-Home-Systeme integriert werden. Eine ordnungsgemäße Installation und Konfiguration des Steuergeräts gewährleistet einen konsistenten und zuverlässigen Betrieb.
Ohne PWM-Verstärker

Verdrahtung von abstimmbaren weißen LED-Leuchtbändern mit DMX512-Decoder

Verwenden Sie einen DMX512-Decoder für abstimmbare weiße Streifen in fortgeschrittenen Setups. Schließen Sie den Streifen an den Decoder an und folgen Sie dabei dem Verdrahtungsplan für eine ordnungsgemäße Installation. DMX512-Decoder bieten eine feine Kontrolle über Farbtemperatur und Helligkeit. Sie sind ideal für professionelle Beleuchtungen. Vergewissern Sie sich, dass der Decoder korrekt an den DMX-Controller angeschlossen ist und dass alle Verbindungen sicher sind, um eine optimale Leistung zu erzielen.
Zwei Drähte Tunable White LED Strip Lights
Einfachere abstimmbare weiße Streifen verwenden zwei Drähte zur Steuerung der Farbtemperatur. Verbinden Sie diese Drähte mit den entsprechenden Anschlüssen an Ihrem Controller oder Treiber. Diese Art von durchstimmbaren weißen Streifen hat in der Regel eine einfachere Verdrahtungskonfiguration und ist daher leichter zu installieren. Im Vergleich zu fortschrittlicheren durchstimmbaren weißen Systemen bieten sie jedoch möglicherweise weniger Steuerungsoptionen. Stellen Sie sicher, dass Ihr Steuergerät oder Treiber mit der Zweidraht-Konfiguration kompatibel ist, um einen zuverlässigen Betrieb zu gewährleisten.

Verdrahtung von RGB-LED-Leuchtbändern
Verdrahtung von RGB-LED-Leuchtbändern mit dimmbaren LED-Treibern
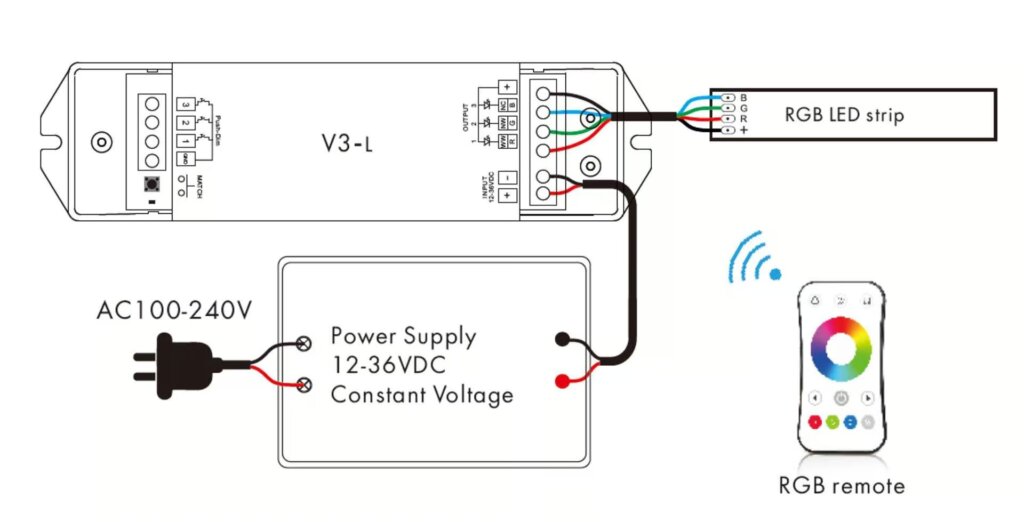
Schließen Sie den RGB-Streifen an den dimmbaren Treiber an, indem Sie die roten, grünen und blauen Drähte an die entsprechenden Klemmen anschließen. Verwenden Sie das mitgelieferte Verdrahtungsschema. Mit dimmbaren Treibern für RGB-Leisten können Sie die Helligkeit der gesamten Leiste einstellen. Für die Farbsteuerung wird jedoch ein zusätzlicher RGB-Controller benötigt. Vergewissern Sie sich, dass alle Verbindungen sicher sind und dass der Treiber mit Ihrem RGB-Streifen kompatibel ist, damit er zuverlässig funktioniert.
DALI DT8 RGB-LED-Treiber
Für eine erweiterte RGB-Steuerung verwenden Sie einen DALI DT8-Treiber. Befolgen Sie den Verdrahtungsplan des Herstellers für eine präzise Installation. DALI DT8-Treiber bieten eine separate Steuerung für jede Farbe. Dies ermöglicht eine komplexe Beleuchtung und eine präzise Farbmischung. Diese fortschrittliche Steuerung ist ideal für Anwendungen, die eine dynamische Beleuchtung benötigen. Sie benötigen eine Beleuchtung, die individuell angepasst werden kann. Die korrekte Installation und Einrichtung des DALI DT8-Treibers stellt sicher, dass Ihre RGB-LED-Streifen gut funktionieren. Sie werden die beste Leistung erbringen.

Verdrahtung von RGB-LED-Leuchtbändern mit LED-Controllern
Schließen Sie den RGB-Streifen an das Steuergerät an und stellen Sie sicher, dass jede Farbe mit dem entsprechenden Kabel verbunden ist.
Terminal. RGB-Steuerungen ermöglichen verschiedene Beleuchtungseffekte, wie Farbwechsel, Blinken und benutzerdefinierte Muster. Vergewissern Sie sich, dass der Controller mit Ihrem RGB-Strip und Ihrem Netzteil kompatibel ist. Wenn Sie die Anschlüsse ordnungsgemäß sichern und die Richtlinien des Herstellers befolgen, können Sie einen zuverlässigen Betrieb sicherstellen und mögliche Probleme vermeiden.
Ohne PWM-Verstärker
Mit PWM-Verstärker

Verdrahtung von RGB-LED-Leuchtbändern mit DMX512-Decoder
Verwenden Sie einen DMX512-Decoder für RGB-Streifen in komplexen Setups. Folgen Sie dem Verdrahtungsplan, um eine korrekte Installation zu gewährleisten. DMX512-Decoder ermöglichen eine präzise Steuerung der einzelnen Farbkanäle, was komplizierte Lichteffekte und präzise Farbmischungen ermöglicht. Diese Konfiguration wird häufig in professionellen Beleuchtungsanwendungen verwendet, z. B. bei der Bühnen- und Architekturbeleuchtung. Stellen Sie sicher, dass der DMX512-Decoder richtig eingestellt ist. Schließen Sie ihn an den DMX-Controller an, um die beste Leistung zu erzielen.

Verdrahtung von RGBW-LED-Leuchtbändern
Verdrahtung von RGBW-LED-Leuchtbändern mit dimmbaren LED-Treibern
Schließen Sie den RGBW-Streifen an den dimmbaren Treiber an und stellen Sie sicher, dass alle Farbdrähte (rot, grün, blau, weiß) richtig angeschlossen sind. Mit dimmbaren Treibern für RGBW-Leisten können Sie die Helligkeit der gesamten Leiste einstellen. Für die Farbsteuerung wird jedoch ein zusätzlicher RGBW-Controller benötigt. Vergewissern Sie sich, dass alle Verbindungen sicher sind und dass der Treiber mit Ihrem RGBW-Streifen kompatibel ist, damit er zuverlässig funktioniert.
DALI DT8 RGBW LED-Treiber
Für eine erweiterte RGBW-Steuerung verwenden Sie einen DALI DT8-Treiber. Befolgen Sie die Verdrahtungsanweisungen des Herstellers. DALI DT8-Treiber bieten eine separate Steuerung für jede Farbe. Dies ermöglicht komplexe Lichteffekte und eine präzise Farbmischung. Diese fortschrittliche Steuerung ist ideal für Anwendungen. Sie benötigen eine dynamische und anpassbare Beleuchtung. Der DT8-Treiber muss richtig installiert und konfiguriert werden. Dies gewährleistet eine reibungslose und optimale Leistung Ihrer RGBW-LED-Streifen.

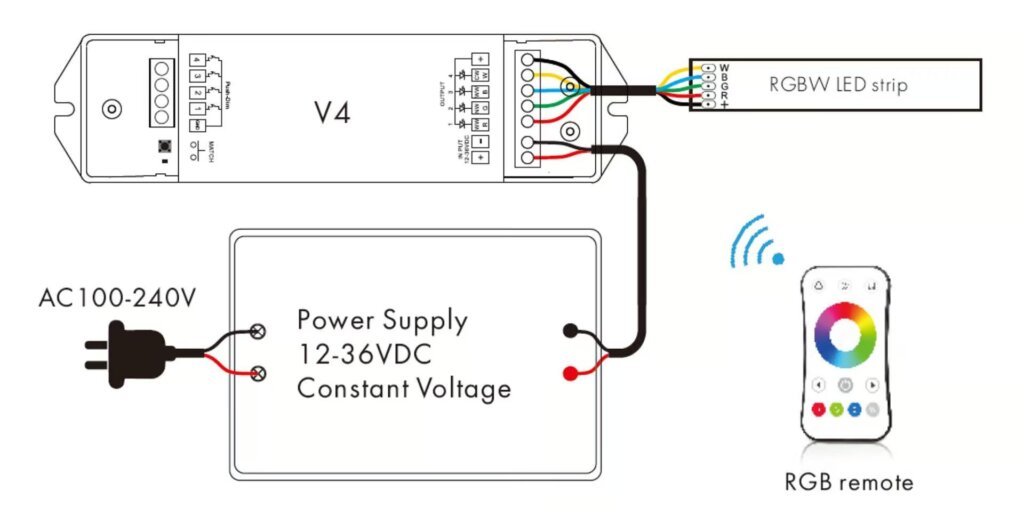
Verdrahtung von RGBW-LED-Leuchtbändern mit LED-Controllern
Schließen Sie den RGBW-Streifen an das Steuergerät an und verbinden Sie alle farbigen Drähte mit den richtigen Anschlüssen. RGBW-Steuerungen ermöglichen verschiedene Beleuchtungseffekte, wie Farbwechsel, Blinken und benutzerdefinierte Muster. Vergewissern Sie sich, dass das Steuergerät mit Ihrem RGBW-Streifen und Ihrer Stromversorgung kompatibel ist. Es ist hilfreich, die Anschlüsse ordnungsgemäß zu sichern und die Richtlinien des Herstellers zu befolgen. Dadurch wird ein zuverlässiger Betrieb gewährleistet und Problemen vorgebeugt.
Ohne PWM-Verstärker
Mit PWM-Verstärker

Verdrahtung von RGBW-LED-Leuchtbändern mit DMX512-Decoder
Verwenden Sie einen DMX512-Decoder für RGBW-Streifen in fortgeschrittenen Setups. Folgen Sie dem Verdrahtungsplan für eine korrekte Installation. DMX512-Decoder ermöglichen eine präzise Kontrolle über jeden Farbkanal. Sie ermöglichen komplexe Lichteffekte und eine exakte Farbmischung. Dieser Aufbau ist in der professionellen Beleuchtung üblich. Sie wird für Bühnen- und Architekturbeleuchtung verwendet. Vergewissern Sie sich, dass der DMX512-Decoder richtig eingestellt und mit dem DMX-Controller verbunden ist. Dies ist für eine optimale Leistung erforderlich.

Verdrahtung von RGB- und CCT-LED-Leuchtbändern
Verdrahtung von RGBW-LED-Leuchtbändern mit dimmbaren LED-Treibern
Folgen Sie dem Verdrahtungsplan, um den RGBW-Streifen an einen dimmbaren Treiber anzuschließen, und stellen Sie sicher, dass alle Verbindungen sicher sind. Mit dimmbaren Treibern für RGBW-Leisten können Sie die Helligkeit der gesamten Leiste einstellen. Für die Farbsteuerung wird jedoch ein zusätzlicher RGBW-Controller benötigt. Vergewissern Sie sich, dass alle Anschlüsse sicher sind und dass der Treiber mit Ihrem RGBW-Streifen kompatibel ist, damit er zuverlässig funktioniert.
Verdrahtung von RGBW-LED-Leuchtbändern mit LED-Controllern
Schließen Sie den Streifen an das Steuergerät an, indem Sie die Drähte mit den entsprechenden Anschlüssen verbinden. RGBW-Steuerungen ermöglichen verschiedene Beleuchtungseffekte, wie Farbwechsel, Blinken und benutzerdefinierte Muster. Vergewissern Sie sich, dass das Steuergerät mit Ihrem RGBW-Streifen und der Stromversorgung kompatibel ist. Wenn Sie die Verbindungen ordnungsgemäß sichern und die Richtlinien des Herstellers befolgen, können Sie einen zuverlässigen Betrieb sicherstellen und mögliche Probleme vermeiden.
Ohne PWM-Verstärker

Mit PWM-Verstärker

Verdrahtung von RGBW-LED-Leuchtbändern mit DMX512-Decoder
Verwenden Sie einen DMX512-Decoder für komplexe Setups. Folgen Sie dem Verdrahtungsplan, um eine ordnungsgemäße Installation zu gewährleisten. DMX512-Decoder bieten eine präzise Kontrolle über jeden Farbkanal. Sie ermöglichen komplexe Lichteffekte und eine exakte Farbmischung. Diese Konfiguration wird häufig in professionellen Beleuchtungsanwendungen verwendet, z. B. bei der Bühnen- und Architekturbeleuchtung. Stellen Sie sicher, dass der DMX512-Decoder richtig konfiguriert ist. Schließen Sie ihn an den DMX-Controller an, um eine optimale Leistung zu erzielen.

Verdrahtung adressierbarer LED-Leuchtbänder
Verdrahtung von SPI-adressierbaren LED-Streifenleuchten
Schließen Sie die Daten- und Stromkabel des SPI-adressierbaren Streifens an den Controller an und folgen Sie dabei dem mitgelieferten Schaltplan. Adressierbare LED-Streifen ermöglichen die individuelle Steuerung jeder LED, wodurch komplexe Lichteffekte und -muster möglich sind. Vergewissern Sie sich, dass der Controller mit Ihrem SPI-adressierbaren Streifen kompatibel ist und dass alle Verbindungen sicher sind. Wenn Sie das Steuergerät richtig konfigurieren und die Anweisungen des Herstellers befolgen, können Sie einen zuverlässigen Betrieb sicherstellen und mögliche Probleme vermeiden.
SPI-adressierbare LED-Leuchtbänder mit nur einem Datenkanal
Vergewissern Sie sich, dass die Datenleitung sicher mit dem Steuergerät verbunden ist. Diese Konfiguration ermöglicht die grundlegende Steuerung von adressierbaren LEDs. Damit können Sie benutzerdefinierte Lichteffekte erzeugen. Wenn Sie das Datenkabel ordnungsgemäß befestigen und den Schaltplan befolgen, können Sie einen zuverlässigen Betrieb sicherstellen und mögliche Probleme vermeiden.

SPI-adressierbare LED-Leuchtbänder mit Daten- und Taktkanälen
Schließen Sie sowohl die Daten- als auch die Taktleitung an den Controller an, um eine sichere Verbindung zu gewährleisten. Diese Konfiguration ermöglicht eine präzisere Steuerung der adressierbaren LEDs und ermöglicht komplexe Lichteffekte und -muster. Die ordnungsgemäße Konfiguration des Steuergeräts und die Befolgung der Anweisungen des Herstellers tragen dazu bei, einen zuverlässigen Betrieb zu gewährleisten und mögliche Probleme zu vermeiden.

SPI-adressierbare LED-Leuchtbänder mit Daten- und Backup-Datenkanälen
Folgen Sie dem Verdrahtungsplan, um die Daten-, Takt- und Sicherungsdatenleitungen mit dem Controller zu verbinden. Diese Konfiguration bietet Redundanz und gewährleistet einen zuverlässigen Betrieb, selbst wenn ein Datenkanal ausfällt. Die ordnungsgemäße Sicherung aller Verbindungen ist entscheidend. Die Befolgung der Anweisungen des Herstellers ist dabei hilfreich. Dies gewährleistet einen zuverlässigen Betrieb und verhindert mögliche Probleme.
Verdrahtung von DMX512-adressierbaren LED-Leuchtbändern
Verwenden Sie einen DMX512-Decoder für adressierbare Leisten. Folgen Sie dem Verdrahtungsplan für eine ordnungsgemäße Installation. DMX512-Decoder bieten eine präzise Steuerung jeder einzelnen LED und ermöglichen komplexe Lichteffekte und -muster. Diese Konfiguration wird häufig in professionellen Beleuchtungsanwendungen verwendet, z. B. bei der Bühnen- und Architekturbeleuchtung. Stellen Sie sicher, dass der DMX512-Decoder richtig eingestellt ist. Schließen Sie ihn an den DMX-Controller an. Dies ist der Schlüssel für eine optimale Leistung.

FAQs
- Wie werden LED-Streifen verdrahtet?
- Für jedes Segment sind die LEDs in Reihe geschaltet, d. h. die Betriebsspannungen werden addiert, wodurch sich die erforderliche höhere Spannung ergibt. Alle Segmente werden parallel verdrahtet, sodass sie die gleiche Spannung erhalten, aber die Stromaufnahme steigt mit der Länge des Streifens. Die Kenntnis dieser Verdrahtungsmethode hilft, eine gleichmäßige Helligkeit zu erhalten und Probleme wie ungleichmäßige Beleuchtung oder Flackern zu vermeiden.
- Welche Farben haben die Drähte von LED-Lichtleisten?
- RGB-Leuchtbänder haben einen 4-Draht-Anschluss: Grün, Rot, Blau für die LEDs und Schwarz/Weiß für den gemeinsamen +12V-Anschluss. Der korrekte Anschluss dieser Drähte an die entsprechenden Klemmen des Steuergeräts oder der Stromversorgung gewährleistet den korrekten Betrieb und die Farbmischung.
- Was sind 4 Drähte in einem LED-Lichtband?
- Für RGB-Streifen benötigen Sie 4 Drähte: einen Nullleiter (gelb) und der Rest steuert die 3 LED-Farben (rot, grün, blau). Der korrekte Anschluss dieser Drähte gewährleistet die korrekte Farbsteuerung und den Betrieb der Leiste.
- Wie viele Drähte für einen LED-Streifen?
- Der RGBW-LED-Streifen hat fünf Drähte: rot, grün, blau, weiß und positiv. Schließen Sie den LED-Streifen an die entsprechende Markierung auf dem RGBW-LED-Lichtsteuergerät an. Stellen Sie sicher, dass alle Verbindungen sicher sind und folgen Sie dem vom Hersteller bereitgestellten Verdrahtungsplan, um mögliche Probleme zu vermeiden und einen zuverlässigen Betrieb zu gewährleisten.
Schlussfolgerung
Die Verdrahtung von LED-Leuchtbändern muss nicht einschüchternd sein. Mit diesem Leitfaden haben Sie nun das Wissen, um verschiedene Arten von LED-Lichtbändern zu verdrahten und eine erfolgreiche und sichere Installation zu gewährleisten. Viel Spaß bei der Beleuchtung!
Schließen
Die Auswahl der richtigen flimmerfreien dimmbaren LED-Treiber ist entscheidend für die Optimierung Ihrer Beleuchtung und damit für Ihr allgemeines Wohlbefinden und Ihren Komfort. Die Abwesenheit von Flimmern ist entscheidend für das Komfortgefühl in Ihren Wohnräumen.
In diesem Artikel gehen wir auf die folgenden Aspekte ein, um Sie bei der Auswahl der idealen flackerfrei dimmenden LED-Treiber zu unterstützen:
Wir werden wesentliche Merkmale wie Spezifikationen, Kompatibilität und Effizienz untersuchen, um jegliches Flackern in der Beleuchtung zu vermeiden. Darüber hinaus werden wir die Bedeutung einer hohen PWM-Frequenz erörtern, um flimmerfreie Ergebnisse in der dimmbaren LED-Treiber-Serie zu erzielen.
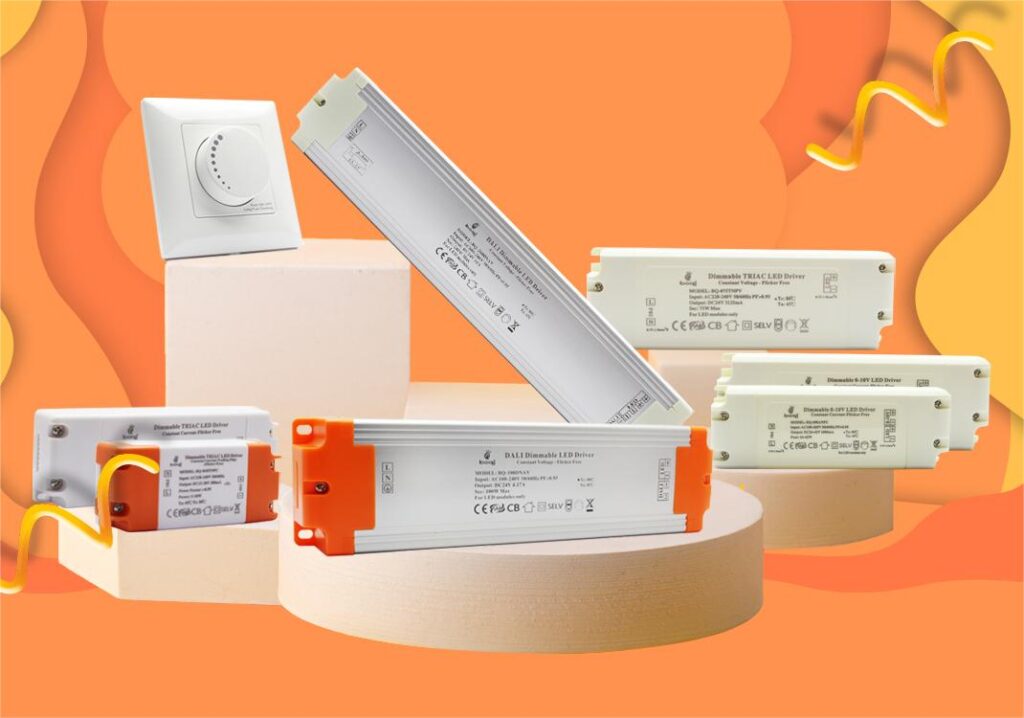
Kaufen Dimmbare LED-Treiber von boqi
Es ist wichtig, über die häufigsten Ursachen des Lichtflackerns informiert zu sein, aber die Auswahl des geeigneten dimmbaren LED-Treibers ist noch nicht abgeschlossen. Um die gewünschten Beleuchtungs- und Dimm-Effekte zu erzielen, ist die Zusammenarbeit mit einem renommierten Hersteller von LED-Treibern unerlässlich. boqi zeichnet sich als renommierter Hersteller von dimmbaren LED-Treibern aus und bietet eine Reihe von flimmerfreien Dimmern und Steuerungen an. Die Produktpalette umfasst TRIAC-, 0-10V- und DALI-LED-Treiber, Dimmer und Controller.
Das Unternehmen, das seine Produktionsstätten in China hat, ist auf die unterschiedlichen Bedürfnisse und Spezifikationen seiner Kunden eingestellt. Wenn Sie Fragen zu Ihrem Bedarf an LED-Treibern oder -Controllern haben, zögern Sie nicht, uns zu kontaktieren, damit wir Sie bei der Auswahl unterstützen können.