Le câblage des bandes LED peut sembler intimidant. Mais avec les bons conseils, c'est un processus simple. Il peut embellir votre espace. Il s'adresse aux bricoleurs, aux propriétaires désireux d'ajouter une ambiance et aux électriciens qui ont un nouveau projet. Ce guide vous simplifiera le câblage.
Pour câbler les bandes de LED, commencez par identifier le type de bande (unicolore, RGB ou RGBW). Connectez les fils positif et négatif aux bornes correspondantes de votre bloc d'alimentation ou de votre contrôleur. Pour les bandes RVB, faites correspondre les couleurs (rouge, vert, bleu) aux bornes appropriées. Veillez à ce que toutes les connexions soient sûres et suivez le schéma de câblage fourni pour obtenir des instructions précises.
Entrons dans les détails du câblage des différents types de bandes LED. Cela vous permettra d'acquérir les connaissances et la confiance nécessaires pour bien faire les choses.
Comprendre la connexion parallèle : Simplifié
Les connexions parallèles sont cruciales dans l'éclairage par bandes LED. Chaque segment de la bande est câblé en série, ce qui signifie que les tensions de fonctionnement sont additionnées, fournissant ainsi la tension supérieure nécessaire. Tous les segments sont câblés en parallèle, recevant la même tension, mais le courant absorbé augmente avec la longueur de la bande. Utilisez des connexions parallèles. Elles garantissent que chaque segment de la bande reçoit une tension constante. Cela permet d'éviter les problèmes de luminosité inégale ou de scintillement. Cette configuration est essentielle pour les longues bandes de LED. Elle permet de conserver une lumière stable et homogène. Comprendre les principes de base du câblage en parallèle peut grandement améliorer l'efficacité et la fiabilité de votre installation d'éclairage à LED.


Chute de tension : une explication simple
La chute de tension se produit lorsque la tension à l'extrémité de la bande est inférieure à celle du début. Cela peut entraîner une diminution de la luminosité des DEL situées à l'extrémité de la bande. Pour atténuer la chute de tension, utilisez des fils plus épais ou des bandes plus courtes, ou injectez de l'énergie en plusieurs points de la bande. Il est essentiel de planifier soigneusement votre installation afin de minimiser la chute de tension, en particulier sur les longues distances. Une bonne méthode consiste à utiliser des amplificateurs de puissance. Utilisez-les à intervalles réguliers. Ils permettent de maintenir une tension constante sur la bande. Le choix d'un meilleur bloc d'alimentation avec une capacité suffisante peut également réduire le risque de chute de tension. En comprenant et en corrigeant les chutes de tension, vous pouvez garantir le bon fonctionnement de vos bandes LED. Elles fourniront une lumière homogène sur l'ensemble de l'installation.
Amplificateur PWM : De la complexité à la simplicité
Un amplificateur à modulation de largeur d'impulsion (PWM) augmente le signal vers les bandes de LED, ce qui permet d'obtenir une luminosité constante sur de longues bandes. Il veille à ce que le signal d'alimentation reste fort, évitant ainsi les variations d'intensité ou le scintillement. Les amplificateurs PWM sont utiles dans les grandes installations. Ils assurent l'uniformité de la luminosité, ce qui est essentiel. Ces amplificateurs régénèrent le signal PWM. Ils étendent la portée effective de vos bandes LED. Cela permet de s'assurer que chaque section reçoit la bonne tension et le bon courant. L'installation d'amplificateurs PWM est simple. Vous pouvez les ajouter à votre installation. En les plaçant et en les installant correctement, les amplificateurs PWM peuvent grandement améliorer l'éclairage par bandes de LED. Ils peuvent augmenter les performances et la longévité.
Types de bandes LED
Il existe différents types de bandes de LED : unicolore, RVB (rouge, vert, bleu), RVBW (rouge, vert, bleu, blanc) et blanc accordable. Chaque type nécessite un câblage et des contrôleurs différents. Les bandes unicolores sont les plus simples, avec seulement deux fils pour les connexions positives et négatives. Les bandes RVB ajoutent trois canaux de couleur, nécessitant un contrôleur pour mélanger les couleurs. Les bandes RGBW comprennent un canal blanc supplémentaire pour des options d'éclairage plus nuancées. Les bandes blanches réglables permettent d'ajuster la température de couleur, offrant une gamme de lumière blanche allant du chaud au froid. Connaître les différences entre ces types de bandes LED peut vous aider à choisir le produit le mieux adapté à vos besoins. Cela vous permettra également d'assurer une installation et une utilisation correctes.
Comment câbler une bande de LED unicolore
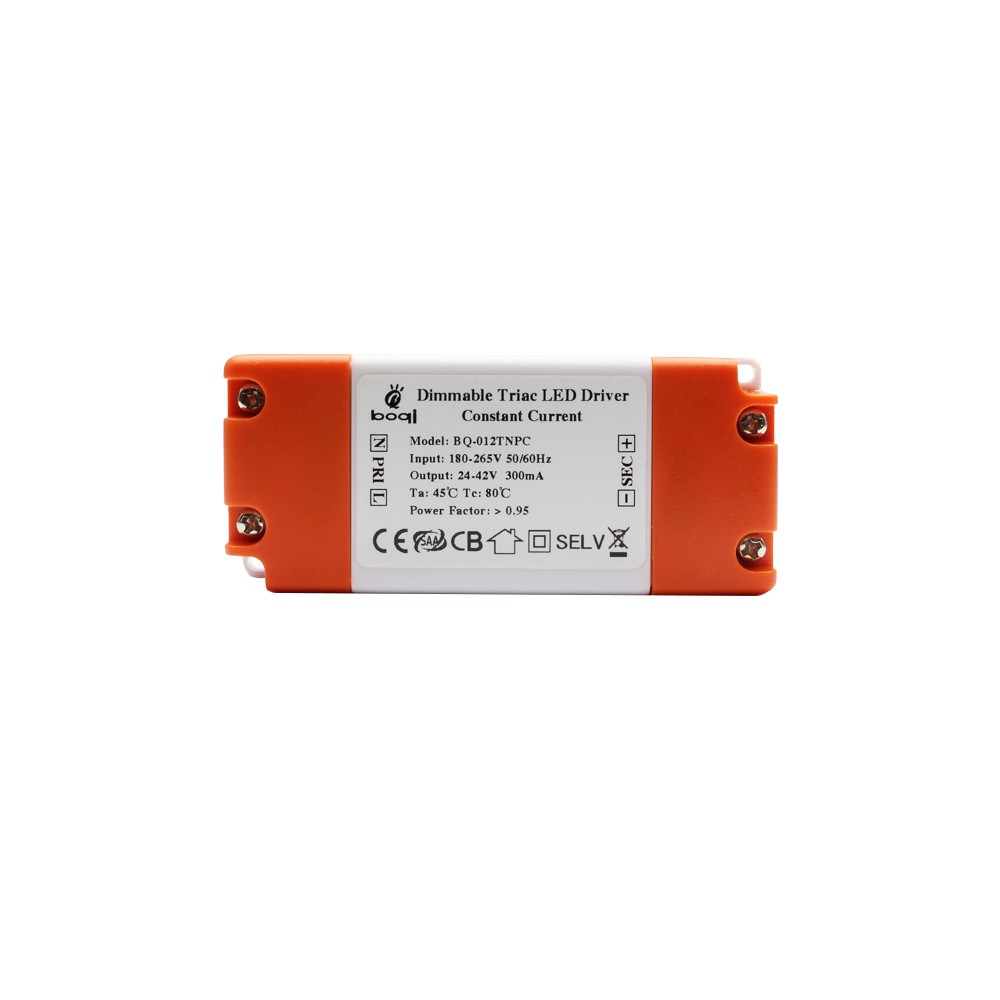
Câblage de bandes de LED unicolores avec des pilotes de LED non graduables
Pour les pilotes de LED non graduables, connectez le fil positif de la bande à la borne positive du pilote. Ensuite, connectez le fil négatif de la bande à la borne négative du pilote. Fixez toutes les connexions et mettez l'appareil sous tension. Cette méthode de câblage simple convient parfaitement aux installations de base. Elles ne nécessitent pas de gradation. Les pilotes non graduables fournissent une sortie constante. Cela permet à vos bandes de LED de donner le meilleur d'elles-mêmes. Lors du câblage de plusieurs bandes, il est important de s'assurer que la puissance totale ne dépasse pas la capacité du pilote. Il est essentiel de sécuriser toutes les connexions. Suivez les instructions du fabricant. Vous éviterez ainsi les problèmes électriques et garantirez une installation sûre et fiable.
Câblage d'une bande de LED unicolore avec un pilote de LED à gradations
Les pilotes de LED à gradation vous permettent de régler la luminosité. Connectez la bande au pilote comme décrit ci-dessus. Suivez le schéma de câblage spécifique à votre type de variateur :
– Diagramme de connexion du pilote de LED à gradation 0-10V
Un variateur 0-10V utilise un signal de commande basse tension pour régler la luminosité. Connectez le gradateur 0-10V aux bornes de commande du pilote, en veillant à respecter la polarité. Cette configuration permet une gradation en douceur sur l'ensemble de la gamme.


– Diagramme de connexion du pilote de LED à gradation Triac
Les gradateurs à triac fonctionnent avec une gradation à coupure de phase en courant alternatif. Connectez le pilote à un gradateur à triac compatible, en veillant à ce que l'entrée du pilote corresponde à la sortie du gradateur. Cette méthode offre une expérience de gradation familière similaire à celle des ampoules à incandescence traditionnelles.

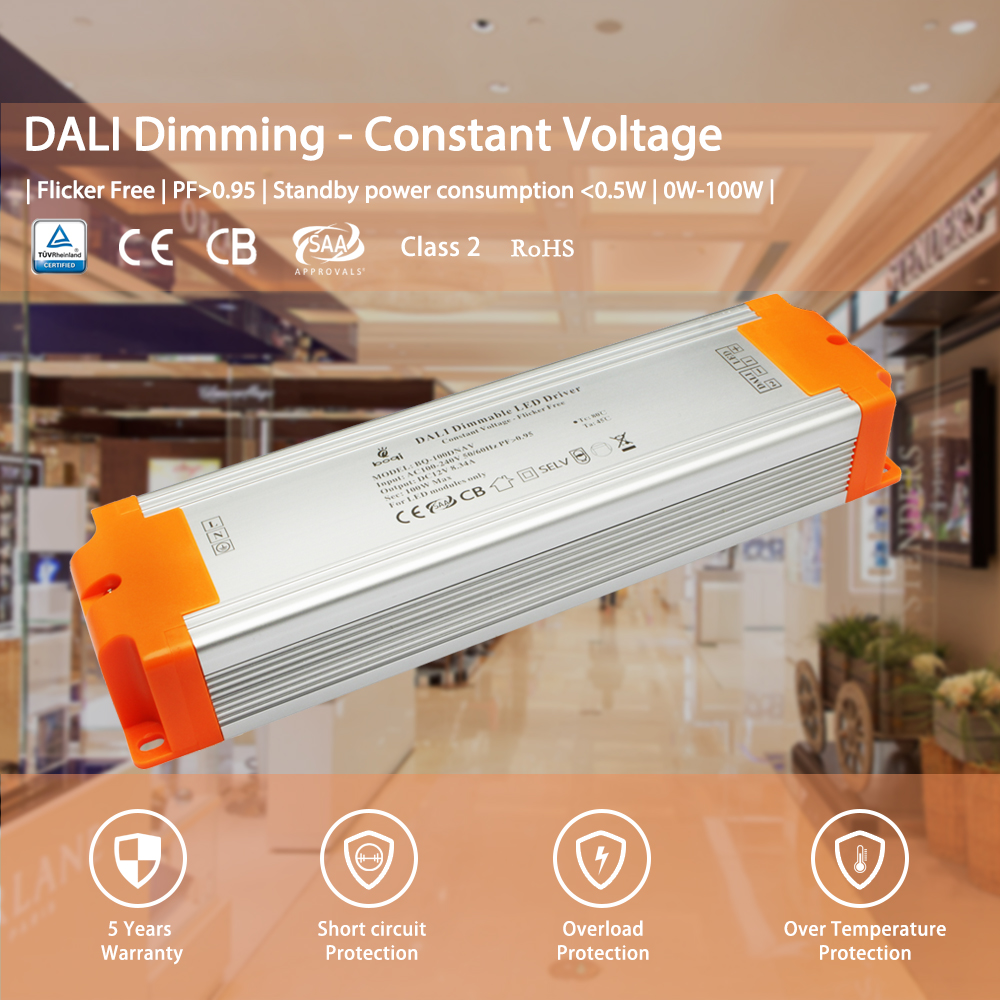
– Diagramme de connexion du pilote de LED à gradation DALI
Les gradateurs DALI (Digital Addressable Lighting Interface) offrent un contrôle précis et une grande facilité de programmation. Connectez les lignes de commande DALI aux bornes d'entrée DALI du pilote. Cette configuration est idéale pour les systèmes d'éclairage complexes nécessitant des fonctions de contrôle avancées.

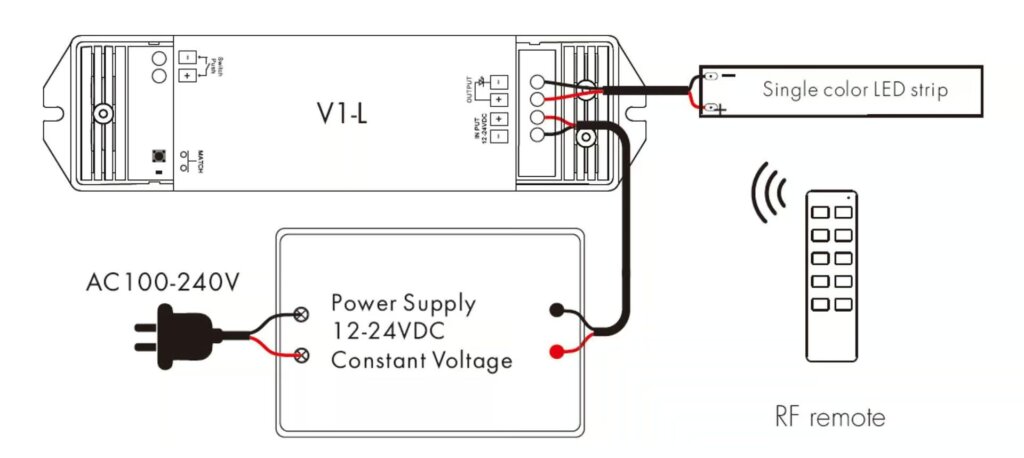
Câblage de bandes de LED unicolores avec des contrôleurs de LED
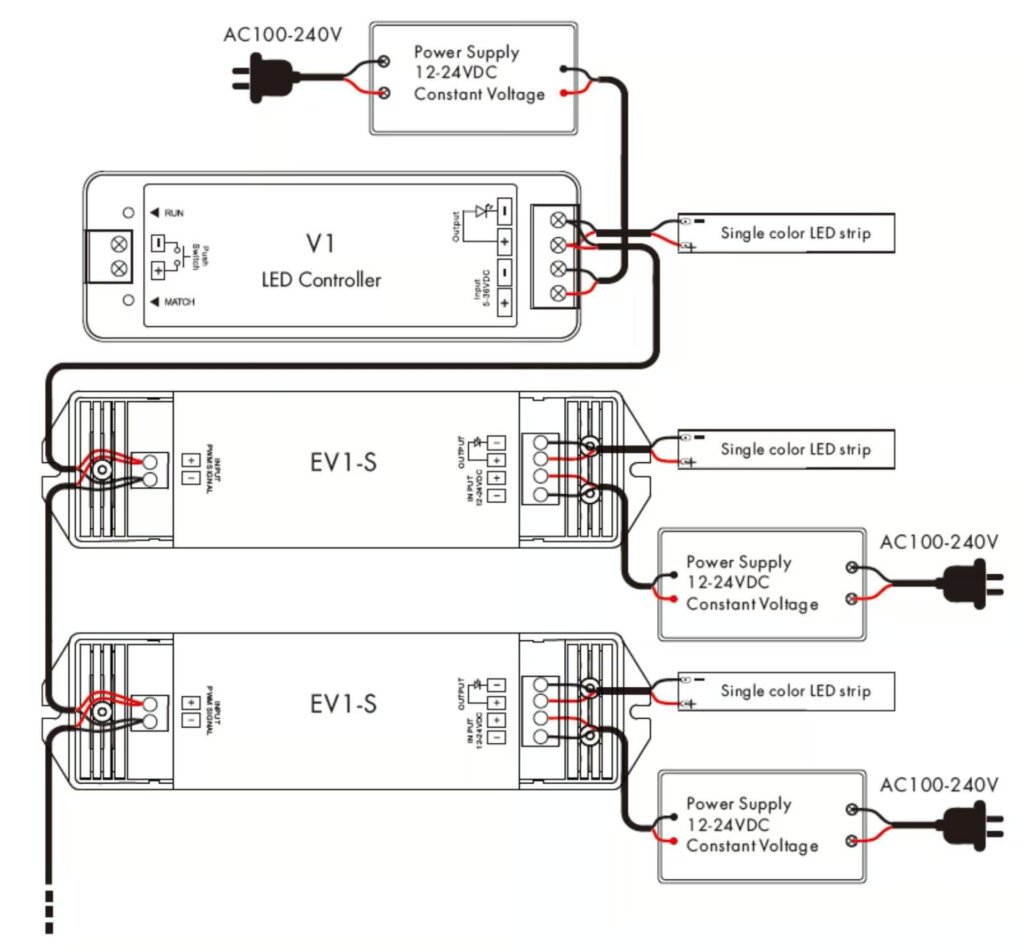
Les contrôleurs de LED offrent une plus grande flexibilité dans le contrôle des lumières. Connectez la bande au contrôleur. Assurez-vous que les fils positif et négatif correspondent aux bornes du contrôleur. Les contrôleurs permettent d'obtenir divers effets, tels que la gradation, le clignotement et des modèles d'éclairage personnalisés. Assurez-vous que le contrôleur est compatible avec votre bande LED et votre alimentation. Il est essentiel de fixer correctement les connexions. Le respect des directives du fabricant garantira un fonctionnement fiable et évitera les problèmes potentiels.
Sans amplificateur PWM
Avec amplificateur PWM
Câblage d'une bande de LED unicolore avec un décodeur DMX512
Les décodeurs DMX512 sont utilisés pour les installations d'éclairage avancées. Connectez la bande au décodeur en faisant correspondre les fils positifs et négatifs aux bornes appropriées. DMX512 est un protocole de communication numérique. Il est utilisé pour le contrôle de l'éclairage et permet un contrôle précis sur de nombreux canaux. Cette configuration est courante dans l'éclairage de scène. Elle est également utilisée pour l'éclairage architectural et d'autres applications professionnelles. Assurez-vous que le décodeur DMX512 est correctement configuré. Connectez-le au contrôleur DMX pour obtenir les meilleures performances.

Comment câbler une bande de LED blanches accordables
Câblage de bandes lumineuses à LED blanches accordables avec des pilotes de LED à gradation
Les bandes de LED blanches réglables permettent d'ajuster la température de couleur. Connectez les fils selon les instructions du pilote, en veillant à ce que les connexions soient correctes pour le contrôle de la température de couleur et de la luminosité. Les bandes blanches accordables sont généralement dotées de lignes de commande supplémentaires permettant de régler la température de couleur. Ces bandes peuvent passer du blanc chaud au blanc froid, offrant ainsi des options d'éclairage polyvalentes. Assurez-vous que votre pilote de LED à gradation est compatible avec les bandes blanches à gradation et que toutes les connexions sont sûres pour un fonctionnement fiable.
DALI DT8 Tunable White LED Driver (pilote de LED blanches accordables)
Les pilotes DALI DT8 sont utilisés pour le contrôle précis des bandes blanches accordables. Suivez le schéma de câblage fourni par le fabricant. Les pilotes DALI DT8 prennent en charge les bandes de LED blanches réglables. Ils permettent un contrôle indépendant de la luminosité et de la température de couleur. Cette capacité de contrôle avancée est idéale pour les applications nécessitant des environnements lumineux dynamiques. Un câblage et une configuration corrects du pilote DALI DT8 garantissent un fonctionnement sans heurts et des performances optimales de vos barrettes de LED blanches accordables.

Câblage de bandes lumineuses à LED blanches accordables avec des contrôleurs de LED
Connecter la bande blanche accordable au contrôleur, en faisant correspondre les bornes positives et négatives. Veillez à ce que les connexions soient sûres pour un fonctionnement fiable. Les contrôleurs de LED pour bandes blanches accordables permettent des réglages précis de la température de couleur et de la luminosité. Ces contrôleurs sont souvent fournis avec des télécommandes ou peuvent être intégrés à des systèmes domestiques intelligents pour plus de commodité. Une installation et une configuration correctes du contrôleur garantissent un fonctionnement cohérent et fiable.
Sans amplificateur PWM

Câblage d'une bande de LED blanches accordables avec un décodeur DMX512

Utilisez un décodeur DMX512 pour les bandes blanches accordables dans les configurations avancées. Connectez la bande au décodeur en suivant le schéma de câblage pour une installation correcte. Les décodeurs DMX512 permettent un contrôle précis de la température de couleur et de la luminosité. Ils sont idéaux pour l'éclairage professionnel. Assurez-vous que le décodeur est correctement connecté au contrôleur DMX et que toutes les connexions sont sûres pour une performance optimale.
Bande LED blanche accordable à deux fils
Les bandes blanches accordables plus simples utilisent deux fils pour le contrôle de la température de la couleur. Connectez ces fils aux bornes appropriées de votre contrôleur ou pilote. Ce type de bande blanche accordable présente généralement une configuration de câblage plus simple, ce qui en facilite l'installation. Cependant, il peut offrir moins d'options de contrôle que les systèmes blancs accordables plus avancés. Assurez-vous que votre contrôleur ou pilote est compatible avec la configuration à deux fils pour un fonctionnement fiable.

Comment câbler une bande de LED RVB
Câblage des bandes de LED RVB avec des pilotes de LED à gradation
Connectez la bande RVB au pilote de gradation, en faisant correspondre les fils rouge, vert et bleu aux bornes correspondantes. Utilisez le schéma de câblage fourni. Les pilotes à gradation pour les bandes RVB vous permettent de régler la luminosité de l'ensemble de la bande. Cependant, le contrôle des couleurs nécessite un contrôleur RVB supplémentaire. Assurez-vous que toutes les connexions sont sûres et que le pilote est compatible avec votre bande RVB pour un fonctionnement fiable.
Pilote de LED RVB DALI DT8
Pour un contrôle RVB avancé, utilisez un pilote DALI DT8. Suivez le schéma de câblage du fabricant pour une installation précise. Les pilotes DALI DT8 permettent de contrôler séparément chaque couleur. Cela permet de réaliser des éclairages complexes et des mélanges de couleurs précis. Ce contrôle avancé est idéal pour les applications qui nécessitent un éclairage dynamique. Elles ont besoin d'un éclairage personnalisable. Une installation et une configuration correctes du pilote DALI DT8 garantissent le bon fonctionnement de vos bandes LED RVB. Leurs performances seront optimales.

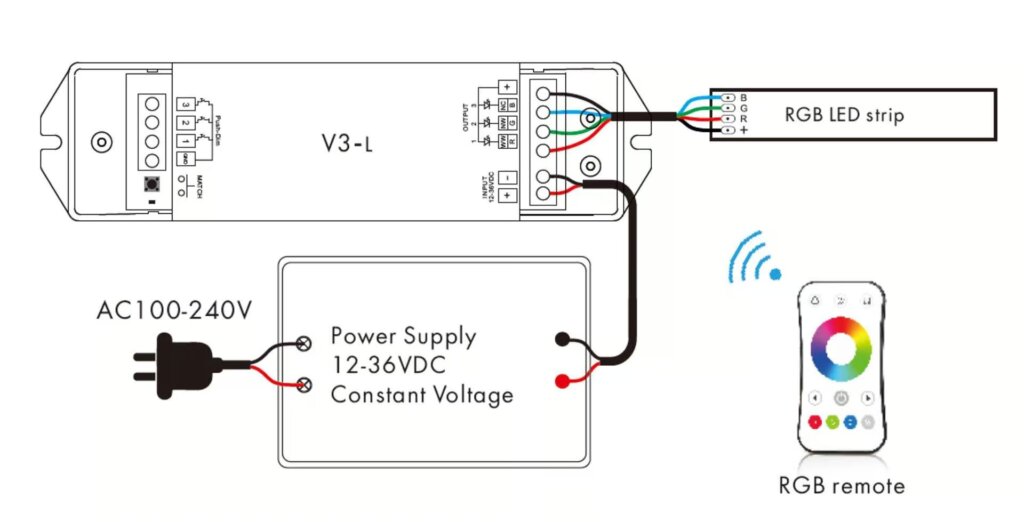
Câblage des bandes de LED RVB avec des contrôleurs de LED
Connectez la bande RVB au contrôleur, en veillant à ce que chaque fil de couleur soit connecté à l'élément approprié.
terminal. Les contrôleurs RVB permettent d'obtenir divers effets d'éclairage, tels que le changement de couleur, le clignotement et les motifs personnalisés. Assurez-vous que le contrôleur est compatible avec votre bande RVB et votre bloc d'alimentation. En fixant correctement les connexions et en suivant les instructions du fabricant, vous garantirez un fonctionnement fiable et éviterez les problèmes potentiels.
Sans amplificateur PWM
Avec amplificateur PWM

Câblage d'une bande de LED RVB avec un décodeur DMX512
Utilisez un décodeur DMX512 pour les bandes RVB dans les installations complexes. Suivez le schéma de câblage pour assurer une installation correcte. Les décodeurs DMX512 permettent un contrôle précis de chaque canal de couleur, ce qui permet d'obtenir des effets d'éclairage complexes et un mélange précis des couleurs. Cette configuration est couramment utilisée dans les applications d'éclairage professionnel, telles que l'éclairage de scène et l'éclairage architectural. Assurez-vous que le décodeur DMX512 est correctement configuré. Connectez-le au contrôleur DMX pour obtenir les meilleures performances.

Comment câbler une bande de LED RGBW
Câblage des bandes de LED RGBW avec des pilotes de LED à gradation
Connectez la bande RGBW au pilote de gradation en veillant à ce que tous les fils de couleur (rouge, vert, bleu, blanc) soient correctement connectés. Les pilotes de gradation pour les bandes RGBW vous permettent de régler la luminosité de l'ensemble de la bande. Cependant, le contrôle des couleurs nécessite un contrôleur RGBW supplémentaire. Assurez-vous que toutes les connexions sont sûres et que le pilote est compatible avec votre bande RGBW pour un fonctionnement fiable.
Pilote de LED DALI DT8 RGBW
Pour un contrôle RGBW avancé, utilisez un pilote DALI DT8. Suivez les instructions de câblage du fabricant. Les pilotes DALI DT8 permettent de contrôler séparément chaque couleur. Cela permet d'obtenir des effets d'éclairage complexes et un mélange précis des couleurs. Ce contrôle avancé est idéal pour les applications. Elles ont besoin d'un éclairage dynamique et personnalisable. Le pilote DT8 doit être correctement installé et configuré. Cela garantit des performances optimales et régulières de vos bandes LED RGBW.

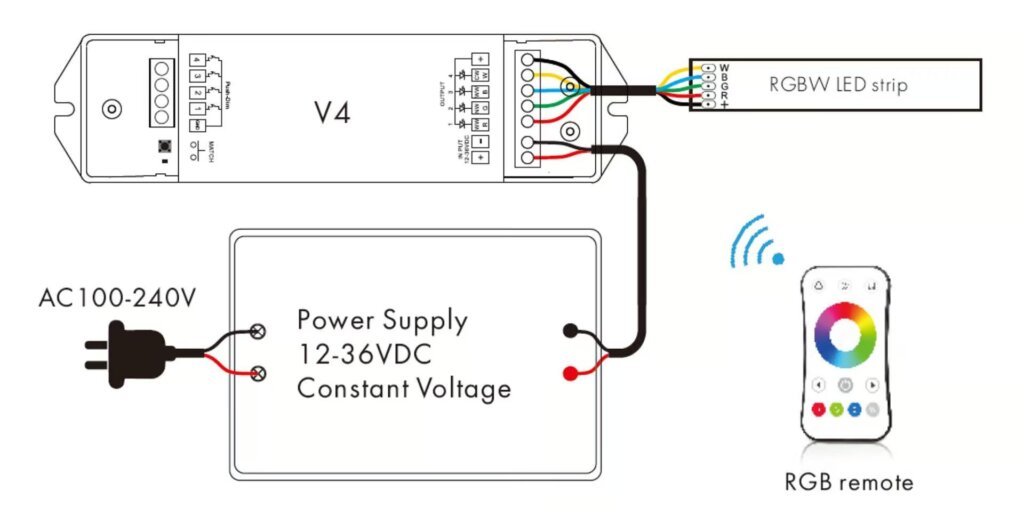
Câblage des bandes de LED RGBW avec des contrôleurs de LED
Connectez la bande RGBW au contrôleur, en faisant correspondre tous les fils de couleur aux bornes correctes. Les contrôleurs RGBW permettent d'obtenir divers effets d'éclairage, tels que le changement de couleur, le clignotement et les motifs personnalisés. Assurez-vous que le contrôleur est compatible avec votre bande RGBW et votre alimentation. Il est utile de sécuriser correctement les connexions et de suivre les directives du fabricant. Cela garantira un fonctionnement fiable et évitera les problèmes.
Sans amplificateur PWM
Avec amplificateur PWM

Câblage de bandes lumineuses LED RGBW avec décodeur DMX512
Utilisez un décodeur DMX512 pour les bandes RGBW dans les configurations avancées. Suivez le schéma de câblage pour une installation correcte. Les décodeurs DMX512 permettent un contrôle précis de chaque canal de couleur. Ils permettent d'obtenir des effets d'éclairage complexes et de mélanger les couleurs avec précision. Cette configuration est courante dans l'éclairage professionnel. Elle est utilisée pour l'éclairage de scène et l'éclairage architectural. Assurez-vous que le décodeur DMX512 est configuré et connecté au contrôleur DMX. Cela est nécessaire pour obtenir les meilleures performances.

Comment câbler les bandes de LED RVB et CCT
Câblage des bandes de LED RGBW avec des pilotes de LED à gradation
Suivez le schéma de câblage pour connecter la bande RGBW à un pilote de gradation, en veillant à ce que toutes les connexions soient sûres. Les pilotes à gradation pour les bandes RGBW vous permettent de régler la luminosité de l'ensemble de la bande. Cependant, le contrôle des couleurs nécessite un contrôleur RGBW supplémentaire. Assurez-vous que toutes les connexions sont sûres et que le pilote est compatible avec votre bande RGBW pour un fonctionnement fiable.
Câblage des bandes de LED RGBW avec des contrôleurs de LED
Connectez la bande au contrôleur, en faisant correspondre les fils aux bornes appropriées. Les contrôleurs RGBW permettent d'obtenir divers effets d'éclairage, tels que le changement de couleur, le clignotement et les motifs personnalisés. Assurez-vous que le contrôleur est compatible avec votre bande RGBW et votre alimentation. Le fait de fixer correctement les connexions et de suivre les directives du fabricant permet de garantir un fonctionnement fiable et d'éviter les problèmes potentiels.
Sans amplificateur PWM

Avec amplificateur PWM

Câblage de bandes lumineuses LED RGBW avec décodeur DMX512
Utilisez un décodeur DMX512 pour les installations complexes. Suivez le schéma de câblage pour assurer une installation correcte. Les décodeurs DMX512 permettent un contrôle précis de chaque canal de couleur. Ils permettent d'obtenir des effets d'éclairage complexes et de mélanger les couleurs avec précision. Cette configuration est couramment utilisée dans les applications d'éclairage professionnel, telles que l'éclairage de scène et l'éclairage architectural. Assurez-vous que le décodeur DMX512 est correctement configuré. Connectez-le au contrôleur DMX pour obtenir les meilleures performances.

Comment câbler une bande de LED adressable
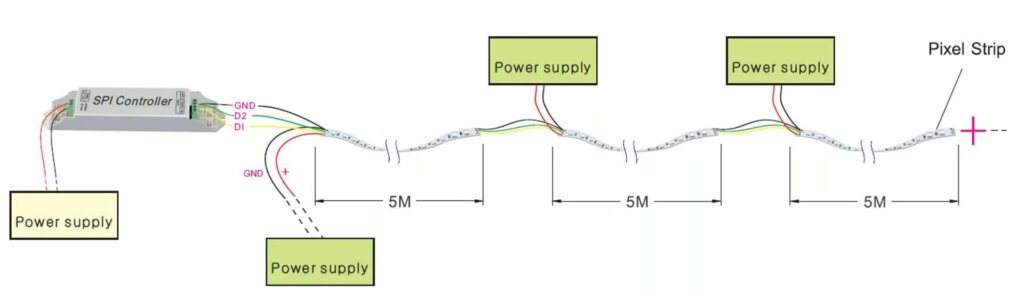
Comment câbler une bande de LED adressable SPI
Connectez les fils de données et d'alimentation de la barrette adressable SPI au contrôleur, en suivant le schéma de câblage fourni. Les bandes de LED adressables permettent de contrôler individuellement chaque LED, ce qui permet d'obtenir des effets et des modèles d'éclairage complexes. Assurez-vous que le contrôleur est compatible avec votre bande SPI adressable et que toutes les connexions sont sécurisées. Une configuration correcte du contrôleur et le respect des instructions du fabricant permettront d'assurer un fonctionnement fiable et d'éviter les problèmes potentiels.
Bande LED adressable SPI avec canal de données uniquement
Veillez à ce que le fil de données soit bien connecté au contrôleur. Cette configuration permet un contrôle de base des LED adressables. Elle vous permet de créer des effets d'éclairage personnalisés. Le fait de fixer correctement le câble de données et de suivre le schéma de câblage permet d'assurer un fonctionnement fiable et d'éviter les problèmes potentiels.

Bande LED adressable SPI avec canaux de données et d'horloge
Connectez les fils de données et d'horloge au contrôleur, en veillant à ce que les connexions soient sûres. Cette configuration permet un contrôle plus précis des LED adressables, ce qui permet d'obtenir des effets et des modèles d'éclairage complexes. Une configuration correcte du contrôleur et le respect des instructions du fabricant permettront d'assurer un fonctionnement fiable et d'éviter les problèmes potentiels.

Bande LED adressable SPI avec canaux de données et de sauvegarde
Suivez le schéma de câblage pour connecter les fils de données, d'horloge et de données de sauvegarde au contrôleur. Cette configuration assure la redondance, garantissant un fonctionnement fiable même en cas de défaillance d'un canal de données. Il est essentiel de sécuriser correctement toutes les connexions. Il est utile de suivre les instructions du fabricant. Cela permet d'assurer un fonctionnement fiable et d'éviter les problèmes potentiels.
Comment câbler une bande de LED adressables DMX512
Utilisez un décodeur DMX512 pour les bandes adressables. Suivez le schéma de câblage pour une installation correcte. Les décodeurs DMX512 permettent un contrôle précis de chaque LED, ce qui permet d'obtenir des effets et des motifs d'éclairage complexes. Cette configuration est couramment utilisée dans les applications d'éclairage professionnel, telles que l'éclairage de scène et l'éclairage architectural. Assurez-vous que le décodeur DMX512 est correctement installé. Connectez-le au contrôleur DMX. C'est la clé d'une performance optimale.

FAQ
- Comment les bandes LED sont-elles câblées ?
- Pour chaque segment, les LED sont câblées en série, ce qui signifie que les tensions de fonctionnement sont additionnées, ce qui permet d'obtenir la tension la plus élevée nécessaire. Tous les segments sont câblés en parallèle, de sorte qu'ils reçoivent la même tension, mais le courant absorbé augmente avec la longueur de la bande. La compréhension de cette méthode de câblage permet de maintenir une luminosité constante et d'éviter des problèmes tels qu'un éclairage inégal ou un scintillement.
- Quelles sont les couleurs des fils des bandes lumineuses à LED ?
- La bande lumineuse RVB possède une connexion à 4 fils : vert, rouge, bleu pour les LED, et noir/blanc pour la connexion commune +12V. L'association correcte de ces fils aux bornes correspondantes du contrôleur ou du bloc d'alimentation garantit un fonctionnement correct et un mélange des couleurs.
- Qu'est-ce que les 4 fils d'une bande LED ?
- Pour les bandes RVB, vous avez besoin de 4 fils : un neutre (jaune) et les autres pour contrôler les 3 couleurs des LED (rouge, vert, bleu). Le fait de connecter correctement ces fils permet de contrôler correctement les couleurs et le fonctionnement de la bande.
- Combien de fils pour une bande LED ?
- La bande LED RGBW comporte cinq fils : rouge, vert, bleu, blanc et positif. Connectez la bande de LED à la marque correspondante sur le contrôleur de lumière LED RGBW. Le fait de s'assurer que toutes les connexions sont sûres et de suivre le schéma de câblage fourni par le fabricant permet d'éviter les problèmes potentiels et de garantir un fonctionnement fiable.
Conclusion
Le câblage des bandes LED n'a pas à être intimidant. Grâce à ce guide, vous disposez désormais des connaissances nécessaires pour vous attaquer à différents types de bandes LED et garantir une installation réussie et sûre. Bon éclairage !
Fermeture
Le choix de pilotes LED gradables sans scintillement est essentiel pour optimiser votre éclairage et améliorer ainsi votre bien-être et votre confort. L'absence de scintillement est cruciale pour le niveau de confort perçu dans vos espaces de vie.
Dans cet article, nous examinons les aspects suivants afin de vous guider dans le choix d'un pilote LED à gradation sans scintillement idéal :
Nous explorerons les caractéristiques essentielles telles que les spécifications, la compatibilité et l'efficacité pour éviter tout scintillement dans l'éclairage. En outre, nous discuterons de l'importance d'une fréquence PWM élevée pour obtenir des résultats sans scintillement dans la série des pilotes de LED à gradation.
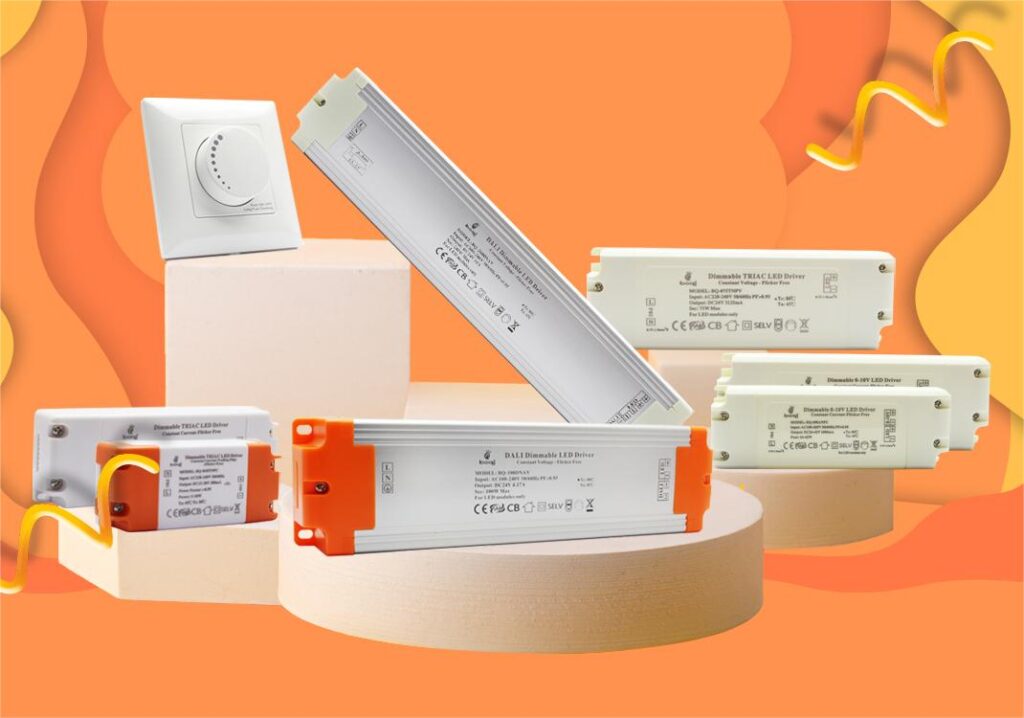
Acheter Pilotes LED à intensité variable de boqi
Il est essentiel d'être informé des causes principales du scintillement de la lumière, mais la tâche de sélectionner le pilote LED gradable approprié reste à faire. Pour obtenir les effets d'éclairage et de gradation souhaités, il est impératif de s'adresser à un fabricant de pilotes de LED réputé. boqi est un fabricant renommé de pilotes de LED gradables, offrant une gamme de gradateurs et de contrôleurs sans scintillement. La gamme de produits comprend des pilotes de LED TRIAC, 0-10V et DALI, des gradateurs et des contrôleurs.
Avec des bases de production en Chine, l'entreprise est à l'écoute des besoins et des spécifications de sa clientèle. N'hésitez pas à nous contacter pour toute question relative à vos besoins en matière de pilotes ou de contrôleurs de DEL. Nous pourrons ainsi vous aider à affiner vos choix.