Menghubungkan kabel lampu strip LED dapat terlihat menakutkan. Namun, dengan panduan yang tepat, ini adalah proses yang sederhana. Hal ini dapat mempercantik ruang Anda dengan indah. Panduan ini ditujukan bagi penggemar DIY, pemilik rumah yang ingin menambah suasana, dan teknisi listrik yang sedang mengerjakan proyek baru. Panduan ini akan menyederhanakan pemasangan kabel untuk Anda.
Untuk menyambungkan kabel lampu strip LED, mulailah dengan mengidentifikasi jenis strip (warna tunggal, RGB, atau RGBW). Hubungkan kabel positif dan negatif ke terminal yang sesuai pada catu daya atau pengontrol Anda. Untuk strip RGB, cocokkan warnanya (merah, hijau, biru) ke terminal yang sesuai. Pastikan semua koneksi aman dan ikuti diagram pengkabelan yang disertakan untuk mendapatkan instruksi yang tepat.
Mari kita selami detail pengkabelan berbagai jenis lampu strip LED. Hal ini akan memastikan Anda memiliki pengetahuan dan kepercayaan diri untuk melakukannya dengan benar.
Memahami Koneksi Paralel: Sederhana
Koneksi paralel sangat penting dalam pencahayaan strip LED. Setiap segmen strip dihubungkan secara seri, yang berarti tegangan operasi dijumlahkan, memberikan tegangan yang lebih tinggi yang diperlukan. Semua segmen dihubungkan secara paralel, menerima tegangan yang sama, tetapi penarikan arus meningkat seiring dengan panjang strip. Gunakan koneksi paralel. Koneksi ini memastikan bahwa setiap segmen strip mendapatkan tegangan yang stabil. Hal ini menghentikan masalah seperti kecerahan yang tidak merata atau kedipan. Pengaturan ini adalah kunci untuk penggunaan strip LED yang panjang. Ini menjaga cahaya tetap stabil dan merata. Memahami dasar-dasar pengkabelan paralel dapat sangat meningkatkan efektivitas dan keandalan instalasi pencahayaan LED Anda.


Penurunan Tegangan: Penjelasan Sederhana
Penurunan tegangan terjadi apabila tegangan di ujung strip lebih rendah daripada di awal. Hal ini dapat menyebabkan LED di bagian ujung menjadi lebih redup. Untuk mengurangi penurunan tegangan, gunakan kabel yang lebih tebal, atau strip yang lebih pendek, atau menyuntikkan daya pada beberapa titik di sepanjang strip. Sangat penting untuk merencanakan instalasi Anda dengan hati-hati untuk meminimalkan penurunan tegangan, terutama dalam jangka waktu yang lebih lama. Salah satu metode yang baik adalah dengan menggunakan penguat daya atau amplifier. Gunakan secara berkala. Mereka membantu mempertahankan tegangan yang stabil di seluruh strip. Selain itu, memilih catu daya yang lebih baik dengan kapasitas yang cukup juga dapat mengurangi risiko penurunan tegangan. Dengan memahami dan memperbaiki penurunan tegangan, Anda dapat memastikan bahwa lampu strip LED Anda bekerja dengan baik. Mereka akan memberikan cahaya yang merata di seluruh instalasi.
Penguat PWM: Mengubah Kompleks Menjadi Sederhana
Penguat Pulse Width Modulation (PWM) meningkatkan sinyal ke strip LED, memungkinkan kecerahan yang konsisten di seluruh strip yang panjang. Hal ini memastikan bahwa sinyal daya tetap kuat, mencegah peredupan atau kedipan. Amplifier PWM berguna dalam instalasi besar. Mereka menjaga keseragaman output cahaya, yang sangat penting. Amplifier ini meregenerasi sinyal PWM. Mereka memperluas jangkauan efektif strip LED Anda. Hal ini memastikan bahwa setiap bagian mendapatkan tegangan dan arus yang tepat. Menginstal amplifier PWM itu sederhana. Anda dapat menambahkannya ke pengaturan Anda. Menempatkan dan mengaturnya dengan benar, amplifier PWM dapat sangat meningkatkan pencahayaan strip LED. Mereka dapat meningkatkan kinerja dan umur panjang.
Jenis-jenis Lampu Strip LED
Lampu strip LED tersedia dalam berbagai jenis, termasuk warna tunggal, RGB (Merah, Hijau, Biru), RGBW (Merah, Hijau, Biru, Putih), dan putih yang dapat disetel. Setiap jenis memerlukan kabel dan pengendali yang berbeda. Strip warna tunggal adalah yang paling sederhana, hanya dengan dua kabel untuk koneksi positif dan negatif. Strip RGB menambahkan tiga saluran warna, membutuhkan pengontrol untuk mencampur warna. Strip RGBW menyertakan saluran putih tambahan untuk opsi pencahayaan yang lebih bernuansa. Strip putih yang dapat disetel memungkinkan penyesuaian suhu warna, menawarkan rentang cahaya putih dari hangat hingga dingin. Mengetahui perbedaan antara jenis strip LED ini dapat membantu Anda memilih produk yang tepat untuk kebutuhan Anda. Hal ini juga akan memastikan pengaturan dan penggunaan yang tepat.
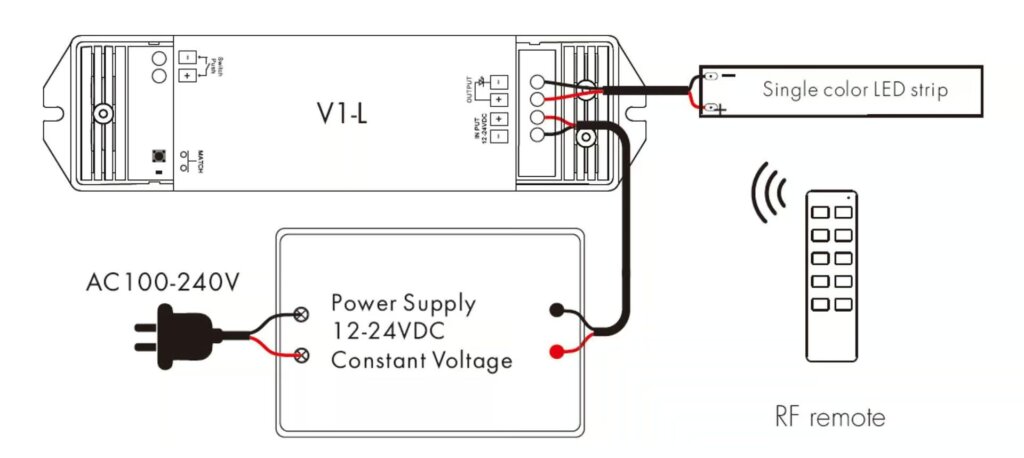
Cara Menyambungkan Lampu Strip LED Warna Tunggal
Pengkabelan Lampu Strip LED Warna Tunggal dengan Driver LED Non-Dimmable
Untuk driver LED yang tidak dapat diredupkan, sambungkan kabel positif strip ke terminal positif driver. Kemudian, sambungkan kabel negatif strip ke terminal negatif driver. Amankan semua koneksi dan nyalakan. Metode pengkabelan sederhana ini sangat bagus untuk instalasi dasar. Mereka tidak memerlukan peredupan. Driver yang tidak dapat diredupkan memberikan output yang konstan. Hal ini memastikan bahwa strip LED Anda bersinar dalam kondisi terbaiknya. Saat memasang kabel beberapa strip, penting untuk memastikan bahwa watt total tidak melebihi kapasitas driver. Mengamankan semua koneksi adalah kuncinya. Ikuti petunjuk dari produsen. Hal ini akan mencegah masalah kelistrikan dan memastikan pemasangan yang aman dan andal.
Pengkabelan Lampu Strip LED Warna Tunggal dengan Driver LED yang Dapat Dimatikans
Driver LED yang dapat diredupkan memungkinkan Anda menyesuaikan kecerahan. Hubungkan strip ke driver seperti yang dijelaskan di atas. Ikuti diagram pengkabelan khusus untuk jenis peredup Anda:
– Diagram Koneksi Driver LED Dimmable 0-10V
Driver 0-10V yang dapat diredupkan menggunakan sinyal kontrol tegangan rendah untuk menyesuaikan kecerahan. Hubungkan peredup 0-10V ke terminal kontrol driver, untuk memastikan polaritas yang benar. Pengaturan ini memungkinkan peredupan yang mulus di seluruh rentang.


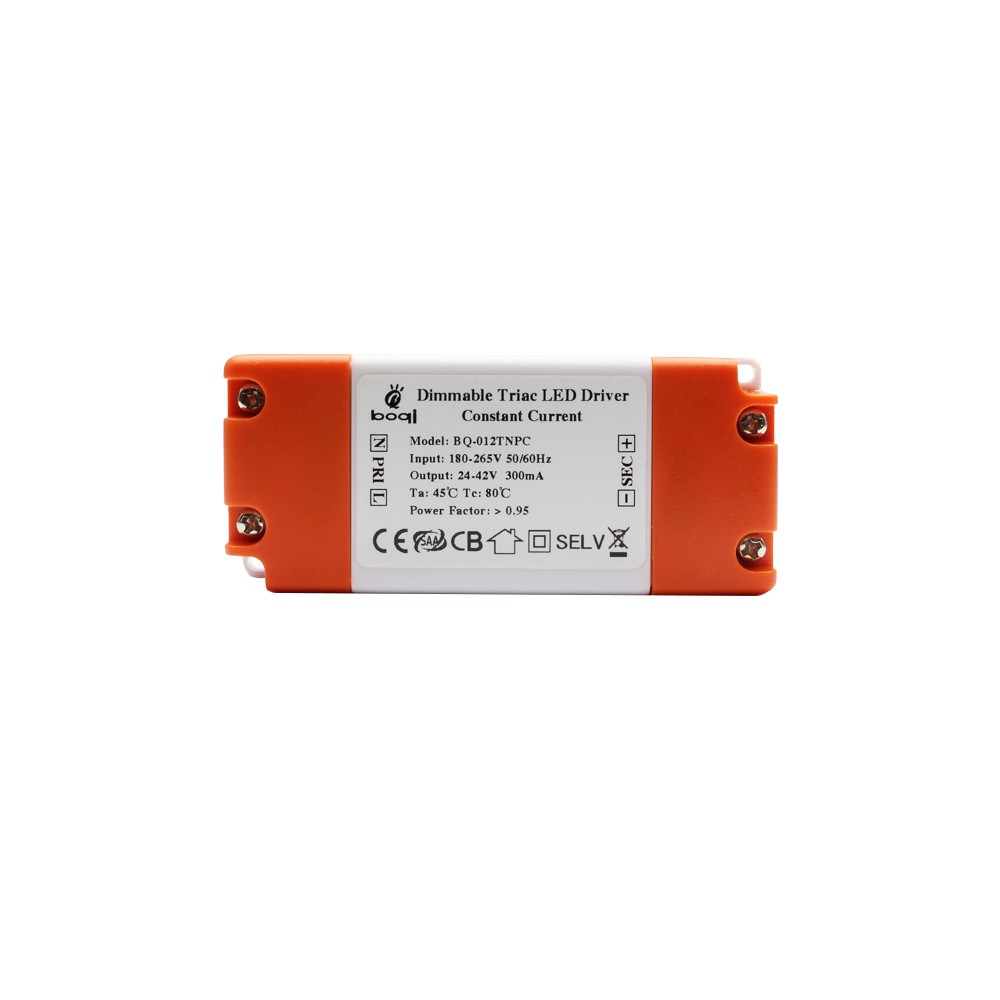
– Diagram Koneksi Driver LED Triac Dimmable
Peredup triac bekerja dengan peredupan fase-potong AC. Hubungkan driver ke sakelar peredup triac yang kompatibel, memastikan bahwa input driver cocok dengan output peredup. Metode ini memberikan pengalaman peredupan yang familiar, mirip dengan lampu pijar tradisional.

– Diagram Sambungan Driver LED DALI yang Dapat Direfleksikan
Peredup DALI (Digital Addressable Lighting Interface) menawarkan kontrol yang tepat dan kemampuan pemrograman. Hubungkan jalur kontrol DALI ke terminal input DALI driver. Pengaturan ini ideal untuk sistem pencahayaan kompleks yang memerlukan fitur kontrol canggih.


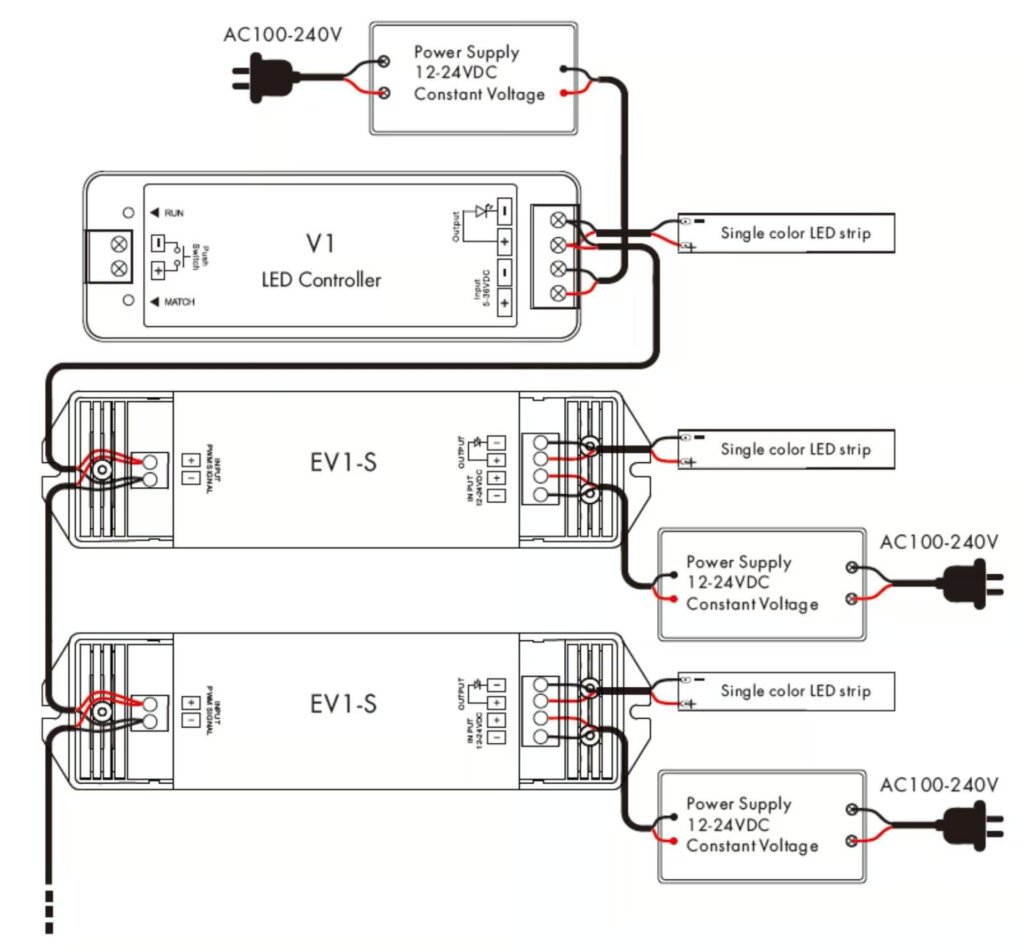
Pengkabelan Lampu Strip LED Warna Tunggal dengan Pengontrol LED
Pengontrol LED memberikan fleksibilitas yang lebih besar dalam mengontrol lampu. Hubungkan strip ke pengontrol. Pastikan kabel positif dan negatif sesuai dengan terminal pengontrol. Pengontrol memungkinkan berbagai efek, seperti peredupan, kedipan, dan pola pencahayaan khusus. Pastikan pengontrol kompatibel dengan strip LED dan catu daya Anda. Mengamankan koneksi dengan benar adalah kuncinya. Mengikuti panduan produsen akan memastikan pengoperasian yang andal dan mencegah potensi masalah.
Tanpa penguat PWM
Dengan penguat PWM
Pengkabelan Lampu Strip LED Warna Tunggal dengan Dekoder DMX512
Dekoder DMX512 digunakan untuk pengaturan pencahayaan tingkat lanjut. Hubungkan strip ke dekoder, cocokkan kabel positif dan negatif ke terminal yang benar. DMX512 adalah protokol komunikasi digital. Protokol ini digunakan untuk kontrol pencahayaan dan memberikan kontrol yang tepat pada banyak saluran. Penyiapan ini umum dilakukan dalam pencahayaan panggung. Hal ini juga digunakan dalam pencahayaan arsitektural dan aplikasi pro lainnya. Pastikan dekoder DMX512 diatur dengan benar. Hubungkan ke pengontrol DMX untuk performa terbaik.

Cara Menyambungkan Lampu Strip LED Putih yang Dapat Disetel
Pengkabelan Lampu Strip LED Putih yang Dapat Disetel dengan Driver LED yang Dapat Diredupkan
Strip LED putih yang dapat disetel memungkinkan penyesuaian suhu warna. Hubungkan kabel sesuai petunjuk driver, memastikan koneksi yang tepat untuk suhu warna dan kontrol kecerahan. Strip putih yang dapat disetel biasanya memiliki garis kontrol tambahan untuk menyesuaikan suhu warna. Strip ini dapat bertransisi dari putih hangat ke putih dingin, sehingga memberikan opsi pencahayaan yang serbaguna. Pastikan bahwa driver LED yang dapat diredupkan kompatibel dengan strip putih yang dapat disetel dan semua koneksi aman untuk pengoperasian yang andal.
Driver LED Putih Tunable DALI DT8
Driver DALI DT8 digunakan untuk kontrol yang tepat dari strip putih yang dapat disetel. Ikuti diagram pengkabelan yang disediakan oleh produsen. Driver DALI DT8 mendukung strip LED putih yang dapat disetel. Driver ini memungkinkan kontrol kecerahan dan temperatur warna secara independen. Kemampuan kontrol canggih ini sangat ideal untuk aplikasi yang membutuhkan lingkungan pencahayaan yang dinamis. Pengkabelan dan konfigurasi driver DALI DT8 dengan benar memastikan pengoperasian yang lancar dan kinerja optimal dari strip LED putih yang dapat disetel.

Pengkabelan Lampu Strip LED Putih yang Dapat Disetel dengan Pengontrol LED
Hubungkan strip putih yang dapat disetel ke pengontrol, cocokkan terminal positif dan negatif. Pastikan koneksi aman untuk pengoperasian yang andal. Pengontrol LED untuk strip putih yang dapat disetel memungkinkan penyesuaian yang tepat dalam suhu dan kecerahan warna. Pengontrol ini sering kali dilengkapi dengan remote control atau dapat diintegrasikan ke dalam sistem rumah pintar untuk menambah kenyamanan. Pemasangan dan konfigurasi pengontrol yang tepat memastikan pengoperasian yang konsisten dan andal.
Tanpa penguat PWM

Pengkabelan Lampu Strip LED Putih yang Dapat Disetel dengan Dekoder DMX512

Gunakan dekoder DMX512 untuk strip putih yang dapat disetel dalam pengaturan lanjutan. Hubungkan strip ke dekoder, dengan mengikuti diagram pengkabelan untuk pemasangan yang benar. Dekoder DMX512 memberikan kontrol yang baik atas suhu dan kecerahan warna. Mereka ideal untuk pencahayaan profesional. Pastikan dekoder terhubung dengan benar ke pengontrol DMX dan semua koneksi aman untuk performa optimal.
Lampu Strip LED Putih Dua Kabel yang Dapat Disetel
Strip putih yang dapat disetel lebih sederhana menggunakan dua kabel untuk kontrol suhu warna. Hubungkan kabel ini ke terminal yang sesuai pada pengontrol atau driver Anda. Jenis strip putih yang dapat disetel ini biasanya memiliki konfigurasi kabel yang lebih sederhana, sehingga lebih mudah dipasang. Namun, ini mungkin menawarkan opsi kontrol yang lebih sedikit dibandingkan dengan sistem putih yang dapat disetel yang lebih canggih. Pastikan pengontrol atau driver Anda kompatibel dengan konfigurasi dua kabel untuk pengoperasian yang andal.

Cara Menyambungkan Lampu Strip LED RGB
Pengkabelan Lampu Strip LED RGB dengan Driver LED yang Dapat Dimatikan
Hubungkan strip RGB ke driver yang dapat diredupkan, cocokkan kabel merah, hijau, dan biru ke terminal yang sesuai. Gunakan diagram pengkabelan yang disediakan. Driver yang dapat diredupkan untuk strip RGB memungkinkan Anda menyesuaikan kecerahan seluruh strip. Namun, kontrol warna akan memerlukan pengontrol RGB tambahan. Pastikan semua sambungan aman dan driver kompatibel dengan strip RGB Anda untuk pengoperasian yang andal.
Driver LED RGB DALI DT8
Untuk kontrol RGB tingkat lanjut, gunakan driver DALI DT8. Ikuti diagram pengkabelan pabrikan untuk pemasangan yang tepat. Driver DALI DT8 memberikan kontrol terpisah untuk setiap warna. Hal ini memungkinkan pencahayaan yang kompleks dan pencampuran warna yang tepat. Kontrol canggih ini sangat bagus untuk aplikasi yang membutuhkan pencahayaan dinamis. Mereka membutuhkan pencahayaan yang dapat disesuaikan. Pemasangan dan pengaturan driver DALI DT8 yang tepat memastikan strip LED RGB Anda berfungsi dengan baik. Mereka akan memiliki kinerja terbaik.

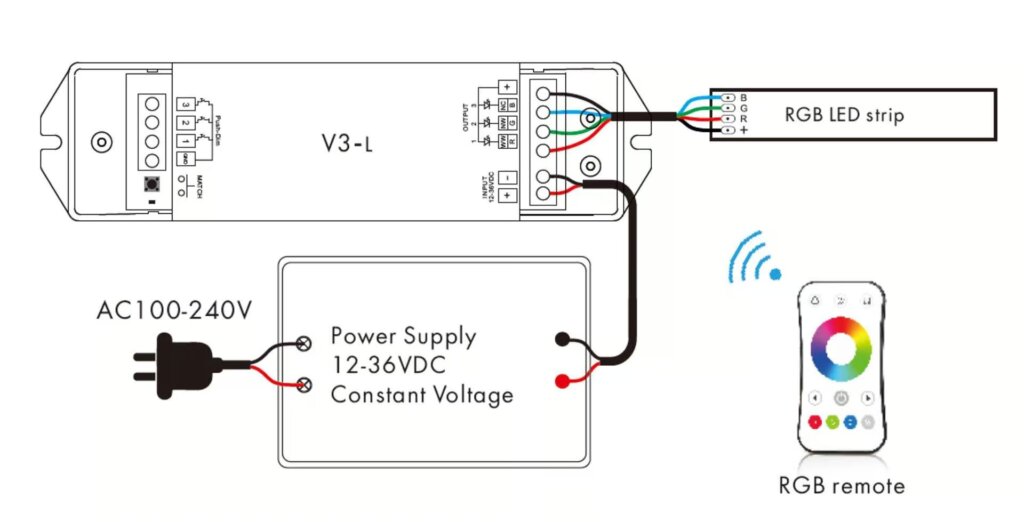
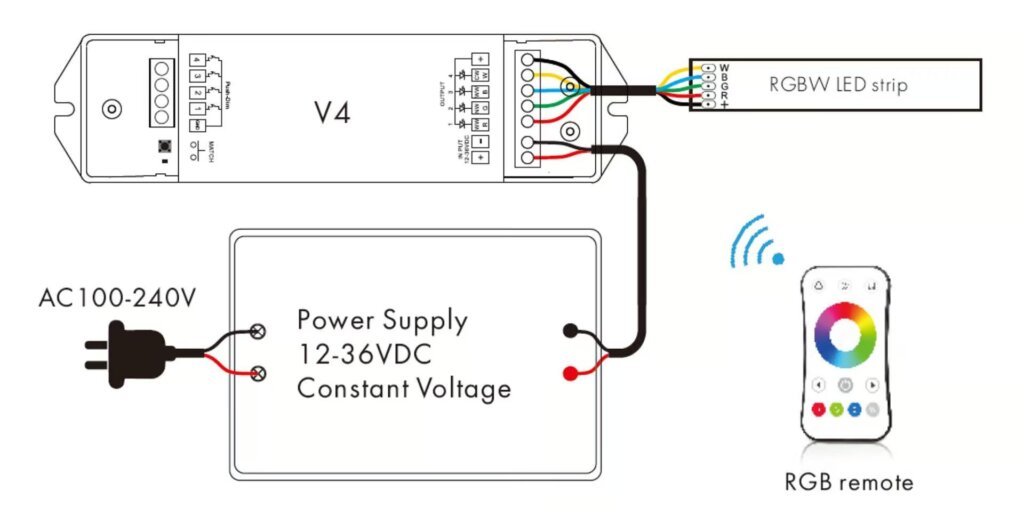
Pengkabelan Lampu Strip LED RGB dengan Pengontrol LED
Hubungkan strip RGB ke controller, pastikan setiap kabel warna terhubung ke kabel yang sesuai
terminal. Pengontrol RGB memungkinkan berbagai efek pencahayaan, seperti perubahan warna, kedipan, dan pola khusus. Pastikan pengontrol kompatibel dengan strip RGB dan catu daya Anda. Mengamankan koneksi dengan benar dan mengikuti panduan produsen akan membantu memastikan pengoperasian yang andal dan mencegah potensi masalah.
Tanpa penguat PWM
Dengan penguat PWM

Pengkabelan Lampu Strip LED RGB dengan Dekoder DMX512
Gunakan dekoder DMX512 untuk strip RGB dalam pengaturan yang rumit. Ikuti diagram pengkabelan untuk memastikan pemasangan yang benar. Dekoder DMX512 memberikan kontrol yang tepat pada setiap saluran warna, memungkinkan efek pencahayaan yang rumit dan pencampuran warna yang tepat. Pengaturan ini biasanya digunakan dalam aplikasi pencahayaan profesional, seperti pencahayaan panggung dan pencahayaan arsitektural. Pastikan dekoder DMX512 diatur dengan benar. Hubungkan ke pengontrol DMX untuk performa terbaik.

Cara Menyambungkan Lampu Strip LED RGBW
Pengkabelan Lampu Strip LED RGBW dengan Driver LED yang Dapat Diredupkan
Hubungkan strip RGBW ke driver yang dapat diredupkan, pastikan semua kabel warna (merah, hijau, biru, putih) terhubung dengan benar. Driver yang dapat diredupkan untuk strip RGBW memungkinkan Anda menyesuaikan kecerahan seluruh strip. Namun, kontrol warna akan memerlukan pengontrol RGBW tambahan. Pastikan semua koneksi aman dan driver kompatibel dengan strip RGBW Anda untuk pengoperasian yang andal.
Driver LED DALI DT8 RGBW
Untuk kontrol RGBW tingkat lanjut, gunakan driver DALI DT8. Ikuti petunjuk pengkabelan dari produsen. Driver DALI DT8 memberikan kontrol terpisah untuk setiap warna. Hal ini memungkinkan efek pencahayaan yang kompleks dan pencampuran warna yang tepat. Kontrol lanjutan ini sangat bagus untuk aplikasi. Mereka membutuhkan pencahayaan yang dinamis dan dapat disesuaikan. Driver DT8 harus diinstal dan dikonfigurasi dengan benar. Hal ini memastikan kinerja yang mulus dan optimal dari strip LED RGBW Anda.

Pengkabelan Lampu Strip LED RGBW dengan Pengontrol LED
Hubungkan strip RGBW ke controller, cocokkan semua kabel warna ke terminal yang benar. Pengontrol RGBW memungkinkan berbagai efek pencahayaan, seperti perubahan warna, kedipan, dan pola khusus. Pastikan pengontrol kompatibel dengan strip RGBW dan catu daya Anda. Mengamankan koneksi dengan benar dan mengikuti panduan produsen akan membantu. Hal ini akan memastikan pengoperasian yang andal dan mencegah masalah.
Tanpa penguat PWM
Dengan penguat PWM

Pengkabelan Lampu Strip LED RGBW dengan Dekoder DMX512
Gunakan dekoder DMX512 untuk strip RGBW dalam pengaturan lanjutan. Ikuti diagram pengkabelan untuk pemasangan yang benar. Dekoder DMX512 memberikan kontrol yang tepat pada setiap saluran warna. Mereka memungkinkan efek pencahayaan yang kompleks dan pencampuran warna yang tepat. Penyiapan ini umum dilakukan dalam pencahayaan profesional. Ini digunakan untuk pencahayaan panggung dan arsitektur. Pastikan dekoder DMX512 sudah diatur dan terhubung ke pengontrol DMX. Ini diperlukan untuk performa terbaik.

Cara Menyambungkan Lampu Strip LED RGB & CCT
Pengkabelan Lampu Strip LED RGBW dengan Driver LED yang Dapat Diredupkan
Ikuti diagram pengkabelan untuk menyambungkan strip RGBW ke driver yang dapat diredupkan, dan pastikan semua sambungan aman. Driver yang dapat diredupkan untuk strip RGBW memungkinkan Anda menyesuaikan kecerahan seluruh strip. Namun, kontrol warna akan memerlukan pengontrol RGBW tambahan. Pastikan semua sambungan aman dan driver kompatibel dengan strip RGBW Anda untuk pengoperasian yang andal.
Pengkabelan Lampu Strip LED RGBW dengan Pengontrol LED
Hubungkan strip ke controller, cocokkan kabel ke terminal yang sesuai. Pengontrol RGBW memungkinkan berbagai efek pencahayaan, seperti perubahan warna, kedipan, dan pola khusus. Pastikan pengontrol kompatibel dengan strip RGBW dan catu daya Anda. Mengamankan sambungan dengan benar dan mengikuti panduan produsen akan membantu memastikan pengoperasian yang andal dan mencegah potensi masalah.
Tanpa penguat PWM

Dengan penguat PWM

Pengkabelan Lampu Strip LED RGBW dengan Dekoder DMX512
Gunakan dekoder DMX512 untuk pengaturan yang rumit. Ikuti diagram pengkabelan untuk memastikan pemasangan yang benar. Dekoder DMX512 memberikan kontrol yang tepat pada setiap saluran warna. Mereka memungkinkan efek pencahayaan yang kompleks dan pencampuran warna yang tepat. Pengaturan ini biasanya digunakan dalam aplikasi pencahayaan profesional, seperti pencahayaan panggung dan pencahayaan arsitektural. Pastikan dekoder DMX512 dikonfigurasi dengan benar. Hubungkan ke pengontrol DMX untuk performa terbaik.

Cara Menyambungkan Lampu Strip LED yang Dapat Dialamatkan
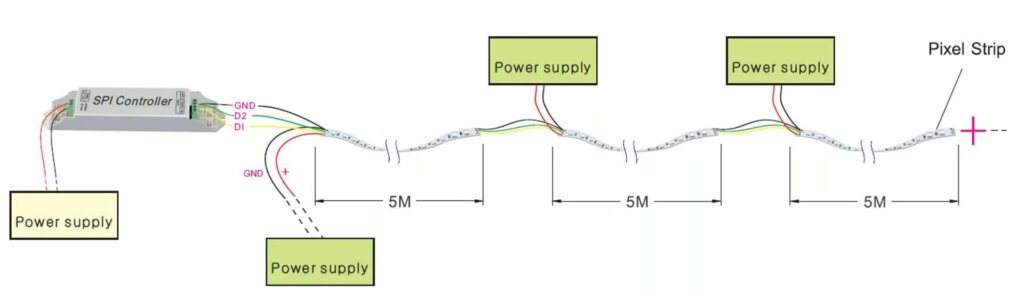
Cara Menyambungkan Lampu Strip LED yang Dapat Dialamatkan SPI
Hubungkan kabel data dan daya dari strip beralamat SPI ke pengontrol, dengan mengikuti diagram pengkabelan yang disediakan. Strip LED beralamat memungkinkan kontrol individual untuk setiap LED, memungkinkan efek dan pola pencahayaan yang kompleks. Pastikan pengontrol kompatibel dengan strip beralamat SPI Anda dan semua koneksi aman. Mengonfigurasi pengontrol dengan benar dan mengikuti petunjuk produsen akan membantu memastikan pengoperasian yang andal dan mencegah potensi masalah.
Lampu Strip LED Beralamat SPI dengan Saluran Data Saja
Pastikan kabel data tersambung dengan aman ke pengontrol. Pengaturan ini memungkinkan kontrol dasar LED yang dapat dialamatkan. Anda dapat membuat efek pencahayaan khusus. Mengamankan kabel data dengan benar dan mengikuti diagram pengkabelan akan membantu memastikan pengoperasian yang andal dan mencegah potensi masalah.

Lampu Strip LED Beralamat SPI dengan Saluran Data dan Jam
Hubungkan kabel data dan jam ke controller, untuk memastikan koneksi yang aman. Pengaturan ini memungkinkan kontrol yang lebih tepat dari LED yang dapat dialamatkan, memungkinkan efek dan pola pencahayaan yang kompleks. Mengonfigurasi pengontrol dengan benar dan mengikuti petunjuk produsen akan membantu memastikan pengoperasian yang andal dan mencegah potensi masalah.

Lampu Strip LED Beralamat SPI dengan Saluran Data dan Data Cadangan
Ikuti diagram pengkabelan untuk menyambungkan kabel data, jam, dan kabel data cadangan ke pengontrol. Konfigurasi ini menyediakan redundansi, memastikan operasi yang andal bahkan jika satu saluran data gagal. Mengamankan semua koneksi dengan benar adalah kuncinya. Mengikuti petunjuk dari produsen akan membantu. Ini memastikan operasi yang andal dan mencegah potensi masalah.
Cara Menyambungkan Lampu Strip LED Beralamat DMX512
Gunakan dekoder DMX512 untuk strip yang dapat dialamatkan. Ikuti diagram pengkabelan untuk pemasangan yang benar. Dekoder DMX512 memberikan kontrol yang tepat pada setiap LED, memungkinkan efek dan pola pencahayaan yang kompleks. Pengaturan ini biasanya digunakan dalam aplikasi pencahayaan profesional, seperti pencahayaan panggung dan pencahayaan arsitektural. Pastikan dekoder DMX512 sudah diatur dengan benar. Hubungkan ke pengontrol DMX. Ini adalah kunci untuk performa terbaik.

Pertanyaan Umum
- Bagaimana cara pemasangan kabel LED strip?
- Untuk tiap segmen, LED disambungkan secara seri, yang berarti tegangan operasi dijumlahkan, sehingga menghasilkan tegangan yang lebih tinggi yang diperlukan. Semua segmen dikabelkan secara paralel, sehingga mereka menerima tegangan yang sama, tetapi tarikan arus meningkat seiring dengan panjangnya strip. Memahami metode pengkabelan ini membantu mempertahankan kecerahan yang konsisten dan mencegah masalah seperti pencahayaan yang tidak merata atau kerlipan.
- Apa warna kabel pada strip lampu LED?
- Lampu strip RGB memiliki koneksi 4-kabel: hijau, merah, biru untuk LED, dan hitam/putih untuk koneksi +12V yang umum. Mencocokkan kabel-kabel ini dengan benar ke terminal yang sesuai pada pengontrol atau catu daya untuk memastikan pengoperasian dan pencampuran warna yang benar.
- Apa yang dimaksud dengan 4 kabel pada lampu strip LED?
- Untuk strip RGB, Anda memerlukan 4 kabel: satu kabel netral (kuning) dan sisanya mengontrol 3 warna LED (Merah, Hijau, Biru). Menghubungkan kabel-kabel ini dengan benar akan memastikan kontrol warna dan pengoperasian strip yang tepat.
- Berapa banyak kabel untuk strip LED?
- Strip LED RGBW memiliki lima kabel: merah, hijau, biru, putih, dan positif. Hubungkan strip lampu LED ke tanda yang sesuai pada pengontrol lampu LED RGBW. Memastikan semua koneksi aman dan mengikuti diagram pengkabelan yang disediakan oleh produsen akan membantu mencegah potensi masalah dan memastikan pengoperasian yang andal.
Kesimpulan
Menyalakan lampu strip LED tidak harus menakutkan. Dengan panduan ini, Anda sekarang memiliki pengetahuan untuk menangani berbagai jenis lampu strip LED, memastikan pemasangan yang sukses dan aman. Selamat menikmati pencahayaan!
Penutup
Memilih driver LED dimmable bebas kedip yang sesuai sangat penting untuk mengoptimalkan pencahayaan Anda, sehingga meningkatkan kesehatan dan kenyamanan Anda secara keseluruhan. Tidak adanya kedipan sangat penting untuk tingkat kenyamanan yang dirasakan di dalam ruang keluarga Anda.
Dalam artikel ini, kami akan membahas aspek-aspek berikut ini untuk memandu Anda dalam memilih Driver LED peredupan bebas kerlipan yang ideal:
Kami akan mengeksplorasi fitur-fitur penting seperti spesifikasi, kompatibilitas, dan efisiensi untuk menghindari kerlipan dalam pencahayaan. Selain itu, kami akan membahas pentingnya frekuensi PWM Tinggi untuk mencapai hasil bebas kedipan pada seri Driver LED yang dapat diredupkan.
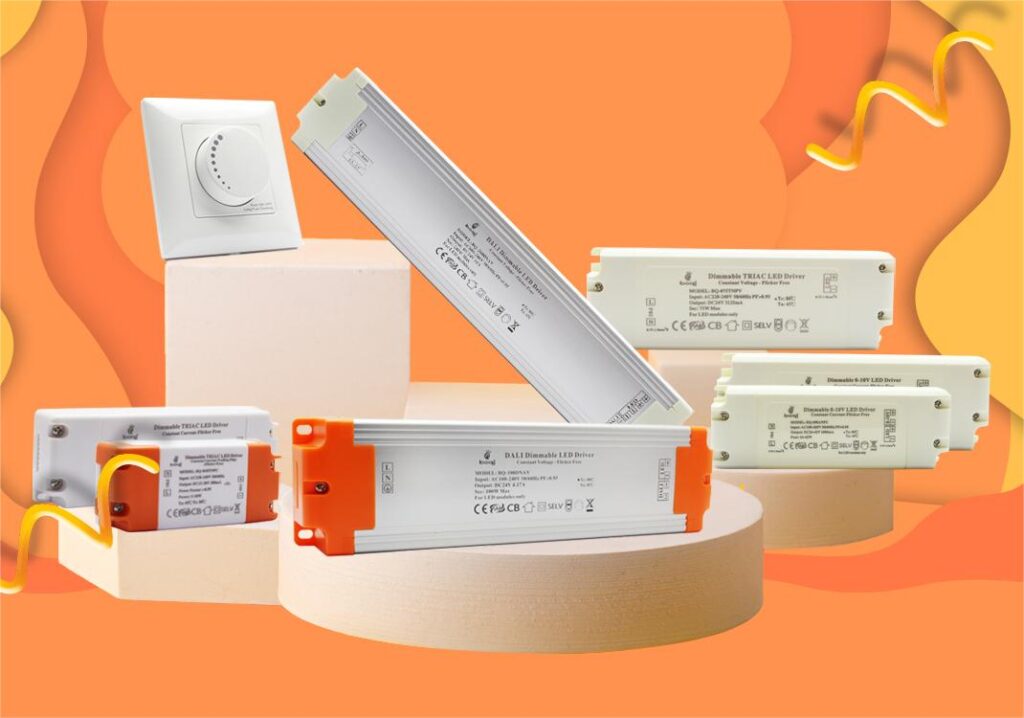
Beli Driver LED yang Dapat Diredupkan dari boqi
Mendapatkan informasi tentang penyebab umum kedipan cahaya sangat penting, tetapi tugas memilih driver LED yang dapat diredupkan yang sesuai masih ada di tangan. Untuk mewujudkan efek pencahayaan dan peredupan yang diinginkan, bekerja sama dengan produsen driver LED terkemuka sangatlah penting. boqi menonjol sebagai produsen driver LED yang dapat diredupkan yang terkenal, menawarkan rangkaian bebas kedipan, peredup, dan pengontrol. Rangkaian produknya meliputi driver, dimmer, dan pengontrol LED TRIAC, 0-10V, dan DALI.
Beroperasi dengan basis manufaktur di Tiongkok, perusahaan ini selaras dengan kebutuhan dan spesifikasi yang berbeda dari pelanggannya. Untuk pertanyaan mengenai kebutuhan driver atau pengontrol LED Anda, jangan ragu untuk menghubungi kami, agar kami dapat membantu Anda dalam menyempurnakan pilihan Anda.