LED 조광기 는 가정과 사무실부터 상업 및 산업 공간에 이르기까지 다양한 환경에서 조명을 제어하는 방식에 혁신을 가져왔습니다. LED 조명의 밝기 수준을 유연하게 조절할 수 있어 분위기를 개선하고 에너지 효율을 높이며 웰빙에도 기여합니다. 이 문서에서는 이해를 돕기 위해 도표와 함께 LED 조광기를 배선하는 단계를 안내합니다.
LED 디머의 종류
배선 과정을 시작하기 전에 사용 가능한 LED 조광기의 유형을 이해하는 것이 중요합니다:
- 위상차 조광기: 주거용 애플리케이션에 적합한 가장 일반적인 유형의 조광기입니다.
- 리딩 엣지 및 트레일링 엣지 TRIAC 디머: LED 디머블 조명 또는 기존 조명에 적합하며 호환성이 뛰어난 디머 유형입니다.
- 0-10V 디머: 상업 및 산업 환경에서 일반적으로 사용되는 이 제품은 정밀한 제어 기능을 제공합니다.
- DALI 디머: 일반적으로 패널이며 지능형 시스템 및 인간 중심 조명에 적합한 DALI 마스터에 의해 제어됩니다.
- 스마트 조광기: 스마트폰이나 음성 명령을 통해 제어할 수 있는 Wi-Fi 또는 블루투스 지원 조광기입니다.

일반적인 디머 배선 작업
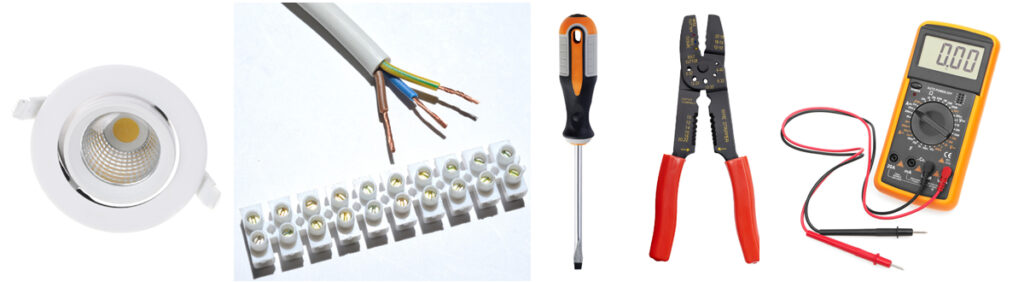
준비된 구성 요소
- LED 조명기구 또는 전구
- LED 호환 디머 스위치
- 전선(일반적으로 14 또는 12 게이지)
- 와이어 너트 또는 커넥터
- 스크루 드라이버
- 전선 스트리퍼
- 전압 테스터
- 선택 사항입니다: 정션 박스
안전 예방 조치
- 전기 작업을 시작하기 전에 항상 회로 차단기에서 전원을 끄세요.
- 전압 테스터를 사용하여 전원이 꺼져 있는지 확인합니다.
- 현지 전기 법규 및 규정을 준수하세요.
- 어떤 단계가 확실하지 않은 경우 자격을 갖춘 전기 기술자에게 문의하세요.
다이어그램
  +----------------+ +-------------------+
  | | | |
  | LED 디머 |------| LED 드라이버 |
  | | | |
  +----------------+ +-------------------+
                             |
                             |
                             |
                     +----------------+
                     | |
                     LED 조명 | |
                     | |
                     +----------------+
간단한 공통 단계별 가이드
1단계: 전원 끄기
차단기에서 전원을 끄고 전압 테스터를 사용하여 전원이 꺼져 있는지 확인합니다.
2단계: 전선 준비
전선 피복제거기를 사용하여 연결할 전선 끝에서 약 0.5인치의 절연체를 벗겨냅니다.
3단계: 전선 식별
일반적으로 다음과 같은 전선이 있습니다:
- 브라운/블랙: 핫 와이어
- 파란색 / 흰색: 중성선
- 녹색/노란색 또는 베어 구리: 접지선

4단계: 조광기 연결하기
- 접지선: 와이어 너트를 사용하여 조광기의 접지선을 전기 상자의 접지선에 연결합니다.
- 중성선: 조광기에 중성선(보통 흰색)이 있는 경우 전기 상자의 중성선에 연결합니다.
- 핫 와이어: 조광기의 검은색 와이어를 전기 상자의 검은색(핫) 와이어에 연결합니다.
5단계: LED 조명 연결
- 검정색(핫) 와이어의 다른 쪽 끝을 LED 조명의 검정색 와이어에 연결합니다.
- 흰색(중성) 와이어의 다른 쪽 끝을 LED 조명의 흰색 와이어에 연결합니다.
- 접지선의 다른 쪽 끝을 LED 조명의 접지선에 연결합니다.
6단계: 모든 연결 보안
와이어 너트 또는 적절한 커넥터를 사용하여 모든 연결부를 고정하세요. 노출된 전선이 없는지 확인합니다.
7단계: 테스트
회로 차단기에서 전원을 다시 켜고 조광기를 테스트하여 예상대로 작동하는지 확인합니다.
5가지 디머에 대한 상세 가이드
위상차 조광기
위상차 조광기 배선은 고전압 전기 회로로 작업해야 하는 복잡한 작업일 수 있습니다. 배선을 잘못하면 감전, 화재 또는 조광기 및 기타 전기 부품의 손상을 초래할 수 있습니다. 전기 작업 경험이 없는 경우 자격을 갖춘 전기 기술자에게 문의하거나 고용하여 설치를 수행하는 것이 좋습니다.
전기 작업에 익숙하고 필요한 모든 안전 예방 조치를 취했다면 위상차 조광기 배선 방법에 대한 일반적인 가이드를 참조하세요:
필요한 도구 및 자료
- 스크루드라이버
- 전선 피복제거기
- 전기 테이프
- 와이어 너트
- 멀티미터
- 위상 차단 디머 스위치
- 적절한 전기 박스 및 커버 플레이트

안전 예방 조치
- 회로 차단기에서 작업할 회로의 전원을 끕니다.
- 멀티미터를 사용하여 전원이 꺼져 있는지 확인합니다.
- 장갑과 보안경 등 적절한 안전 장비를 착용하세요.
단계
- 전선 식별: 전기 상자를 열고 전선을 확인합니다. 검은색(핫) 전선, 흰색(중성) 전선, 녹색 또는 노출된 구리(접지) 전선이 보일 것입니다.
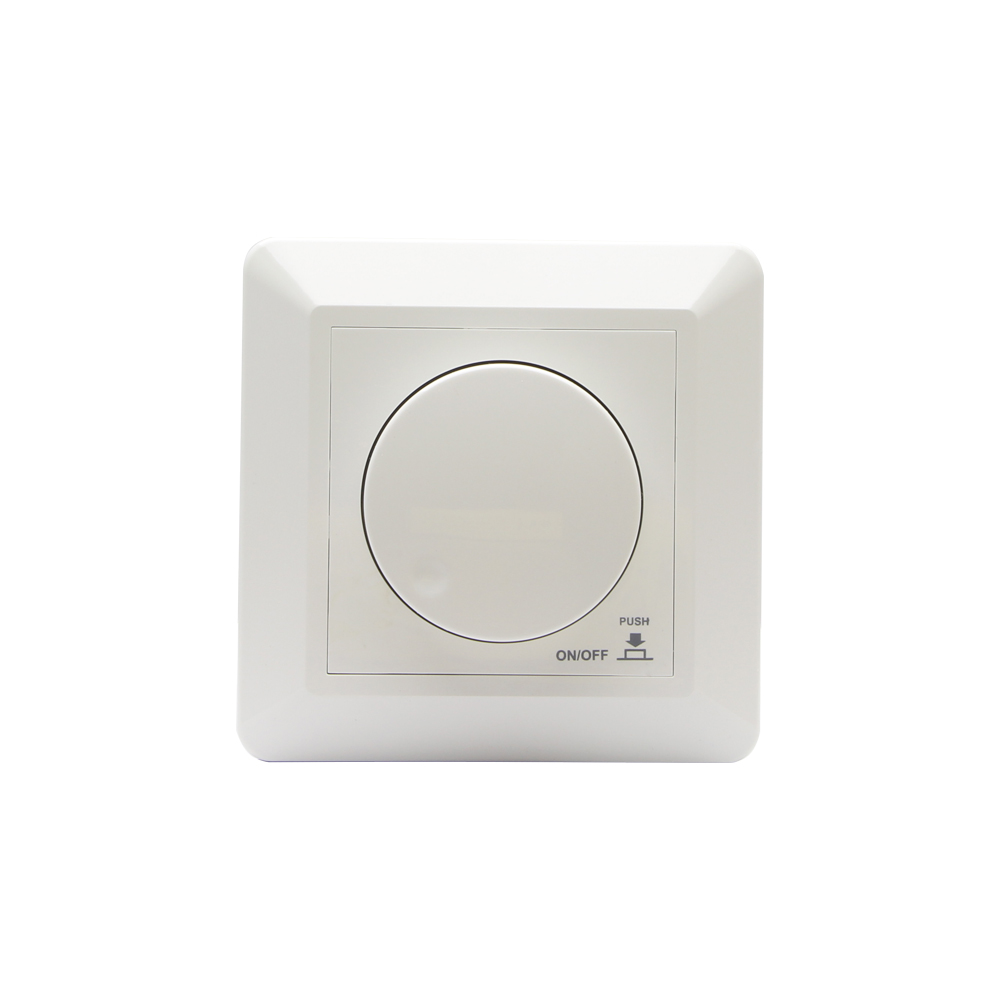
- 조광기 준비: 위상차 조광기의 포장을 풀고 제조업체의 사용 설명서를 주의 깊게 읽습니다. 조광기의 전선 또는 단자를 확인합니다. 일반적으로 열선은 검은색(또는 빨간색), 중성선은 흰색, 접지는 녹색으로 비슷한 색상을 볼 수 있습니다.
- 기존 스위치 분리: 기존 스위치를 교체하는 경우 전선 너트를 풀고 전선을 분리하여 분리하세요.
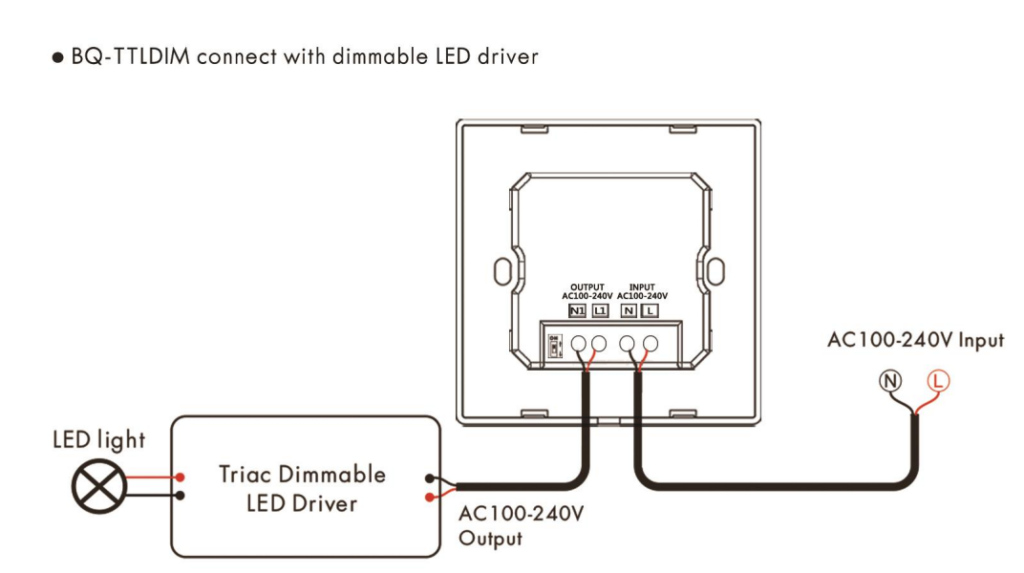
- 조광기를 조명기구와 연결합니다(조광 가능한 LED 드라이버): 디머 #4 포트의 전선을 LED 드라이버의 INPUT -L 포트에 연결합니다. LED 드라이버의 출력 단자(LED+/LED-)를 등기구의 입력 단자에 연결합니다 ③ 디머의 L2를 전기 L선에, LED 드라이버의 N을 전기 N선에 연결합니다. (다이어그램에서 AC가 표시된 라인)
- 중성선 연결: 조광기에 중성 연결이 필요한 경우 전기 상자의 흰색 와이어를 조광기의 흰색 와이어 또는 단자에 연결합니다. 와이어 너트를 사용하여 연결을 고정합니다.
- 핫 와이어 연결: 전기 상자의 검은색(뜨거운) 와이어를 조광기의 검은색(또는 빨간색) 와이어 또는 단자에 연결합니다. 와이어 너트를 사용하여 연결을 고정합니다.
- 집어넣기 및 보안: 모든 전선 너트가 고정되어 있는지 확인하면서 전선을 전기 상자에 조심스럽게 다시 집어넣습니다.
- 조광기 부착: 제조업체의 지침에 따라 조광기를 전기 상자에 나사로 고정합니다.
- 커버 플레이트 설치: 조광기 위에 커버 플레이트를 부착합니다.
- 테스트: 회로 차단기에서 전원을 다시 켜고 조광기를 테스트하여 예상대로 작동하는지 확인합니다.


이는 일반적인 가이드임을 기억하세요. 항상 제조업체의 지침과 현지 전기 규정을 따르세요. 확실하지 않은 단계가 있으면 자격을 갖춘 전기 기술자에게 문의하세요.

리딩 엣지 및 트레일링 엣지 TRIAC 디머
리딩 엣지 및 트레일링 엣지 디머는 조명의 밝기를 제어하는 데 사용되는 위상 차단 디머의 한 유형입니다. 리딩 엣지 디머는 각 AC 사이클의 시작 위상을 차단하고 트레일링 엣지 디머는 종료 위상을 차단합니다. 이러한 디머는 일반적으로 백열등, 할로겐, 일부 유형의 LED 및 CFL 조명과 함께 사용됩니다.
참고: 전기 회로를 다루는 작업은 위험할 수 있습니다. 경험이 없는 경우 자격을 갖춘 전기 기술자에게 문의하거나 고용할 것을 강력히 권장합니다. 배선을 잘못하면 감전, 화재 또는 조광기 및 기타 전기 부품의 손상을 초래할 수 있습니다.
필요한 도구 및 자료
- 스크루드라이버
- 전선 피복제거기
- 전기 테이프
- 와이어 너트
- 멀티미터
- 리딩 엣지 또는 트레일링 엣지 디머 스위치
- 전기 박스 및 커버 플레이트
- 안전 장비(장갑, 보안경)

안전 예방 조치
- 회로 차단기에서 작업할 회로의 전원을 끕니다.
- 멀티미터를 사용하여 전원이 꺼져 있는지 확인합니다.
- 장갑과 보안경 등 적절한 안전 장비를 착용하세요.
일반 배선 단계
- 전선 식별: 전기 상자를 열고 전선을 확인합니다. 일반적으로 검은색(핫) 전선, 흰색(중성) 전선, 녹색 또는 노출된 구리(접지) 전선이 보일 것입니다.
- 조광기 준비: 조광기의 포장을 풀고 제조업체의 설명서를 주의 깊게 읽으세요. 조광기의 전선 또는 단자를 확인합니다. 일반적으로 열선은 검은색(또는 빨간색), 중성선은 흰색, 접지는 녹색으로 비슷한 색상을 볼 수 있습니다.
- 기존 스위치 분리: 기존 스위치를 교체하는 경우 전선 너트를 풀고 전선을 분리하여 분리하세요.
- 조광기를 조명기구와 연결합니다(조광 가능한 LED 드라이버): LED 드라이버의 AC 입력 단자(N, L)에 디머 출력(AC100-240V) 선을 연결합니다. LED 드라이버의 출력 단자(LED+/LED-)를 조명기구의 입력 단자에 연결합니다. 디머 입력 단자(AC100-240V)를 전기에 연결합니다(그림에서 AC가 표시된 선).
- 중성선 연결: 조광기에 중성 연결이 필요한 경우 전기 상자의 흰색 와이어를 조광기의 흰색 와이어 또는 단자에 연결합니다. 와이어 너트를 사용하여 연결을 고정합니다.
- 핫 와이어 연결: 전기 상자의 검은색(뜨거운) 와이어를 조광기의 검은색(또는 빨간색) 와이어 또는 단자에 연결합니다. 와이어 너트를 사용하여 연결을 고정합니다.
- 집어넣기 및 보안: 모든 전선 너트가 고정되어 있는지 확인하면서 전선을 전기 상자에 조심스럽게 다시 집어넣습니다.
- 조광기 부착: 제조업체의 지침에 따라 조광기를 전기 상자에 나사로 고정합니다.
- 커버 플레이트 설치: 조광기 위에 커버 플레이트를 부착합니다.
- 테스트: 회로 차단기에서 전원을 다시 켜고 조광기를 테스트하여 예상대로 작동하는지 확인합니다.

추가 고려 사항
- 호환성: 조광기가 사용 중인 조명 유형(예: LED, 백열등, 할로겐)과 호환되는지 확인하세요.
- 부하 요구 사항: 조광기의 부하 요구 사항을 확인하고 제어 중인 조명의 총 와트 수와 일치하는지 확인하세요.
- 다방향 전환: 다방향 스위칭 배열(예: 3방향 스위치)에 조광기를 설치하는 경우, 이를 지원하는 조광기를 구입하고 다방향 설정에 대한 특정 배선 지침을 따르세요.
항상 제조업체의 지침과 현지 전기 규정을 따르세요. 어떤 단계가 확실하지 않은 경우 자격을 갖춘 전기 기술자에게 문의하세요.
0-10V 조광기
0-10V 디밍 제어 방식은 조명 제어 애플리케이션, 특히 상업 및 산업 환경의 표준입니다. 이 시스템은 저전압 신호를 사용하여 조명 기구의 디밍 레벨을 제어합니다. 전압 신호의 범위는 0V(소등)에서 10V(최대 밝기)까지이며, 그 사이에는 다양한 밝기 레벨이 있습니다.
기본 구성 요소:
- 0-10V 디밍 기능이 있는 조명 기구
- 0-10V 디머 또는 컨트롤러
- 저전압 제어 전선(일반적으로 18~22AWG)
- 전원 공급 장치(조명기구에 필요한 경우)
- 선택 사항입니다: 자동화 시스템 또는 빌딩 관리 시스템(BMS)
배선 단계:
- LED 드라이버: 모든 안전 지침과 현지 전기 규정에 따라 조명 기구와 0-10V 조광기가 각각의 전원 공급 장치에 올바르게 연결되어 있는지 확인합니다.
- 제어 전선: 0-10V 제어 신호에는 두 개의 추가 와이어가 사용됩니다. 한 와이어는 양극 제어 신호(+)용이고 다른 와이어는 제어 신호 접지(-)용입니다.
- 조명기구에 연결: 제어 와이어를 조명기구의 해당 단자(보통 "DIM+" 및 "DIM-" 또는 이와 유사한 라벨이 붙은 단자)에 연결합니다.
- 디머에 연결: 제어 와이어의 다른 쪽 끝을 0-10V 디머 또는 컨트롤러의 해당 단자에 연결합니다.
- 극성: 제어선을 연결할 때 올바른 극성을 유지해야 합니다. 양극선은 조명기구와 조광기 양쪽의 "DIM+" 단자에 연결하고, 음극선은 "DIM-" 단자에 연결해야 합니다.
- 자동화 옵션: 0-10V 디밍 시스템을 더 큰 자동화 또는 BMS에 통합하는 경우 제어 와이어가 시스템 인터페이스에 올바르게 연결되어 있는지 확인하십시오.
- 테스트: 모든 연결이 완료되면 시스템의 전원을 켜고 디밍 기능을 테스트하여 예상대로 작동하는지 확인합니다.

안전 예방 조치:
- 전기 배선 작업 전에는 항상 전원을 끄세요.
- 와이어 너트 또는 적절한 커넥터를 사용하여 모든 연결을 고정합니다.
- 모든 현지 전기 법규 및 규정을 준수하세요.
- 어떤 단계가 확실하지 않은 경우 자격을 갖춘 전기 기술자에게 문의하세요.
0-10V 디밍 시스템은 안정성으로 잘 알려져 있으며 상업용 건물, 산업 환경, 고급 조명 제어 시스템을 갖춘 스마트 홈 등 조도를 정밀하게 제어해야 하는 애플리케이션에서 널리 사용됩니다.
DALI 조광기
디지털 주소 지정이 가능한 조명 인터페이스(DALI)는 건물의 조명 제어를 위한 프로토콜로, 단순하고 견고한 것으로 유명합니다. DALI 디머는 DALI 호환 조명기구를 제어하는 데 사용됩니다. 기존 조광기와 달리 DALI 조광기는 조명 기구와 디지털 방식으로 통신하므로 보다 정밀한 제어가 가능하고 그룹화 및 장면 설정과 같은 추가 기능을 사용할 수 있습니다.
안전 예방 조치
- 항상 회로 차단기에서 작업할 회로의 전원을 끄세요.
- 멀티미터를 사용하여 전원이 꺼져 있는지 확인합니다.
- 장갑과 보안경 등 적절한 안전 장비를 착용하세요.
- 전기 작업 경험이 없는 경우 자격을 갖춘 전기 기술자에게 문의하거나 고용하세요.
필요한 도구 및 자료
- 스크루드라이버
- 전선 피복제거기
- 전기 테이프 또는 열수축 튜브
- 와이어 너트 또는 적절한 커넥터
- 멀티미터
- DALI 조광기
- DALI 호환 조명 기구
- DALI 제어 케이블(일반적으로 2선, 무극성)
DALI 디머 배선을 위한 일반적인 단계
- 매뉴얼 읽기: 시작하기 전에 DALI 조광기 및 DALI 호환 조명기구의 설치 설명서를 읽고 특정 요구 사항과 기능을 이해하세요.
- 네트워크 계획: DALI 네트워크는 일반적으로 데이지 체인 토폴로지로 배선되지만 스타 및 트리 토폴로지도 가능합니다. 이에 따라 네트워크 레이아웃을 계획하세요.
- 전원 끄기: 작업할 회로의 모든 전원을 꺼야 합니다.
- 디머에 전원 연결: 제조업체의 지침에 따라 전원 공급선을 DALI 디머에 연결합니다. 여기에는 일반적으로 활선(핫), 중성선 및 접지선을 연결해야 합니다.
- DALI 라인 연결: DALI는 통신을 위해 별도의 2선 제어선을 사용합니다. 조광기의 DALI 제어선을 DALI 호환 조명기구에 연결합니다. DALI는 일반적으로 극성이 없으므로 전선을 거꾸로 연결할 염려가 없습니다.
- 데이지 체인 또는 스타 구성: 레이아웃 계획에 따라 데이지 체인 또는 스타 구성으로 각 조명기구에 DALI 제어 와이어를 연결합니다. 데이지 체인을 사용하는 경우 DALI 라인은 조광기에서 첫 번째 조명기구로, 첫 번째 조명기구에서 두 번째 조명기구로 이어지는 식으로 연결됩니다.
- 주소 지정: 일부 DALI 시스템에서는 각 조명기구에 대한 주소를 설정해야 합니다. 이 작업은 일반적으로 제조업체에서 제공하는 별도의 DALI 컨트롤러 또는 소프트웨어를 사용하여 수행할 수 있습니다.
- 연결 테스트: 전원을 복원하기 전에 모든 연결이 안전한지 다시 확인하세요.
- 전원 복원 및 테스트: 전원을 다시 켜고 시스템을 테스트하여 조광기가 예상대로 조명기구를 제어할 수 있는지 확인합니다.
- 장면 또는 그룹 구성: DALI 시스템이 장면 설정 또는 조명기구 그룹화와 같은 고급 기능을 지원하는 경우 제조업체의 지침에 따라 이러한 설정을 구성할 수 있습니다.

DALI 시스템은 기능 및 요구 사항이 크게 다를 수 있으므로 항상 제조업체의 설명서를 참조하여 가장 정확하고 자세한 정보를 확인하세요.
스마트 조광기

스마트 조광기 스위치 배선은 기존 조광기 배선과 비슷한 단계를 거치지만, 스마트 홈 네트워크에 장치를 연결할 때 몇 가지 추가 고려사항이 있습니다. 스마트 조광기는 스마트폰 앱, 음성 명령 또는 자동화 루틴을 통해 제어할 수 있으며, 무선 연결을 유지하기 위해 일정한 전력을 공급하기 위한 중성선이 필요한 경우가 많습니다.
참고: 전기 회로를 다루는 작업은 위험할 수 있습니다. 경험이 없는 경우 자격을 갖춘 전기 기술자에게 문의하거나 고용할 것을 강력히 권장합니다. 배선을 잘못하면 감전, 화재 또는 조광기 및 기타 전기 부품의 손상을 초래할 수 있습니다.
필요한 도구 및 자료
- 스크루드라이버
- 전선 피복제거기
- 전기 테이프
- 와이어 너트
- 멀티미터
- 스마트 디머 스위치
- 전기 박스 및 커버 플레이트
- 안전 장비(장갑, 보안경)
안전 예방 조치
- 회로 차단기에서 작업할 회로의 전원을 끕니다.
- 멀티미터를 사용하여 전원이 꺼져 있는지 확인합니다.
- 장갑과 보안경 등 적절한 안전 장비를 착용하세요.
일반 배선 단계
- 매뉴얼 읽기: 시작하기 전에 스마트 조광기의 설치 설명서를 읽고 특정 요구 사항과 기능을 이해하세요.
- 전선 식별: 전기 상자를 열고 전선을 확인합니다. 일반적으로 검은색(핫) 전선, 흰색(중성) 전선, 녹색 또는 노출된 구리(접지) 전선이 보일 것입니다.
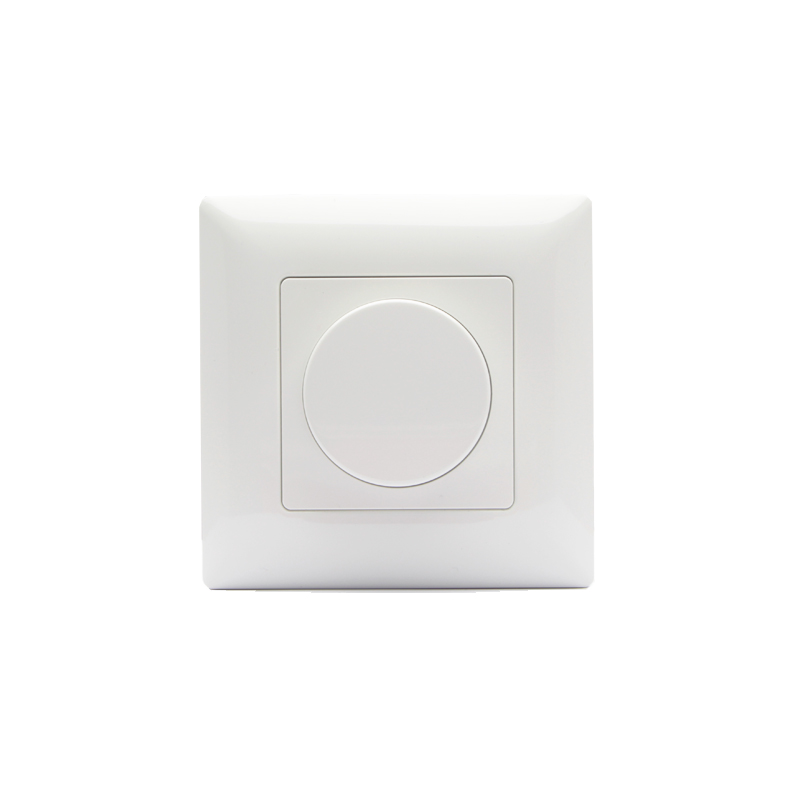
- 조광기 준비: 스마트 조명의 포장을 풀고 전선 또는 단자를 확인합니다. 일반적으로 검은색(또는 빨간색)은 열선, 흰색은 중성선, 녹색은 접지선 등 비슷한 색상을 볼 수 있습니다.
- 기존 스위치 분리: 기존 스위치를 교체하는 경우 전선 너트를 풀고 전선을 분리하여 분리하세요.
- 접지선 연결: 전기 상자의 접지선을 조광기의 접지선 또는 단자에 연결합니다. 와이어 너트를 사용하여 연결을 고정합니다.
- 중성선 연결: 대부분의 스마트 조광기는 상시 전원을 위해 중성선 연결이 필요합니다. 전기 상자의 흰색 와이어를 조광기의 흰색 와이어 또는 단자에 연결합니다. 와이어 너트를 사용하여 연결을 고정합니다.
- 핫 와이어 연결: 전기 상자의 검은색(뜨거운) 와이어를 조광기의 검은색(또는 빨간색) 와이어 또는 단자에 연결합니다. 와이어 너트를 사용하여 연결을 고정합니다.
- 집어넣기 및 보안: 모든 전선 너트가 고정되어 있는지 확인하면서 전선을 전기 상자에 조심스럽게 다시 집어넣습니다.
- 조광기 부착: 제조업체의 지침에 따라 스마트 조광기를 전기 상자에 나사로 고정합니다.
- 커버 플레이트 설치: 조광기 위에 커버 플레이트를 부착합니다.
- 전원 복원 및 테스트: 회로 차단기에서 전원을 다시 켜고 조광기를 테스트하여 예상대로 작동하는지 확인합니다.
스마트 기능을 위한 추가 단계
- Wi-Fi에 연결: 제조업체의 지침에 따라 일반적으로 스마트폰 앱을 통해 스마트 조광기를 Wi-Fi 네트워크에 연결합니다.
- 소프트웨어 업데이트: 일부 스마트 디머는 설치 후 소프트웨어 업데이트가 필요할 수 있습니다. 이는 일반적으로 앱을 통해 수행됩니다.
- 설정 구성: 앱을 사용하여 일정, 장면 또는 Amazon Alexa 또는 Google Assistant와 같은 스마트 어시스턴트를 통한 음성 제어와 같은 설정을 구성할 수 있습니다.
- 스마트 기능 테스트: 스마트 기능을 테스트하여 예상대로 작동하는지 확인하세요.
항상 제조업체의 지침과 현지 전기 규정을 따르세요. 어떤 단계가 확실하지 않은 경우 자격을 갖춘 전기 기술자에게 문의하세요.
결론
LED 조광기 배선은 단계를 주의 깊게 따르고 필요한 안전 예방 조치를 취한다면 간단한 과정입니다. 집의 분위기를 개선하거나 상업 환경에서 에너지 효율을 개선하려는 경우 LED 조광기는 조명 시스템에 추가할 수 있는 유용한 제품입니다.