LED-valonauhojen kytkentä voi tuntua pelottavalta. Oikealla opastuksella se on kuitenkin yksinkertainen prosessi. Se voi parantaa tilaasi kauniisti. Se on tarkoitettu tee-se-itse-harrastajille, kodinomistajille, jotka haluavat lisätä tunnelmaa, ja sähköasentajille uuden projektin parissa. Tämä opas yksinkertaistaa johdotusta puolestasi.
LED-valonauhojen kytkentä aloitetaan määrittämällä nauhan tyyppi (yksivärinen, RGB tai RGBW). Kytke positiivinen ja negatiivinen johto virtalähteen tai ohjaimen vastaaviin liittimiin. RGB-nauhojen osalta sovita värit (punainen, vihreä, sininen) vastaaviin liittimiin. Varmista, että kaikki liitännät ovat tukevasti kiinni, ja noudata mukana toimitettua kytkentäkaaviota tarkkojen ohjeiden saamiseksi.
Tutustutaanpa yksityiskohtaisesti erityyppisten LED-valonauhojen kytkentään. Näin varmistat, että sinulla on tietoa ja varmuus tehdä se oikein.
Rinnakkaiskytkennän ymmärtäminen: Yksinkertaistettu
Rinnakkaisliitännät ovat ratkaisevan tärkeitä LED-nauhavalaistuksessa. Jokainen nauhan segmentti on kytketty sarjaan, mikä tarkoittaa, että käyttöjännitteet lasketaan yhteen, jolloin saadaan tarvittava korkeampi jännite. Kaikki segmentit on kytketty rinnakkain, jolloin ne saavat saman jännitteen, mutta virrankulutus kasvaa nauhan pituuden myötä. Käytä rinnakkaiskytkentöjä. Ne varmistavat, että jokainen nauhan segmentti saa tasaisen jännitteen. Tämä estää epätasaisen kirkkauden tai välkkymisen kaltaiset ongelmat. Tämä asetus on avainasemassa pitkille LED-nauhoille. Se pitää valon vakaana ja tasaisena. Rinnakkaiskytkennän perusteiden ymmärtäminen voi parantaa huomattavasti LED-valaistusasennuksen tehokkuutta ja luotettavuutta.


Jännitehäviö: yksinkertainen selitys
Jännitehäviö syntyy, kun jännite nauhan lopussa on pienempi kuin alussa. Tämä voi aiheuttaa sen, että lopussa olevat LEDit ovat himmeämpiä. Voit vähentää jännitehäviötä käyttämällä paksumpia johtoja tai lyhyempiä nauhoja tai syöttämällä virtaa useammasta kohdasta nauhan varrella. Asennus on suunniteltava huolellisesti jännitehäviön minimoimiseksi, erityisesti pidemmissä juoksuissa. Yksi hyvä menetelmä on käyttää tehonkorotuksia tai vahvistimia. Käytä niitä säännöllisin väliajoin. Ne auttavat ylläpitämään tasaista jännitettä nauhan yli. Myös paremman virtalähteen valitseminen, jossa on riittävästi kapasiteettia, voi myös vähentää jännitehäviön riskiä. Ymmärtämällä ja korjaamalla jännitehäviön voit varmistaa, että LED-valonauhat toimivat hyvin. Ne tuottavat tasaista valoa koko asennuksessa.
PWM-vahvistin: Monimutkaisen muuttaminen yksinkertaiseksi
PWM-vahvistin (Pulse Width Modulation) vahvistaa signaalia LED-nauhoille, mikä mahdollistaa tasaisen kirkkauden pitkillä nauhoilla. Se varmistaa, että virtasignaali pysyy voimakkaana, mikä estää himmenemisen tai välkkymisen. PWM-vahvistimet ovat hyödyllisiä suurissa asennuksissa. Ne pitävät valotehon tasaisena, mikä on ratkaisevan tärkeää. Nämä vahvistimet elvyttävät PWM-signaalin. Ne pidentävät LED-nauhojen tehokasta kantamaa. Näin varmistetaan, että jokainen osa saa oikean jännitteen ja virran. PWM-vahvistimien asentaminen on yksinkertaista. Voit lisätä ne asennukseesi. Kun ne sijoitetaan ja asetetaan oikein, PWM-vahvistimet voivat parantaa LED-nauhavalaistusta huomattavasti. Ne voivat parantaa suorituskykyä ja pitkäikäisyyttä.
LED-valonauhatyypit
LED-valonauhoja on erilaisia, kuten yksivärisiä, RGB- (punainen, vihreä, sininen), RGBW- (punainen, vihreä, sininen, valkoinen) ja säädettävän valkoisia. Kukin tyyppi vaatii erilaiset johdotukset ja ohjaimet. Yksiväriset nauhat ovat yksinkertaisimpia, ja niissä on vain kaksi johtoa positiivista ja negatiivista liitäntää varten. RGB-nauhat lisäävät kolme värikanavaa, jolloin värien sekoittaminen edellyttää ohjainta. RGBW-nauhat sisältävät ylimääräisen valkoisen kanavan vivahteikkaampia valaistusvaihtoehtoja varten. Viritettävät valkoiset nauhat mahdollistavat värilämpötilan säädöt, jolloin valkoisen valon vaihteluväli vaihtelee lämpimästä viileään. Näiden LED-nauhatyyppien välisten erojen tunteminen voi auttaa sinua valitsemaan oikean tuotteen tarpeisiisi. Se varmistaa myös oikean asennuksen ja käytön.
Kuinka johdottaa yhden värin LED-valonauhat
Yhden värin LED-nauhavalojen kytkentä ei-himmennettävien LED-ajureiden kanssa
Jos kyseessä on ei-himmennettävä LED-ohjain, liitä nauhan positiivinen johto ohjaimen positiiviseen liittimeen. Kytke sitten nauhan miinusjohto ohjaimen miinusliittimeen. Kiinnitä kaikki liitännät ja kytke virta päälle. Tämä yksinkertainen kytkentätapa sopii hyvin perusasennuksiin. Ne eivät vaadi himmennystä. Ei-himmennettävät ohjaimet tuottavat vakiotehon. Näin varmistetaan, että LED-nauhat loistavat parhaimmillaan. Kun kytket useita nauhoja, on tärkeää varmistaa, että kokonaiswattimäärä ei ylitä ohjaimen kapasiteettia. Kaikkien liitäntöjen varmistaminen on avainasemassa. Noudata valmistajan ohjeita. Näin vältät sähköongelmat ja varmistat turvallisen ja luotettavan asennuksen.
Johdotus yhden värin LED-valonauhat himmennettävällä LED-ohjaimellas
Himmennettävien LED-ohjainten avulla voit säätää kirkkautta. Liitä nauha ohjaimeen edellä kuvatulla tavalla. Noudata himmennintyyppisi erityistä kytkentäkaaviota:
– 0-10V himmennettävän LED-ohjaimen kytkentäkaavio
Himmennettävä 0-10V-ohjain käyttää kirkkauden säätämiseen pienjänniteohjaussignaalia. Kytke 0-10V-himmennin ohjaimen ohjausliittimiin varmistaen oikea napaisuus. Tämä asetus mahdollistaa tasaisen himmennyksen koko alueella.


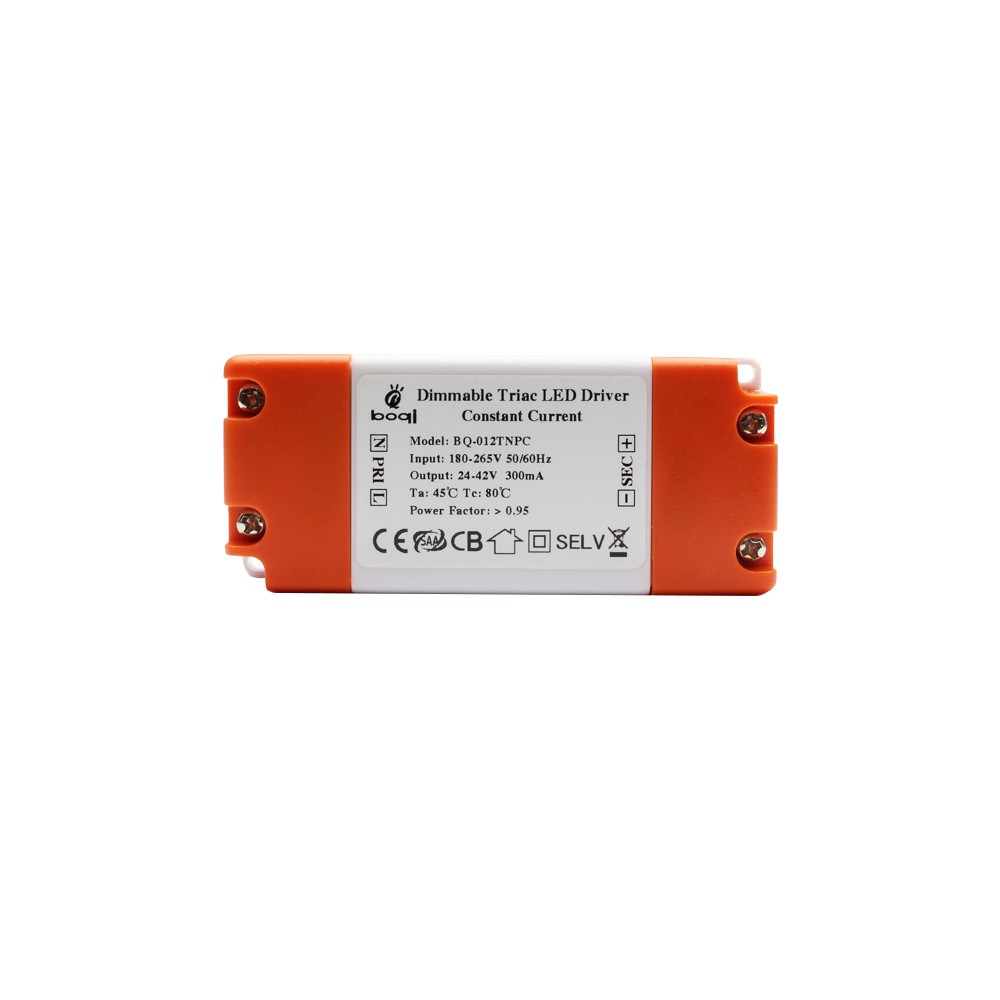
– Triac Dimmable LED Driver Connection Diagram
Triac dimmers work with AC phase-cut dimming. Connect the driver to a compatible triac dimmer switch, ensuring that the driver’s input matches the dimmer’s output. This method provides a familiar dimming experience similar to traditional incandescent bulbs.

– DALI Dimmable LED Driver Connection Diagram
DALI (Digital Addressable Lighting Interface) dimmers offer precise control and programmability. Connect the DALI control lines to the driver’s DALI input terminals. This setup is ideal for complex lighting systems requiring advanced control features.


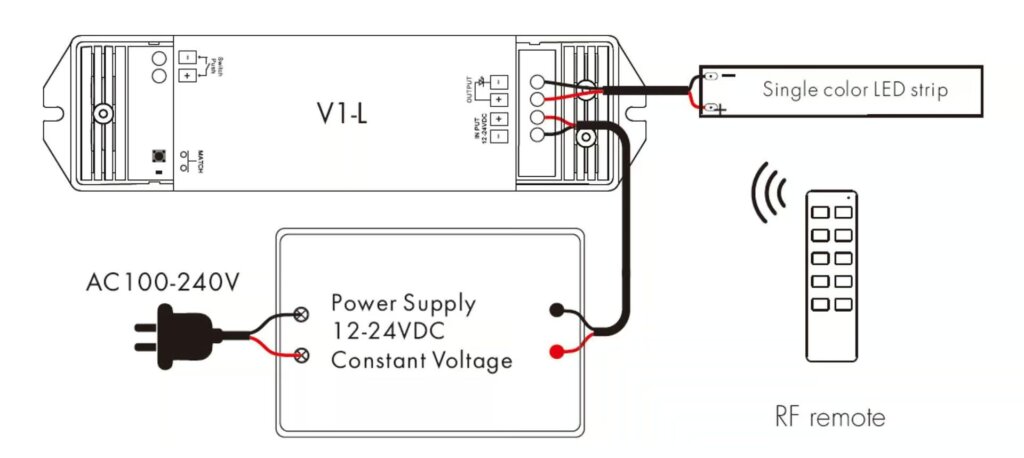
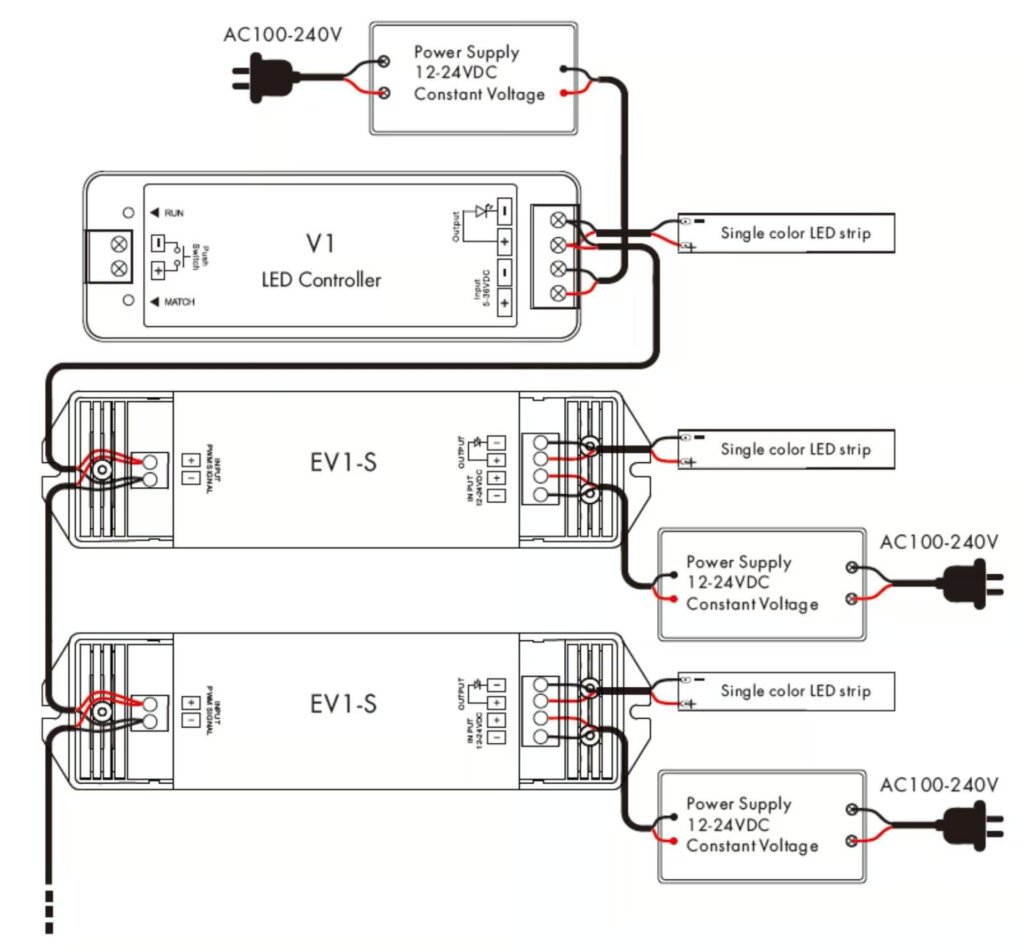
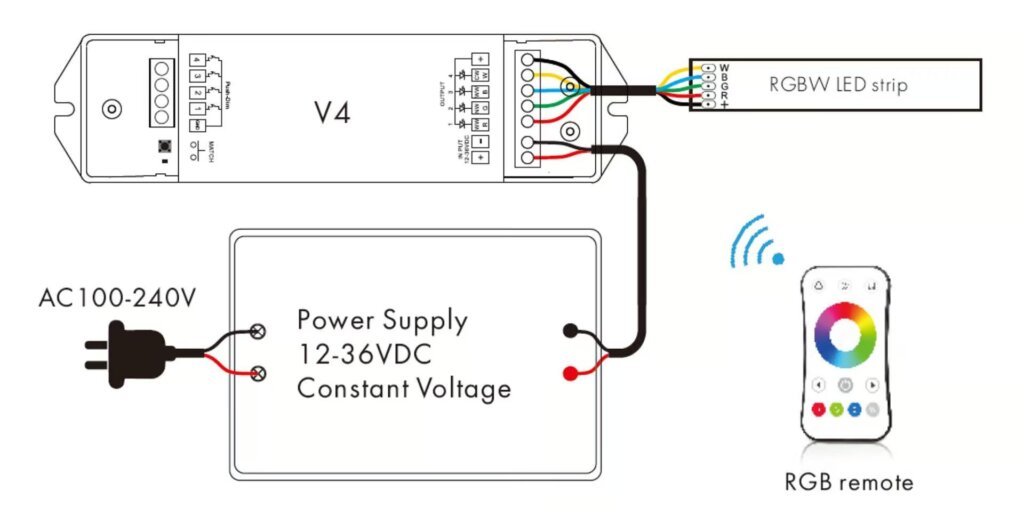
Yhden värin LED-nauhavalojen kytkentä LED-ohjaimiin
LED controllers provide more flexibility in controlling the lights. Connect the strip to the controller. Make sure the positive and negative wires match the controller’s terminals. Controllers allow for various effects, such as dimming, flashing, and custom lighting patterns. Ensure that the controller is compatible with your LED strip and power supply. Securing the connections properly is key. Following the manufacturer’s guidelines will ensure reliable operation and prevent potential issues.
Without PWM amplifier
With PWM amplifier
Yhden värin LED-valonauhojen kytkentä DMX512-dekooderin kanssa
DMX512 decoders are used for advanced lighting setups. Connect the strip to the decoder, matching the positive and negative wires to the correct terminals. DMX512 is a digital communication protocol. It is used for lighting control and provides precise control over many channels. This setup is common in stage lighting. It is also used in architectural lighting and other pro applications. Ensure the DMX512 decoder is set up right. Connect it to the DMX controller for best performance.

Kuinka johdottaa viritettäviä valkoisia LED-valonauhoja
Viritettävien valkoisten LED-valonauhojen kytkentä himmennettävien LED-ohjainten kanssa
Tunable white LED strips allow for color temperature adjustments. Connect the wires as per the driver’s instructions, ensuring proper connections for both color temperature and brightness control. Tunable white strips typically have additional control lines for adjusting the color temperature. These strips can transition from warm white to cool white, providing versatile lighting options. Ensure that your dimmable LED driver is compatible with tunable white strips and that all connections are secure for reliable operation.
DALI DT8 Tunable White LED Driver
DALI DT8 drivers are used for precise control of tunable white strips. Follow the wiring diagram provided by the manufacturer. DALI DT8 drivers support tunable white LED strips. They allow independent control of brightness and color temperature. This advanced control capability is ideal for applications requiring dynamic lighting environments. Properly wiring and configuring the DALI DT8 driver ensures smooth operation and optimal performance of your tunable white LED strips.

Viritettävien valkoisten LED-valonauhojen kytkentä LED-ohjaimiin
Connect the tunable white strip to the controller, matching the positive and negative terminals. Ensure secure connections for reliable operation. LED controllers for tunable white strips allow for precise adjustments in color temperature and brightness. These controllers often come with remote controls or can be integrated into smart home systems for added convenience. Proper installation and configuration of the controller ensure consistent and reliable operation.
Without PWM amplifier

Viritettävien valkoisten LED-valonauhojen kytkentä DMX512-dekooderin kanssa

Use a DMX512 decoder for tunable white strips in advanced setups. Connect the strip to the decoder, following the wiring diagram for proper installation. DMX512 decoders provide fine control over color temperature and brightness. They are ideal for professional lighting. Ensure that the decoder is correctly connected to the DMX controller and that all connections are secure for optimal performance.
Kaksi johdot viritettävissä valkoinen LED nauhat valot
Simpler tunable white strips use two wires for color temperature control. Connect these wires to the appropriate terminals on your controller or driver. This type of tunable white strip typically has a simpler wiring configuration, making it easier to install. However, it may offer fewer control options compared to more advanced tunable white systems. Ensure that your controller or driver is compatible with the two-wire configuration for reliable operation.

Miten johdottaa RGB LED nauhat valot
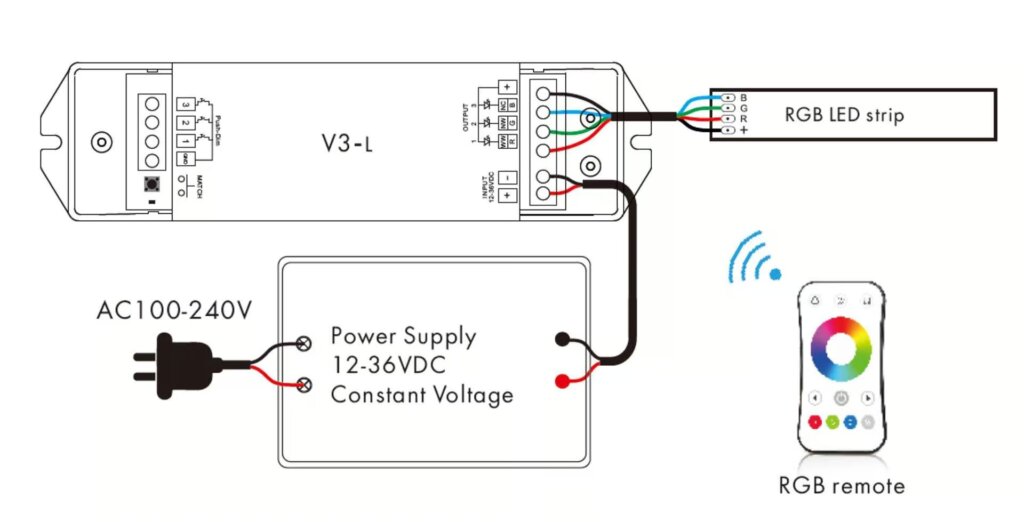
Johdotus RGB LED-valonauhat himmennettävillä LED-ajureilla
Connect the RGB strip to the dimmable driver, matching the red, green, and blue wires to the corresponding terminals. Use the wiring diagram provided. Dimmable drivers for RGB strips allow you to adjust the brightness of the entire strip. However, color control will require an additional RGB controller. Ensure that all connections are secure and that the driver is compatible with your RGB strip for reliable operation.
DALI DT8 RGB LED Driver
For advanced RGB control, use a DALI DT8 driver. Follow the manufacturer’s wiring diagram for precise installation. DALI DT8 drivers provide separate control over each color. This allows for complex lighting and precise color mixing. This advanced control is great for apps that need dynamic lighting. They need lighting that can be customized. Proper installation and setup of the DALI DT8 driver make sure your RGB LED strips work well. They will have the best performance.

Johdotus RGB LED-valonauhat LED-ohjaimilla
Connect the RGB strip to the controller, ensuring each color wire is connected to the appropriate
terminal. RGB controllers allow for various lighting effects, such as color changing, flashing, and custom patterns. Ensure that the controller is compatible with your RGB strip and power supply. Properly securing the connections and following the manufacturer’s guidelines will help ensure reliable operation and prevent potential issues.
Without PWM amplifier
With PWM amplifier

Johdotus RGB LED nauhavalot DMX512 dekooderin kanssa
Use a DMX512 decoder for RGB strips in complex setups. Follow the wiring diagram to ensure correct installation. DMX512 decoders provide precise control over each color channel, allowing for intricate lighting effects and precise color mixing. This setup is commonly used in professional lighting applications, such as stage lighting and architectural lighting. Make sure the DMX512 decoder is set up right. Connect it to the DMX controller for the best performance.

Miten johdottaa RGBW LED Strip Lights
Johdotus RGBW LED-valonauhat himmennettävillä LED-ajureilla
Connect the RGBW strip to the dimmable driver, ensuring all color wires (red, green, blue, white) are connected correctly. Dimmable drivers for RGBW strips allow you to adjust the brightness of the entire strip. However, color control will require an additional RGBW controller. Ensure that all connections are secure and that the driver is compatible with your RGBW strip for reliable operation.
DALI DT8 RGBW LED Driver
For advanced RGBW control, use a DALI DT8 driver. Follow the manufacturer’s wiring instructions. DALI DT8 drivers provide separate control over each color. This allows for complex lighting effects and precise color mixing. This advanced control is great for applications. They need dynamic and customizable lighting. The DT8 driver must be properly installed and configured. This ensures smooth and optimal performance of your RGBW LED strips.

Johdotus RGBW LED-valonauhat LED-ohjaimilla
Connect the RGBW strip to the controller, matching all color wires to the correct terminals. RGBW controllers allow for various lighting effects, such as color changing, flashing, and custom patterns. Ensure that the controller is compatible with your RGBW strip and power supply. Securing the connections properly and following the manufacturer’s guidelines will help. It will ensure reliable operation and prevent issues.
Without PWM amplifier
With PWM amplifier

Johdotus RGBW LED-valonauhat DMX512-dekooderin kanssa
Use a DMX512 decoder for RGBW strips in advanced setups. Follow the wiring diagram for proper installation. DMX512 decoders give precise control over each color channel. They allow for complex lighting effects and exact color mixing. This setup is common in professional lighting. It is used for stage and architectural lighting. Make sure the DMX512 decoder is set up and connected to the DMX controller. This is needed for best performance.

Kuinka johdottaa RGB & CCT LED-valonauhat valot
Johdotus RGBW LED-valonauhat himmennettävillä LED-ajureilla
Follow the wiring diagram to connect the RGBW strip to a dimmable driver, ensuring all connections are secure. Dimmable drivers for RGBW strips allow you to adjust the brightness of the entire strip. However, color control will require an additional RGBW controller. Ensure that all connections are secure and that the driver is compatible with your RGBW strip for reliable operation.
Johdotus RGBW LED-valonauhat LED-ohjaimilla
Connect the strip to the controller, matching the wires to the appropriate terminals. RGBW controllers allow for various lighting effects, such as color changing, flashing, and custom patterns. Ensure that the controller is compatible with your RGBW strip and power supply. Properly securing the connections and following the manufacturer’s guidelines will help ensure reliable operation and prevent potential issues.
Without PWM amplifier

With PWM amplifier

Johdotus RGBW LED-valonauhat DMX512-dekooderin kanssa
Use a DMX512 decoder for complex setups. Follow the wiring diagram to ensure proper installation. DMX512 decoders provide precise control over each color channel. They allow for complex lighting effects and exact color mixing. This setup is commonly used in professional lighting applications, such as stage lighting and architectural lighting. Ensure the DMX512 decoder is properly configured. Connect it to the DMX controller for best performance.

Kuinka johdottaa osoitteelliset LED-valonauhat
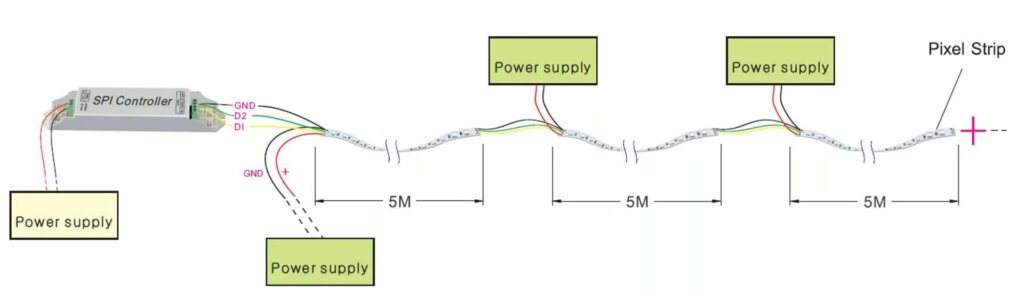
Kuinka johdottaa SPI-osoitteelliset LED-valonauhat
Connect the data and power wires of the SPI addressable strip to the controller, following the wiring diagram provided. Addressable LED strips allow for individual control of each LED, enabling complex lighting effects and patterns. Ensure that the controller is compatible with your SPI addressable strip and that all connections are secure. Properly configuring the controller and following the manufacturer’s instructions will help ensure reliable operation and prevent potential issues.
SPI-osoitteelliset LED-valonauhat, joissa on vain datakanava
Ensure the data wire is connected securely to the controller. This setup allows for basic control of addressable LEDs. It lets you make custom lighting effects. Properly securing the data wire and following the wiring diagram will help ensure reliable operation and prevent potential issues.

SPI-osoitteelliset LED-valonauhat, joissa on data- ja kellokanavat
Connect both data and clock wires to the controller, ensuring secure connections. This setup allows for more precise control of the addressable LEDs, enabling complex lighting effects and patterns. Properly configuring the controller and following the manufacturer’s instructions will help ensure reliable operation and prevent potential issues.

SPI-osoitettavat LED-valonauhat, joissa on data- ja varakäyttökanavat
Follow the wiring diagram to connect data, clock, and backup data wires to the controller. This configuration provides redundancy, ensuring reliable operation even if one data channel fails. Securing all connections properly is key. Following the manufacturer’s instructions will help. It ensures reliable operation and prevents potential issues.
DMX512-osoitteellisten LED-valonauhojen kytkentäohjeet
Use a DMX512 decoder for addressable strips. Follow the wiring diagram for proper installation. DMX512 decoders provide precise control over each LED, enabling complex lighting effects and patterns. This setup is commonly used in professional lighting applications, such as stage lighting and architectural lighting. Ensure the DMX512 decoder is set up right. Connect it to the DMX controller. This is key for top performance.

UKK
- How are strip LEDs wired?
- For each segment, the LEDs are wired in series, which means the operating voltages are added up, giving the higher voltage needed. All segments are wired in parallel, so they receive the same voltage, but the current draw increases with the length of the strip. Understanding this wiring method helps maintain consistent brightness and prevents issues such as uneven lighting or flickering.
- What are the colors of the wires on LED light strips?
- RGB strip light has a 4-wire connection: green, red, blue for the LEDs, and black/white for the common +12V connection. Properly matching these wires to the corresponding terminals on the controller or power supply ensures correct operation and color mixing.
- What are 4 wires in LED strip light?
- For RGB strips, you need 4 wires: one neutral (yellow) and the rest control the 3 LED colors (Red, Green, Blue). Connecting these wires correctly ensures proper color control and operation of the strip.
- How many wires for an LED strip?
- The RGBW LED strip has five wires: red, green, blue, white, and positive. Connect the LED light strip to the corresponding mark on the RGBW LED light controller. Ensuring all connections are secure and following the wiring diagram provided by the manufacturer will help prevent potential issues and ensure reliable operation.
Päätelmä
Wiring LED strip lights don’t have to be intimidating. With this guide, you now have the knowledge to tackle various types of LED strip lights, ensuring a successful and safe installation. Happy lighting!
Sulkeminen
Sopivien välkkymättömien himmennettävien LED-ajurien valinta on ratkaisevan tärkeää valaistuksen optimoimiseksi ja siten yleisen hyvinvoinnin ja mukavuuden parantamiseksi. Välkynnän puuttuminen on ratkaisevan tärkeää asuintilojen viihtyisyyden kannalta.
Tässä artikkelissa perehdymme seuraaviin seikkoihin, jotka auttavat sinua valitsemaan ihanteelliset välkkymättömät himmentävät LED-ohjaimet:
Tutustumme olennaisiin ominaisuuksiin, kuten eritelmiin, yhteensopivuuteen ja tehokkuuteen, jotta voimme välttää valaistuksen välkkymisen. Lisäksi keskustelemme korkean PWM-taajuuden merkityksestä välkkymättömien tulosten saavuttamiseksi himmennettävissä LED-ajurisarjoissa.
Osta Himmennettävät LED-ajurit boqi
Tieto valon välkkymisen yleisimmistä syistä on tärkeää, mutta sopivan himmennettävän LED-ohjaimen valinta on vielä käsillä. Haluttujen valaistus- ja himmennystehosteiden toteuttamiseksi on ehdottoman tärkeää olla yhteydessä hyvämaineiseen LED-ajurivalmistajaan. boqi on tunnettu himmennettävien LED-ajurien valmistaja, joka tarjoaa valikoiman välkkymättömiä, himmentimiä ja ohjaimia. Tuotevalikoimaan kuuluvat TRIAC-, 0-10V- ja DALI-LED-ajurit, himmentimet ja ohjaimet.
Yrityksellä on tuotantotukikohtia Kiinassa, joten se on perehtynyt asiakaskuntansa erityisiin tarpeisiin ja vaatimuksiin. Älä epäröi ottaa yhteyttä, jos haluat tiedustella LED-ajuria tai -ohjainta koskevia tarpeitasi, jotta voimme auttaa sinua valintojesi tarkentamisessa.