LED-stripverlichting bedraden kan ontmoedigend lijken. Maar met de juiste begeleiding is het een eenvoudig proces. Het kan je ruimte prachtig verfraaien. Het is voor doe-het-zelvers, huiseigenaren die sfeer willen toevoegen en elektriciens die een nieuw project willen beginnen. Deze gids zal de bedrading voor je vereenvoudigen.
Om LED stripverlichting te bedraden, begin je met het identificeren van het type strip (enkele kleur, RGB of RGBW). Sluit de positieve en negatieve draden aan op de overeenkomstige klemmen op je voeding of controller. Voor RGB-strips moet je de kleuren (rood, groen, blauw) op de juiste aansluitpunten aansluiten. Zorg ervoor dat alle aansluitingen goed vastzitten en volg het meegeleverde bedradingsschema voor precieze instructies.
Laten we eens in de details duiken van het bedraden van verschillende soorten LED stripverlichting. Zo weet je zeker dat je de kennis en het vertrouwen hebt om het goed te doen.
Parallelle aansluiting begrijpen: Vereenvoudigd
Parallelle verbindingen zijn cruciaal bij LED stripverlichting. Elk segment van de strip wordt in serie bedraad, wat betekent dat de bedrijfsspanningen worden opgeteld, waardoor de noodzakelijke hogere spanning wordt geleverd. Alle segmenten zijn parallel geschakeld en krijgen dezelfde spanning, maar de stroomopname neemt toe met de lengte van de strip. Gebruik parallelle aansluitingen. Ze zorgen ervoor dat elk strooksegment een constante spanning krijgt. Dit voorkomt problemen zoals ongelijke helderheid of flikkeren. Deze opstelling is essentieel voor lange LED-strips. Het houdt het licht stabiel en gelijkmatig. Als je de basisprincipes van parallelle bedrading begrijpt, kun je de effectiviteit en betrouwbaarheid van je LED-verlichtingsinstallatie aanzienlijk verbeteren.


Spanningsdaling: een eenvoudige uitleg
Spanningsdaling treedt op wanneer de spanning aan het einde van de strip lager is dan aan het begin. Dit kan ervoor zorgen dat de LED's aan het einde zwakker worden. Om spanningsverlies te beperken, kun je dikkere draden of kortere strips gebruiken, of op meerdere punten langs de strip stroom injecteren. Het is essentieel om je installatie zorgvuldig te plannen om spanningsverlies te minimaliseren, vooral bij langere stroken. Een goede methode is om stroomversterkers te gebruiken. Gebruik ze op regelmatige tijdstippen. Ze helpen een constante spanning over de strip te handhaven. Ook het kiezen van een betere voeding met voldoende capaciteit kan het risico op spanningsval verminderen. Door de spanningsval te begrijpen en op te lossen, kun je ervoor zorgen dat je LED stripverlichting goed werkt. Ze zullen gelijkmatig licht geven over de hele installatie.
PWM-versterker: Van complex naar eenvoudig
Een PWM-versterker (Pulse Width Modulation) versterkt het signaal naar de LED-strips, waardoor een consistente helderheid over lange strips mogelijk is. Het zorgt ervoor dat het voedingssignaal sterk blijft, waardoor dimmen of flikkeren wordt voorkomen. PWM-versterkers zijn handig in grote installaties. Ze houden de lichtopbrengst uniform, wat essentieel is. Deze versterkers regenereren het PWM-signaal. Ze vergroten het effectieve bereik van je LED strips. Dit zorgt ervoor dat elke sectie de juiste spanning en stroom krijgt. Het installeren van PWM-versterkers is eenvoudig. Je kunt ze toevoegen aan je opstelling. Als je ze goed plaatst en instelt, kunnen PWM-versterkers LED-stripverlichting enorm verbeteren. Ze kunnen de prestaties en levensduur verbeteren.
Soorten LED Stripverlichting
LED stripverlichting is er in verschillende soorten, waaronder enkele kleur, RGB (Rood, Groen, Blauw), RGBW (Rood, Groen, Blauw, Wit) en afstembaar wit. Elk type vereist andere bedrading en controllers. Strips met één kleur zijn het eenvoudigst, met slechts twee draden voor positieve en negatieve aansluitingen. RGB-strips voegen drie kleurkanalen toe, waarvoor een controller nodig is om kleuren te mengen. RGBW-strips hebben een extra wit kanaal voor meer genuanceerde verlichtingsopties. Met afstembare witte strips kun je de kleurtemperatuur aanpassen en heb je een bereik van warm tot koel wit licht. Als je de verschillen tussen deze soorten LED-strips kent, kun je het juiste product voor jouw behoeften kiezen. Het zorgt ook voor een juiste opstelling en gebruik.
Hoe enkelkleurige LED-stripverlichting bedraden
Bedrading van enkelkleurige LED Stripverlichting met niet-dimbare LED-drivers
Sluit bij niet-dimbare LED-drivers de positieve draad van de strip aan op de positieve klem van de driver. Sluit vervolgens de negatieve draad van de strip aan op de negatieve klem van de driver. Zet alle aansluitingen vast en schakel in. Deze eenvoudige bedradingsmethode is geweldig voor basisinstallaties. Dimmen is niet nodig. Niet-dimbare drivers leveren een constante output. Dit zorgt ervoor dat je LED-strips op hun best schijnen. Als je meerdere strips bedraadt, is het belangrijk om ervoor te zorgen dat het totale wattage de capaciteit van de driver niet overschrijdt. Het is belangrijk dat je alle aansluitingen goed vastmaakt. Volg de instructies van de fabrikant. Dit voorkomt elektrische problemen en zorgt voor een veilige, betrouwbare installatie.
Bedrading enkelkleurige LED Stripverlichting met dimbare LED-stuurprogrammas
Met dimbare LED-drivers kun je de helderheid aanpassen. Sluit de strip aan op de driver zoals hierboven beschreven. Volg het specifieke bedradingsschema voor je type dimmer:
– 0-10V Dimbare LED Driver Aansluitingsschema
Een 0-10V dimbare driver gebruikt een laagspanningssignaal om de helderheid aan te passen. Sluit de 0-10V dimmer aan op de stuurklemmen van de driver en zorg voor de juiste polariteit. Deze opstelling zorgt voor vloeiend dimmen over het hele bereik.


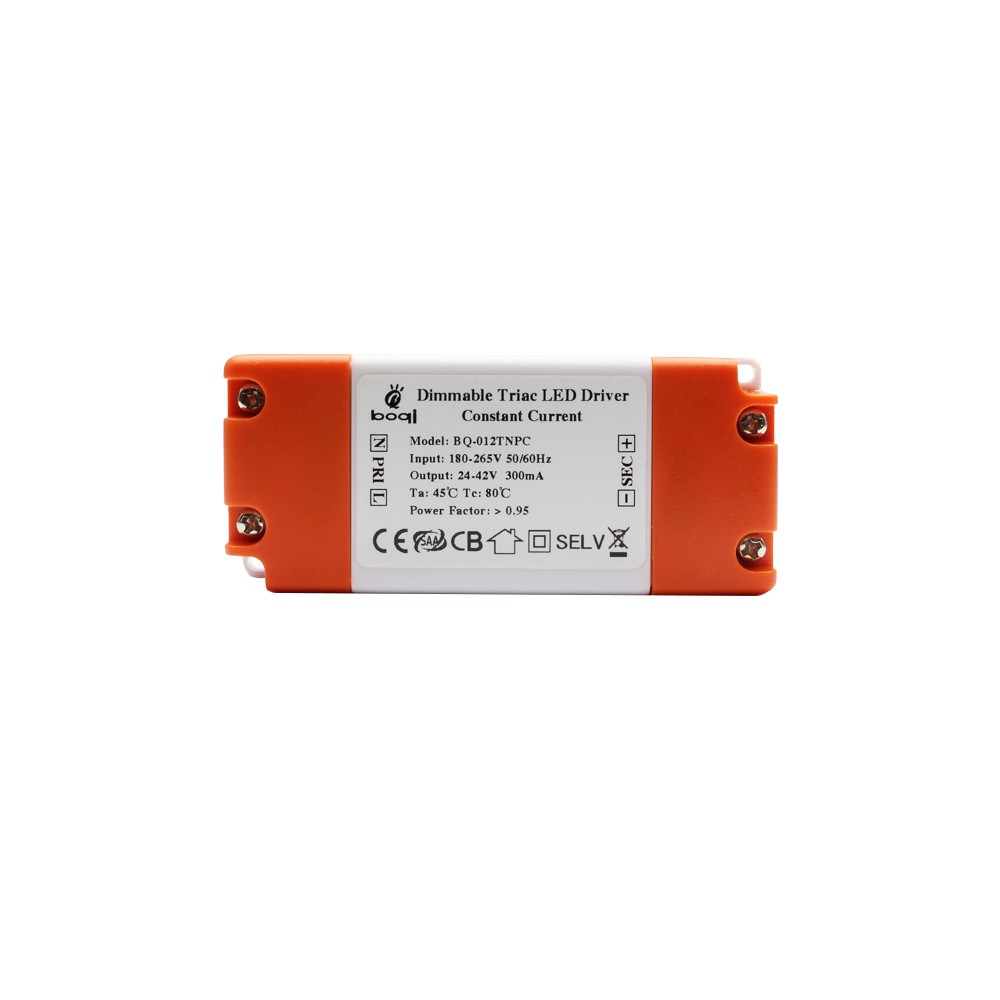
– Aansluitschema triac dimbare LED-driver
Triac-dimmers werken met AC-fase-afsnijdingsdimming. Sluit de driver aan op een compatibele triac-dimschakelaar en zorg ervoor dat de ingang van de driver overeenkomt met de uitgang van de dimmer. Deze methode biedt een vertrouwde dimervaring die vergelijkbaar is met traditionele gloeilampen.

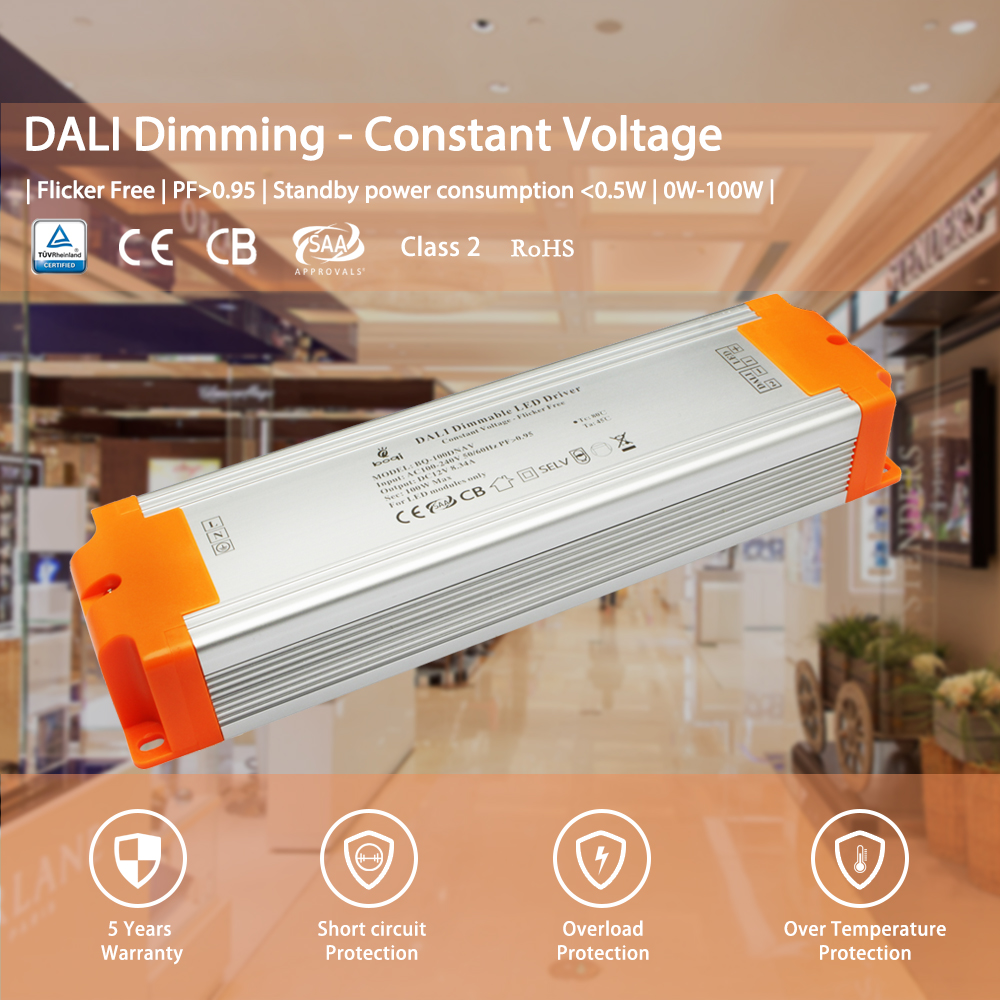
– DALI Dimbare LED Driver Aansluitschema
DALI-dimmers (Digital Addressable Lighting Interface) bieden nauwkeurige bediening en programmeerbaarheid. Sluit de DALI-besturingslijnen aan op de DALI-ingangen van de driver. Deze opstelling is ideaal voor complexe verlichtingssystemen die geavanceerde bedieningsfuncties vereisen.

Bedrading van enkelkleurige LED Stripverlichting met LED Regelaars
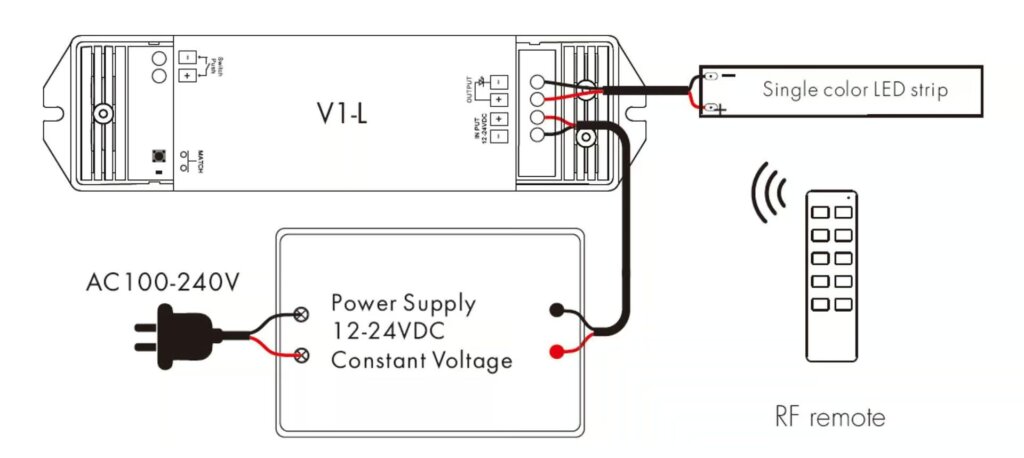
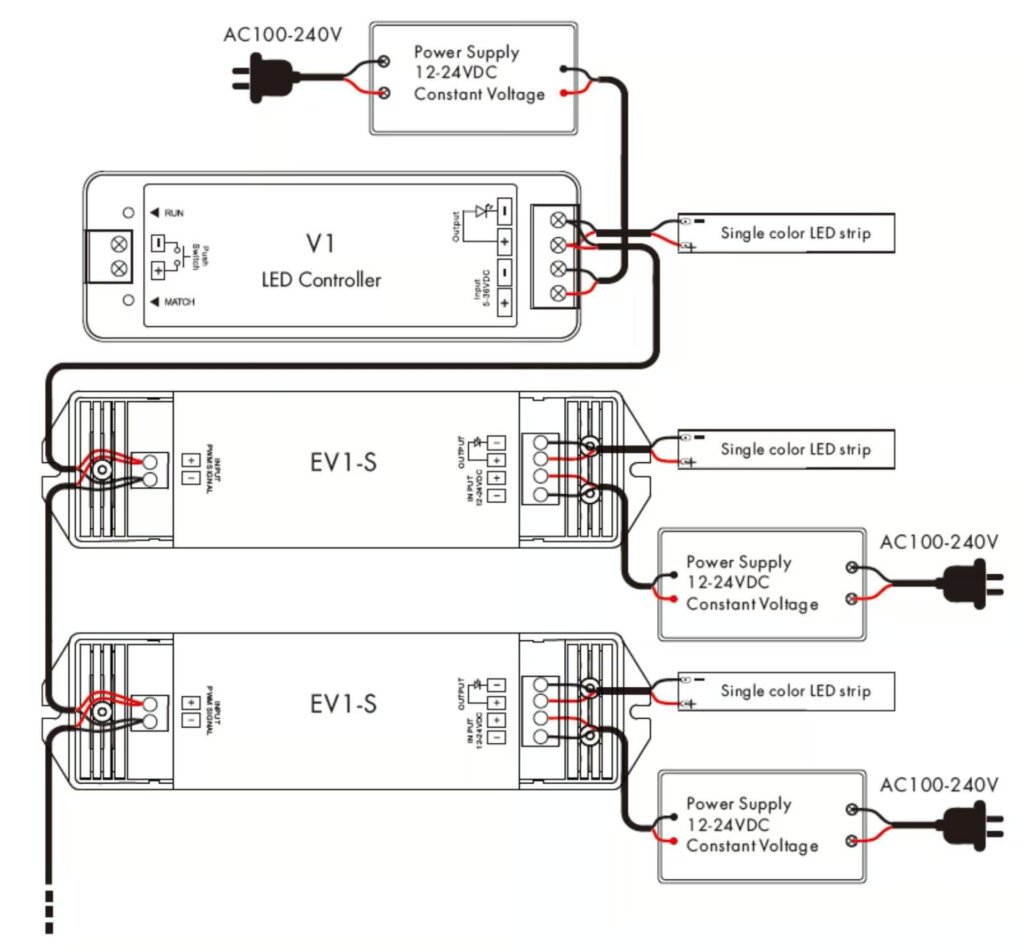
LED-controllers bieden meer flexibiliteit bij het regelen van de verlichting. Sluit de strip aan op de controller. Zorg ervoor dat de positieve en negatieve draden overeenkomen met de aansluitingen van de controller. Controllers maken verschillende effecten mogelijk, zoals dimmen, knipperen en aangepaste verlichtingspatronen. Zorg ervoor dat de controller compatibel is met je ledstrip en voeding. Het is belangrijk om de aansluitingen goed te beveiligen. Door de richtlijnen van de fabrikant te volgen, zorg je voor een betrouwbare werking en voorkom je mogelijke problemen.
Zonder PWM-versterker
Met PWM-versterker
Bedrading enkelkleurige LED Stripverlichting met DMX512 Decoder
DMX512 decoders worden gebruikt voor geavanceerde verlichtingsopstellingen. Sluit de strip aan op de decoder en zorg dat de positieve en negatieve draden op de juiste aansluitingen zitten. DMX512 is een digitaal communicatieprotocol. Het wordt gebruikt voor het regelen van verlichting en biedt nauwkeurige regeling over veel kanalen. Deze opstelling is gebruikelijk bij podiumverlichting. Het wordt ook gebruikt in architecturale verlichting en andere professionele toepassingen. Zorg ervoor dat de DMX512 decoder goed is ingesteld. Sluit hem aan op de DMX-controller voor de beste prestaties.

Zo bedraad je Tunable White LED Strip Lights
Bedrading van afstembare witte LED-stripverlichting met dimbare LED-drivers
Met afstembare witte LED-strips kun je de kleurtemperatuur aanpassen. Sluit de draden aan volgens de instructies van de driver en zorg voor de juiste aansluitingen voor zowel de kleurtemperatuur- als de helderheidsregeling. Afstembare witte strips hebben meestal extra besturingslijnen om de kleurtemperatuur aan te passen. Deze strips kunnen overgaan van warm wit naar koel wit, wat veelzijdige verlichtingsopties biedt. Zorg ervoor dat je dimbare LED-driver compatibel is met tunable white strips en dat alle aansluitingen goed vastzitten voor een betrouwbare werking.
DALI DT8 Afstembare witte LED-driver
DALI DT8-drivers worden gebruikt voor nauwkeurige aansturing van afstembare witte strips. Volg het bedradingsschema van de fabrikant. DALI DT8-drivers ondersteunen afstembare witte LED-strips. Hiermee kunnen helderheid en kleurtemperatuur onafhankelijk worden geregeld. Deze geavanceerde regelmogelijkheid is ideaal voor toepassingen die dynamische verlichtingsomgevingen vereisen. Een juiste bedrading en configuratie van de DALI DT8 driver zorgt voor een soepele werking en optimale prestaties van uw witte LED strips.

Bedrading van afstembare witte LED-stripverlichting met LED-regelaars
Sluit de afstembare witte strip aan op de controller en zorg dat de positieve en negatieve aansluitingen overeenkomen. Zorg voor stevige aansluitingen voor een betrouwbare werking. Met LED-controllers voor afstembare witte strips kun je de kleurtemperatuur en helderheid nauwkeurig aanpassen. Deze controllers worden vaak geleverd met afstandsbedieningen of kunnen worden geïntegreerd in smart home-systemen voor extra gebruiksgemak. Een juiste installatie en configuratie van de controller zorgen voor een consistente en betrouwbare werking.
Zonder PWM-versterker

Bedrading Afstembare witte LED Stripverlichting met DMX512 Decoder

Gebruik een DMX512 decoder voor afstembare witte strips in geavanceerde opstellingen. Sluit de strip aan op de decoder en volg het bedradingsschema voor een correcte installatie. DMX512 decoders bieden fijne controle over kleurtemperatuur en helderheid. Ze zijn ideaal voor professionele verlichting. Zorg ervoor dat de decoder correct is aangesloten op de DMX-controller en dat alle verbindingen goed vastzitten voor optimale prestaties.
Twee Draden Afstembare Witte LED Stripverlichting
Eenvoudiger afstembare witte strips gebruiken twee draden om de kleurtemperatuur te regelen. Sluit deze draden aan op de juiste aansluitingen van je controller of driver. Dit type afstembare witte strips heeft meestal een eenvoudigere bedradingsconfiguratie, waardoor het gemakkelijker te installeren is. Het kan echter minder besturingsopties bieden in vergelijking met meer geavanceerde afstembare witte systemen. Zorg ervoor dat je controller of driver compatibel is met de tweedraadsconfiguratie voor een betrouwbare werking.

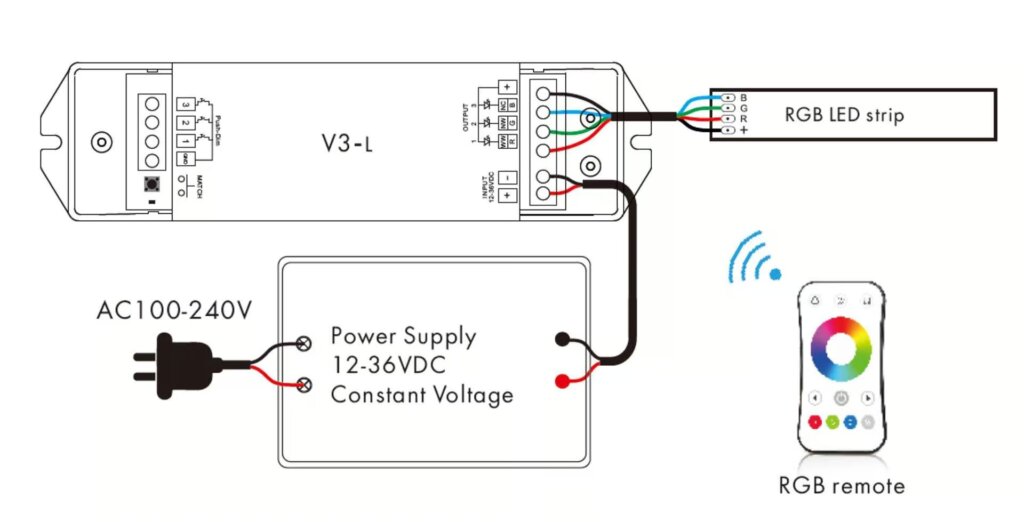
Hoe RGB LED Stripverlichting bedraden
Bedrading van RGB LED Stripverlichting met Dimbare LED Drivers
Sluit de RGB-strip aan op de dimbare driver en breng de rode, groene en blauwe draden aan op de overeenkomstige aansluitingen. Gebruik het meegeleverde bedradingsschema. Met dimbare stuurprogramma's voor RGB-strips kun je de helderheid van de hele strip aanpassen. Voor kleurregeling heb je echter een extra RGB-controller nodig. Zorg ervoor dat alle aansluitingen goed vastzitten en dat de driver compatibel is met je RGB-strip voor een betrouwbare werking.
DALI DT8 RGB LED-stuurprogramma
Voor geavanceerde RGB-besturing gebruikt u een DALI DT8 driver. Volg het bedradingsschema van de fabrikant voor een nauwkeurige installatie. DALI DT8-drivers bieden afzonderlijke controle over elke kleur. Dit maakt complexe verlichting en precieze kleurmenging mogelijk. Deze geavanceerde besturing is geweldig voor toepassingen die dynamische verlichting nodig hebben. Ze hebben verlichting nodig die kan worden aangepast. Een juiste installatie en instelling van de DALI DT8 driver zorgen ervoor dat uw RGB LED strips goed werken. Ze zullen de beste prestaties leveren.

Bedrading van RGB LED Stripverlichting met LED Regelaars
Sluit de RGB-strip aan op de controller en zorg ervoor dat elke kleur draad is aangesloten op de juiste
terminal. RGB controllers maken verschillende verlichtingseffecten mogelijk, zoals kleurverandering, knipperen en aangepaste patronen. Zorg ervoor dat de controller compatibel is met je RGB-strip en voeding. Als je de aansluitingen goed vastzet en de richtlijnen van de fabrikant volgt, zorg je voor een betrouwbare werking en voorkom je mogelijke problemen.
Zonder PWM-versterker
Met PWM-versterker

Bedrading van RGB LED Stripverlichting met DMX512 Decoder
Gebruik een DMX512 decoder voor RGB-strips in complexe opstellingen. Volg het bedradingsschema voor een correcte installatie. DMX512 decoders bieden nauwkeurige controle over elk kleurkanaal, waardoor ingewikkelde verlichtingseffecten en precieze kleurmenging mogelijk zijn. Deze opstelling wordt vaak gebruikt in professionele verlichtingstoepassingen, zoals podiumverlichting en architecturale verlichting. Zorg ervoor dat de DMX512 decoder goed is ingesteld. Sluit hem aan op de DMX-controller voor de beste prestaties.

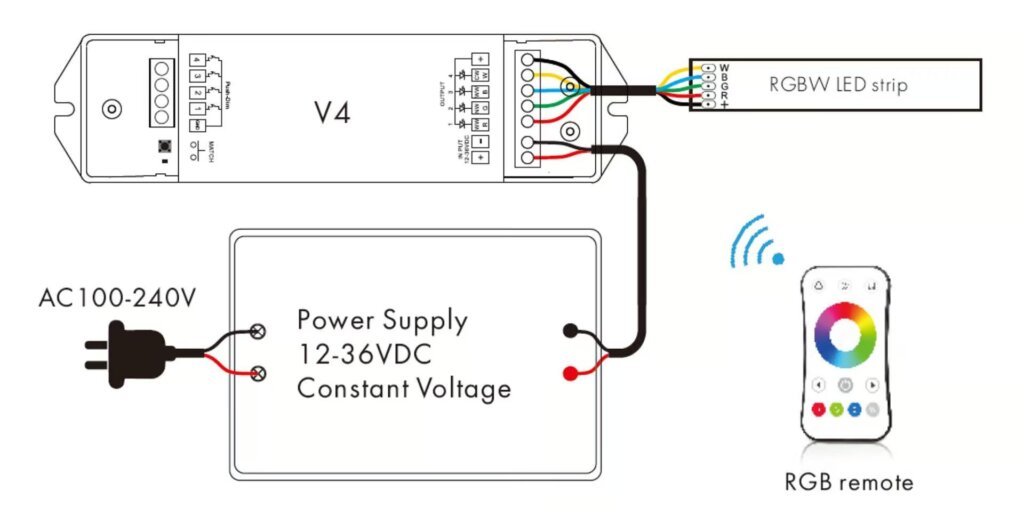
Hoe RGBW LED Stripverlichting bedraden
Bedrading van RGBW LED Stripverlichting met Dimbare LED Drivers
Sluit de RGBW-strip aan op de dimbare driver en zorg ervoor dat alle gekleurde draden (rood, groen, blauw, wit) correct zijn aangesloten. Met dimbare stuurprogramma's voor RGBW-strips kun je de helderheid van de hele strip aanpassen. Voor kleurregeling heb je echter een extra RGBW-controller nodig. Zorg ervoor dat alle aansluitingen goed vastzitten en dat het stuurprogramma compatibel is met je RGBW-strip voor een betrouwbare werking.
DALI DT8 RGBW LED-stuurprogramma
Voor geavanceerde RGBW-besturing gebruikt u een DALI DT8-driver. Volg de bedradingsinstructies van de fabrikant. DALI DT8-drivers bieden afzonderlijke controle over elke kleur. Hierdoor zijn complexe verlichtingseffecten en nauwkeurige kleurmenging mogelijk. Deze geavanceerde besturing is geweldig voor toepassingen. Ze hebben dynamische en aanpasbare verlichting nodig. De DT8-driver moet op de juiste manier worden geïnstalleerd en geconfigureerd. Dit zorgt voor soepele en optimale prestaties van uw RGBW LED strips.

Bedrading van RGBW LED Stripverlichting met LED Regelaars
Sluit de RGBW-strip aan op de controller en zorg dat alle gekleurde draden op de juiste aansluitingen zitten. RGBW controllers maken verschillende verlichtingseffecten mogelijk, zoals kleurverandering, knipperen en aangepaste patronen. Zorg ervoor dat de controller compatibel is met je RGBW-strip en voeding. Het helpt om de aansluitingen goed vast te zetten en de richtlijnen van de fabrikant te volgen. Dit zorgt voor een betrouwbare werking en voorkomt problemen.
Zonder PWM-versterker
Met PWM-versterker

Bedrading van RGBW LED Stripverlichting met DMX512 Decoder
Gebruik een DMX512-decoder voor RGBW-strips in geavanceerde opstellingen. Volg het bedradingsschema voor een juiste installatie. DMX512 decoders geven nauwkeurige controle over elk kleurkanaal. Ze maken complexe verlichtingseffecten en exacte kleurmenging mogelijk. Deze opstelling is gebruikelijk in professionele verlichting. Het wordt gebruikt voor podium- en architecturale verlichting. Zorg ervoor dat de DMX512 decoder is ingesteld en aangesloten op de DMX controller. Dit is nodig voor de beste prestaties.

Hoe RGB & CCT LED Stripverlichting bedraden
Bedrading van RGBW LED Stripverlichting met Dimbare LED Drivers
Volg het bedradingsschema om de RGBW-strip aan te sluiten op een dimbare driver en zorg ervoor dat alle aansluitingen goed vastzitten. Met dimbare stuurprogramma's voor RGBW-strips kun je de helderheid van de hele strip aanpassen. Voor kleurregeling heb je echter een extra RGBW-controller nodig. Zorg ervoor dat alle aansluitingen goed vastzitten en dat het stuurprogramma compatibel is met je RGBW-strip voor een betrouwbare werking.
Bedrading van RGBW LED Stripverlichting met LED Regelaars
Sluit de strip aan op de controller door de draden op de juiste aansluitingen aan te sluiten. RGBW controllers maken verschillende verlichtingseffecten mogelijk, zoals kleurverandering, knipperen en aangepaste patronen. Zorg ervoor dat de controller compatibel is met je RGBW-strip en voeding. Als je de aansluitingen goed vastzet en de richtlijnen van de fabrikant volgt, zorg je voor een betrouwbare werking en voorkom je mogelijke problemen.
Zonder PWM-versterker

Met PWM-versterker

Bedrading van RGBW LED Stripverlichting met DMX512 Decoder
Gebruik een DMX512 decoder voor complexe opstellingen. Volg het bedradingsschema voor een correcte installatie. DMX512 decoders bieden nauwkeurige controle over elk kleurkanaal. Ze maken complexe verlichtingseffecten en exacte kleurmenging mogelijk. Deze opstelling wordt vaak gebruikt in professionele verlichtingstoepassingen, zoals podiumverlichting en architecturale verlichting. Zorg ervoor dat de DMX512 decoder juist is geconfigureerd. Sluit hem aan op de DMX-controller voor de beste prestaties.

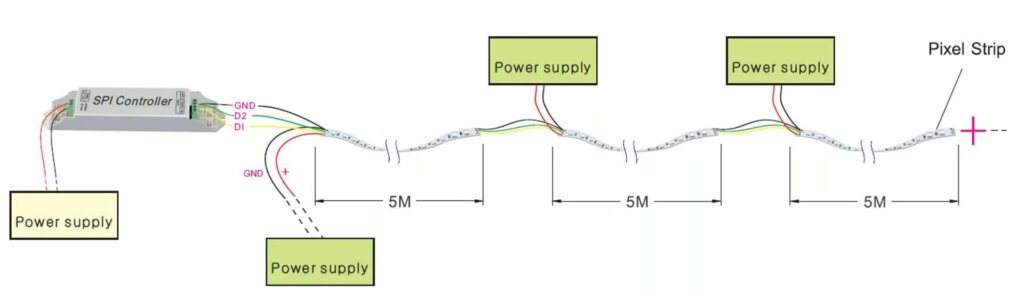
Hoe adresseerbare LED-stripverlichting aansluiten
SPI adresseerbare LED Stripverlichting aansluiten
Sluit de data- en voedingsdraden van de SPI adresseerbare strip aan op de controller volgens het meegeleverde bedradingsschema. Adresseerbare LED-strips maken individuele bediening van elke LED mogelijk, waardoor complexe verlichtingseffecten en -patronen mogelijk zijn. Zorg ervoor dat de controller compatibel is met je SPI adresseerbare strip en dat alle aansluitingen goed vastzitten. Als je de controller goed configureert en de instructies van de fabrikant volgt, zorg je voor een betrouwbare werking en voorkom je mogelijke problemen.
SPI adresseerbare LED Stripverlichting met alleen gegevenskanaal
Zorg ervoor dat de datakabel goed is aangesloten op de controller. Met deze opstelling kun je eenvoudig adresseerbare LED's aansturen. Hiermee kun je aangepaste verlichtingseffecten maken. Als je de datakabel goed vastmaakt en het bedradingsschema volgt, zorg je voor een betrouwbare werking en voorkom je mogelijke problemen.

SPI adresseerbare LED Stripverlichting met data- en klokkanalen
Sluit zowel de gegevens- als de klokdraden aan op de controller en zorg voor een veilige verbinding. Deze opstelling maakt een nauwkeurigere besturing van de adresseerbare LED's mogelijk, waardoor complexe verlichtingseffecten en -patronen mogelijk worden. Als je de controller goed configureert en de instructies van de fabrikant volgt, zorg je voor een betrouwbare werking en voorkom je mogelijke problemen.

SPI adresseerbare LED Stripverlichting met data- en back-updatakanalen
Volg het bedradingsschema om de draden voor gegevens, klok en back-upgegevens aan te sluiten op de controller. Deze configuratie zorgt voor redundantie en een betrouwbare werking, zelfs als één datakanaal uitvalt. Het is belangrijk om alle aansluitingen goed te beveiligen. Volg de instructies van de fabrikant. Dit zorgt voor een betrouwbare werking en voorkomt mogelijke problemen.
Hoe DMX512 adresseerbare LED-stripverlichting aansluiten
Gebruik een DMX512 decoder voor adresseerbare strips. Volg het bedradingsschema voor een juiste installatie. DMX512 decoders bieden nauwkeurige controle over elke LED, waardoor complexe verlichtingseffecten en -patronen mogelijk zijn. Deze opstelling wordt vaak gebruikt in professionele verlichtingstoepassingen, zoals podiumverlichting en architecturale verlichting. Zorg ervoor dat de DMX512 decoder goed is ingesteld. Sluit hem aan op de DMX-controller. Dit is essentieel voor topprestaties.

FAQs
- Hoe worden strip-LED's bedraad?
- Voor elk segment worden de LED's in serie geschakeld, wat betekent dat de bedrijfsspanningen worden opgeteld, waardoor de benodigde hogere spanning wordt verkregen. Alle segmenten worden parallel bedraad, zodat ze dezelfde spanning ontvangen, maar de stroomopname neemt toe met de lengte van de strip. Inzicht in deze bedradingsmethode helpt om een consistente helderheid te behouden en voorkomt problemen zoals ongelijkmatige verlichting of flikkeren.
- Wat zijn de kleuren van de draden op LED-lichtstrips?
- RGB-stripverlichting heeft een 4-draadsaansluiting: groen, rood, blauw voor de LED's en zwart/wit voor de gemeenschappelijke +12V-aansluiting. Als je deze draden goed afstemt op de corresponderende aansluitingen op de controller of voeding, zorg je voor een correcte werking en kleurmenging.
- Wat zijn 4 draden in LED stripverlichting?
- Voor RGB-strips heb je 4 draden nodig: één neutraal (geel) en de rest regelt de 3 LED-kleuren (rood, groen, blauw). Door deze draden correct aan te sluiten, zorg je voor een goede kleurregeling en werking van de strip.
- Hoeveel draden voor een LED-strip?
- De RGBW LED-strip heeft vijf draden: rood, groen, blauw, wit en positief. Sluit de LED lichtstrip aan op de overeenkomstige markering op de RGBW LED lichtcontroller. Als u ervoor zorgt dat alle aansluitingen goed vastzitten en het bedradingsschema van de fabrikant volgt, voorkomt u mogelijke problemen en zorgt u voor een betrouwbare werking.
Conclusie
LED stripverlichting bedraden hoeft niet intimiderend te zijn. Met deze gids heb je nu de kennis om verschillende soorten LED stripverlichting aan te pakken, zodat je verzekerd bent van een succesvolle en veilige installatie. Veel plezier met de verlichting!
Afsluiting
Het selecteren van de juiste Flicker-Free dimbare LED drivers is van cruciaal belang voor het optimaliseren van uw verlichting en daarmee voor het verbeteren van uw algehele welzijn en comfort. De afwezigheid van flikkering is cruciaal voor het comfortniveau in uw leefruimtes.
In dit artikel gaan we in op de volgende aspecten om je te helpen bij het kiezen van de ideale flikkervrije LED Drivers:
We gaan in op essentiële kenmerken zoals specificaties, compatibiliteit en efficiëntie om flikkeren in de verlichting te voorkomen. Daarnaast bespreken we het belang van een hoge PWM-frequentie om flikkervrije resultaten te bereiken in de dimbare LED Driver-serie.
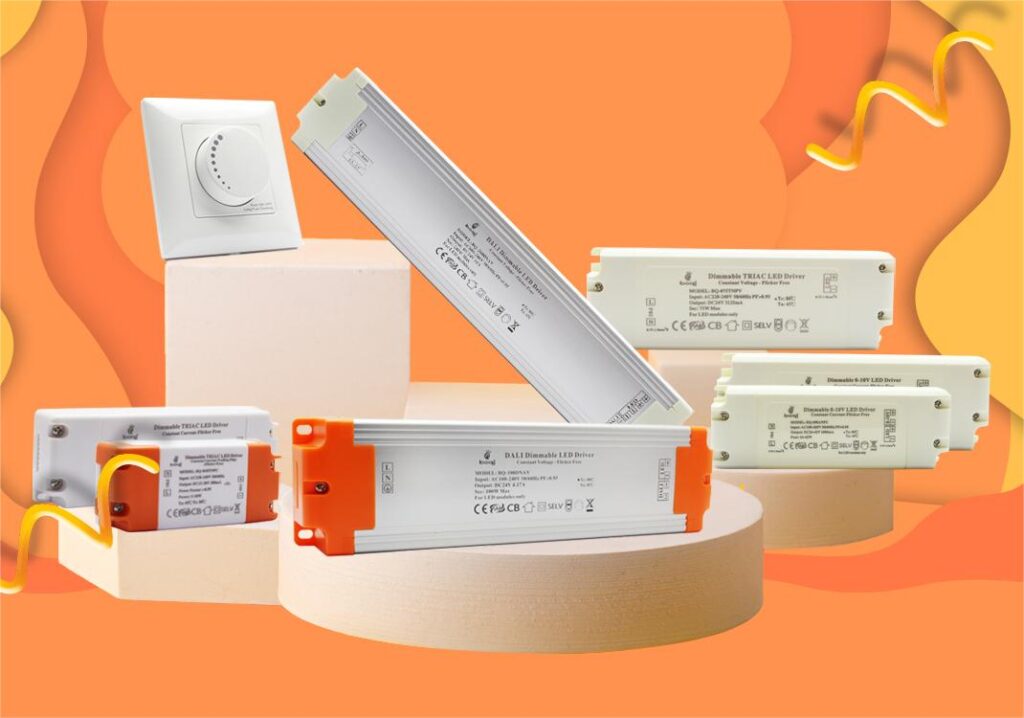
kopen Dimbare LED-stuurprogramma's van boqi
Op de hoogte zijn van de meest voorkomende oorzaken van lichtflikkering is essentieel, maar de taak van het selecteren van de geschikte dimbare LED-driver staat nog steeds voor de deur. Om de gewenste verlichtings- en dimeffecten te realiseren, is het noodzakelijk om contact op te nemen met een gerenommeerde fabrikant van LED-drivers. boqi onderscheidt zich als een gerenommeerde fabrikant van dimbare LED-drivers en biedt een scala aan flikkervrije dimmers en controllers. Het productaanbod omvat TRIAC, 0-10V en DALI LED drivers, dimmers en controllers.
Met productievestigingen in China is het bedrijf afgestemd op de specifieke behoeften en specificaties van zijn klanten. Aarzel niet om contact met ons op te nemen voor vragen over uw LED driver of controller, zodat wij u kunnen helpen bij het verfijnen van uw selecties.