Ligar as luzes de fita LED pode parecer assustador. Mas, com a orientação correcta, é um processo simples. Pode melhorar o seu espaço de uma forma maravilhosa. Destina-se a entusiastas da bricolage, proprietários de casas que pretendem adicionar um ambiente e electricistas num novo projeto. Este guia simplificará a cablagem para si.
Para ligar as luzes de fita LED, comece por identificar o tipo de fita (cor única, RGB ou RGBW). Ligue os fios positivos e negativos aos terminais correspondentes na sua fonte de alimentação ou controlador. Para as tiras RGB, faça corresponder as cores (vermelho, verde, azul) aos terminais adequados. Certifique-se de que todas as ligações estão seguras e siga o diagrama de cablagem incluído para obter instruções precisas.
Vamos mergulhar nos pormenores da cablagem de vários tipos de fitas LED. Isto irá garantir que tem os conhecimentos e a confiança necessários para o fazer corretamente.
Compreender a ligação em paralelo: Simplificado
As ligações paralelas são cruciais na iluminação com fitas LED. Cada segmento da fita é ligado em série, o que significa que as tensões de funcionamento são somadas, fornecendo a tensão mais elevada necessária. Todos os segmentos são ligados em paralelo, recebendo a mesma tensão, mas o consumo de corrente aumenta com o comprimento da faixa. Utilize ligações paralelas. Estas asseguram que cada segmento da fita recebe uma tensão constante. Isto evita problemas como brilho irregular ou cintilação. Esta configuração é fundamental para longas tiragens de LED. Ela mantém a luz estável e uniforme. Compreender os princípios básicos da cablagem paralela pode melhorar significativamente a eficácia e a fiabilidade da sua instalação de iluminação LED.


Queda de tensão: uma explicação simples
A queda de tensão ocorre quando a tensão no final da tira é mais baixa do que no início. Isso pode fazer com que os LEDs no final fiquem mais fracos. Para atenuar a queda de tensão, utilize fios mais grossos, ou tiras mais curtas, ou injecte energia em vários pontos ao longo da tira. É essencial planear cuidadosamente a sua instalação para minimizar a queda de tensão, especialmente em percursos mais longos. Um bom método é utilizar amplificadores de potência. Utilize-os em intervalos regulares. Estes ajudam a manter uma tensão estável em toda a faixa. Além disso, escolher uma fonte de alimentação melhor, com capacidade suficiente, também pode reduzir o risco de queda de tensão. Ao compreender e corrigir a queda de tensão, pode garantir que as suas fitas LED funcionam bem. Elas fornecerão luz uniforme em toda a instalação.
Amplificador PWM: Transformando o complexo em simples
Um amplificador de modulação de largura de pulso (PWM) aumenta o sinal para as tiras de LED, permitindo um brilho consistente em tiras longas. Assegura que o sinal de alimentação permanece forte, evitando escurecimento ou cintilação. Os amplificadores PWM são úteis em grandes instalações. Eles mantêm a saída de luz uniforme, o que é fundamental. Estes amplificadores regeneram o sinal PWM. Alargam o alcance efetivo das suas tiras de LED. Isto garante que cada secção recebe a tensão e a corrente correctas. A instalação de amplificadores PWM é simples. Pode adicioná-los à sua configuração. Colocando-os e configurando-os corretamente, os amplificadores PWM podem melhorar muito a iluminação das fitas LED. Podem aumentar o desempenho e a longevidade.
Tipos de fitas luminosas LED
As tiras de luz LED existem em vários tipos, incluindo de cor única, RGB (vermelho, verde, azul), RGBW (vermelho, verde, azul, branco) e branco sintonizável. Cada tipo requer uma cablagem e controladores diferentes. As tiras de cor única são as mais simples, com apenas dois fios para ligações positivas e negativas. As tiras RGB adicionam três canais de cor, exigindo um controlador para misturar as cores. As tiras RGBW incluem um canal branco adicional para opções de iluminação com mais nuances. As tiras brancas sintonizáveis permitem ajustes na temperatura da cor, oferecendo uma gama de luz branca de quente a fria. Conhecer as diferenças entre estes tipos de tiras LED pode ajudá-lo a escolher o produto certo para as suas necessidades. Também garante uma configuração e utilização correctas.
Como ligar fitas LED de uma só cor
Ligação de tiras de LED de cor única com accionadores de LED não reguláveis
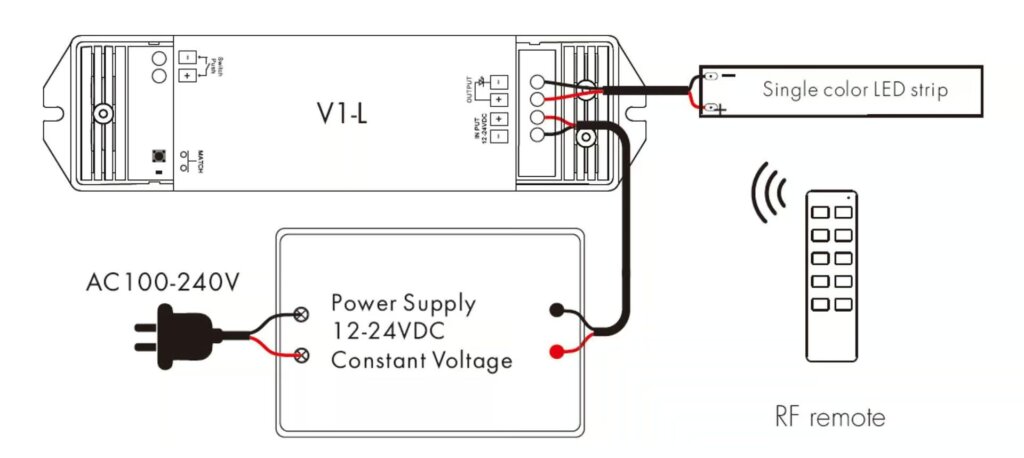
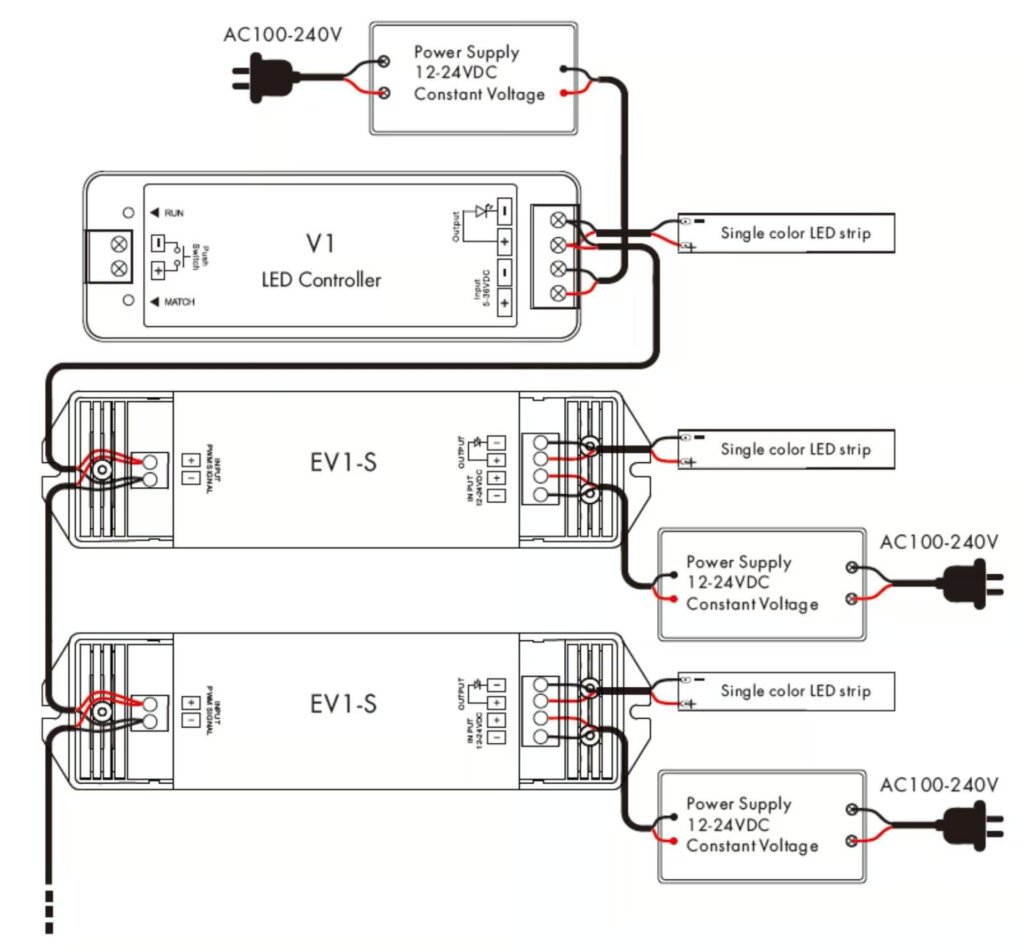
Para controladores de LED não reguláveis, ligue o fio positivo da tira ao terminal positivo do controlador. Em seguida, ligue o fio negativo da tira ao terminal negativo do controlador. Fixe todas as ligações e ligue a alimentação. Este método de ligação simples é ótimo para instalações básicas. Não requerem regulação da intensidade da luz. Os controladores não reguláveis fornecem uma saída constante. Isto garante que as suas tiras de LED brilham no seu melhor. Ao ligar várias tiras, é importante garantir que a potência total não excede a capacidade do controlador. É fundamental garantir a segurança de todas as ligações. Siga as instruções do fabricante. Isto evita problemas eléctricos e garante uma instalação segura e fiável.
Ligação de fitas LED de cor única com controlador LED regulávels
Os controladores de LED reguláveis permitem-lhe ajustar a luminosidade. Ligue a tira ao controlador como descrito acima. Siga o esquema elétrico específico para o seu tipo de regulador de intensidade luminosa:
– Diagrama de ligação do controlador de LED regulável 0-10V
Um controlador regulável de 0-10V utiliza um sinal de controlo de baixa tensão para ajustar a luminosidade. Ligue o regulador de intensidade de 0-10V aos terminais de controlo do controlador, assegurando a polaridade correcta. Esta configuração permite um escurecimento suave em toda a gama.


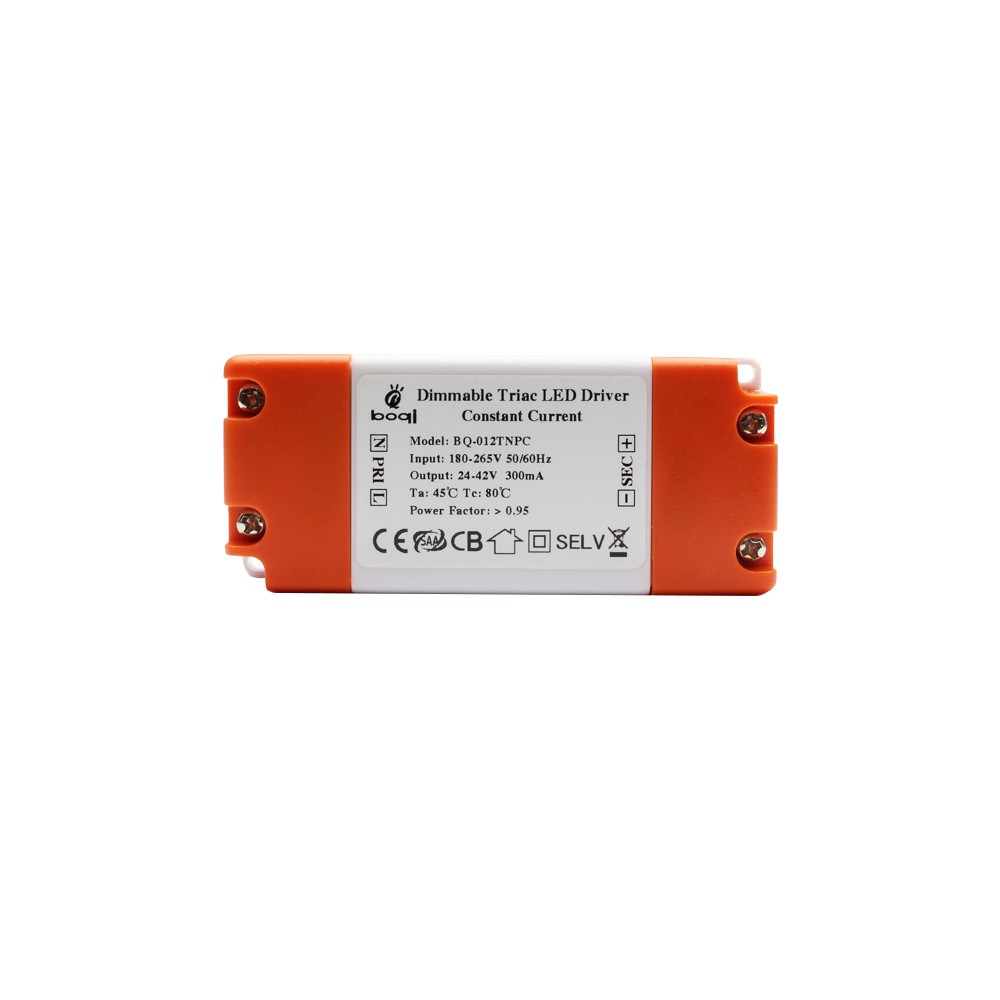
– Diagrama de ligação do controlador LED regulável por triac
Os reguladores triac funcionam com regulação de intensidade de corte de fase AC. Ligue o controlador a um interrutor de regulação de fluxo luminoso triac compatível, assegurando que a entrada do controlador corresponde à saída do regulador de fluxo luminoso. Este método proporciona uma experiência de regulação familiar semelhante à das lâmpadas incandescentes tradicionais.

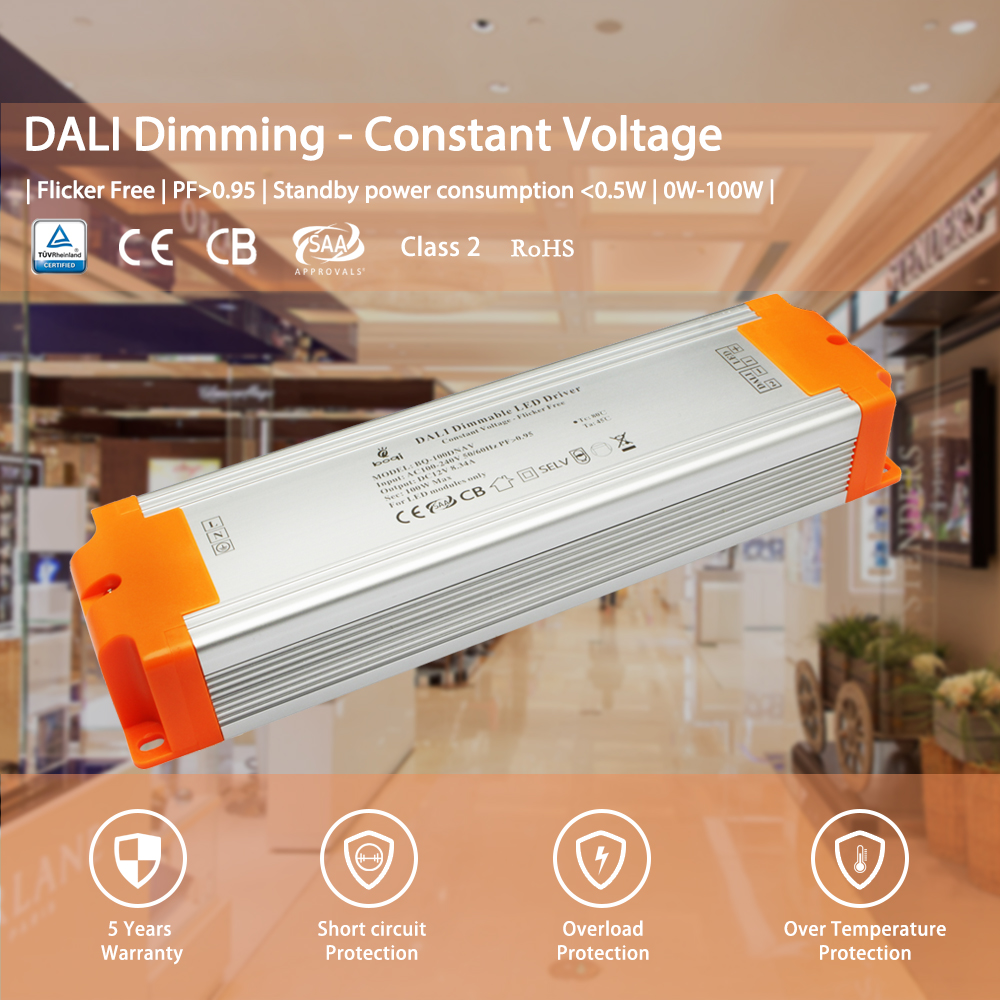
– Diagrama de ligação do controlador LED regulável DALI
Os reguladores DALI (Digital Addressable Lighting Interface) oferecem um controlo preciso e programável. Ligue as linhas de controlo DALI aos terminais de entrada DALI do controlador. Esta configuração é ideal para sistemas de iluminação complexos que requerem funcionalidades de controlo avançadas.

Ligação de fitas LED de cor única com controladores LED
Os controladores LED proporcionam mais flexibilidade no controlo das luzes. Ligue a tira ao controlador. Certifique-se de que os fios positivo e negativo correspondem aos terminais do controlador. Os controladores permitem vários efeitos, tais como escurecimento, intermitência e padrões de iluminação personalizados. Certifique-se de que o controlador é compatível com a sua fita LED e fonte de alimentação. É fundamental fixar corretamente as ligações. Seguir as orientações do fabricante garantirá um funcionamento fiável e evitará potenciais problemas.
Sem amplificador PWM
Com amplificador PWM
Ligação de fitas LED de cor única com descodificador DMX512
Os descodificadores DMX512 são utilizados para configurações de iluminação avançadas. Ligue a tira ao descodificador, fazendo corresponder os fios positivos e negativos aos terminais corretos. O DMX512 é um protocolo de comunicação digital. É utilizado para o controlo da iluminação e proporciona um controlo preciso de muitos canais. Esta configuração é comum na iluminação de palco. Também é utilizada na iluminação arquitetónica e noutras aplicações profissionais. Certifique-se de que o descodificador DMX512 está corretamente configurado. Ligue-o ao controlador DMX para obter o melhor desempenho.

Como ligar tiras de luzes LED brancas sintonizáveis
Ligação de fitas LED brancas sintonizáveis com accionadores de LED reguláveis
As tiras de LED branco sintonizáveis permitem ajustar a temperatura da cor. Ligue os fios de acordo com as instruções do controlador, assegurando ligações adequadas para o controlo da temperatura da cor e do brilho. As fitas brancas sintonizáveis têm normalmente linhas de controlo adicionais para ajustar a temperatura da cor. Estas tiras podem passar do branco quente para o branco frio, proporcionando opções de iluminação versáteis. Certifique-se de que o seu controlador de LED regulável é compatível com as fitas brancas reguláveis e que todas as ligações estão seguras para um funcionamento fiável.
DALI DT8 Controlador de LED branco sintonizável
Os controladores DALI DT8 são utilizados para o controlo preciso de faixas brancas sintonizáveis. Siga o esquema elétrico fornecido pelo fabricante. Os controladores DALI DT8 suportam tiras de LED brancas sintonizáveis. Permitem o controlo independente do brilho e da temperatura da cor. Esta capacidade de controlo avançada é ideal para aplicações que requerem ambientes de iluminação dinâmicos. A cablagem e a configuração corretas do controlador DALI DT8 garantem um funcionamento suave e um desempenho ótimo das suas fitas LED brancas sintonizáveis.

Ligação de fitas LED brancas sintonizáveis com controladores LED
Ligue a tira branca sintonizável ao controlador, fazendo corresponder os terminais positivo e negativo. Assegure-se de que as ligações são seguras para um funcionamento fiável. Os controladores LED para tiras brancas sintonizáveis permitem ajustes precisos na temperatura da cor e no brilho. Estes controladores são frequentemente fornecidos com controlos remotos ou podem ser integrados em sistemas domésticos inteligentes para maior comodidade. A instalação e configuração adequadas do controlador garantem um funcionamento consistente e fiável.
Sem amplificador PWM

Ligação eléctrica de fitas LED brancas sintonizáveis com descodificador DMX512

Utilize um descodificador DMX512 para tiras brancas sintonizáveis em configurações avançadas. Ligue a faixa ao descodificador, seguindo o diagrama de cablagem para uma instalação correta. Os descodificadores DMX512 permitem um controlo preciso da temperatura da cor e do brilho. São ideais para iluminação profissional. Certifique-se de que o descodificador está corretamente ligado ao controlador DMX e que todas as ligações estão seguras para um desempenho ótimo.
Fita LED branca sintonizável com dois fios
As tiras brancas sintonizáveis mais simples utilizam dois fios para o controlo da temperatura da cor. Ligue estes fios aos terminais apropriados no seu controlador ou controlador. Este tipo de fita branca sintonizável tem normalmente uma configuração de cablagem mais simples, tornando-a mais fácil de instalar. No entanto, pode oferecer menos opções de controlo em comparação com sistemas brancos sintonizáveis mais avançados. Certifique-se de que o seu controlador ou controlador é compatível com a configuração de dois fios para um funcionamento fiável.

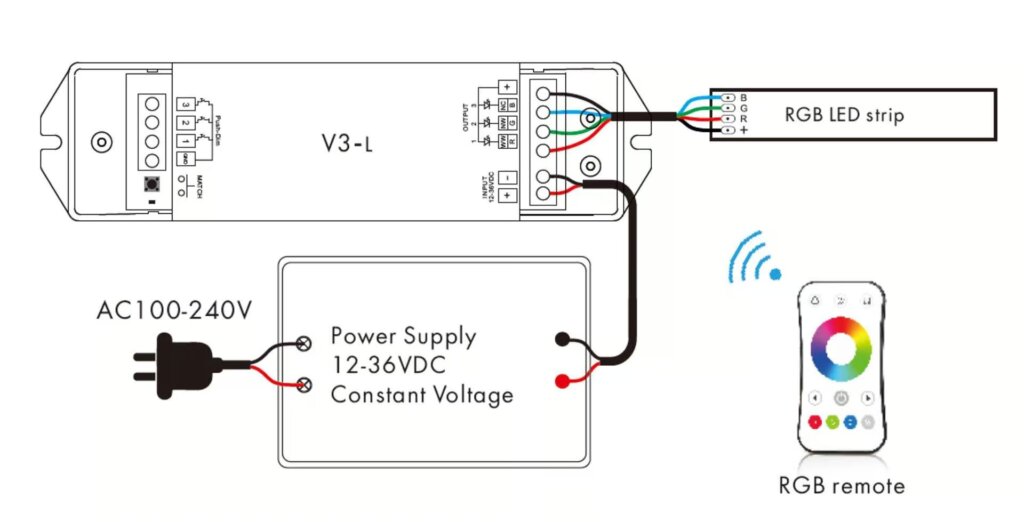
Como ligar fitas LED RGB
Ligação de fitas LED RGB com accionadores de LED reguláveis
Ligue a tira RGB ao controlador regulável, fazendo corresponder os fios vermelho, verde e azul aos terminais correspondentes. Utilize o esquema elétrico fornecido. Os controladores reguláveis para tiras RGB permitem-lhe ajustar o brilho de toda a tira. No entanto, o controlo da cor requer um controlador RGB adicional. Certifique-se de que todas as ligações estão seguras e que o controlador é compatível com a sua fita RGB para um funcionamento fiável.
Controlador de LED DALI DT8 RGB
Para um controlo RGB avançado, utilize um controlador DALI DT8. Siga o diagrama de cablagem do fabricante para uma instalação precisa. Os controladores DALI DT8 permitem um controlo separado de cada cor. Isto permite uma iluminação complexa e uma mistura de cores precisa. Este controlo avançado é excelente para aplicações que necessitam de iluminação dinâmica. Elas precisam de uma iluminação que possa ser personalizada. A instalação e configuração corretas do controlador DALI DT8 garantem que as suas tiras de LED RGB funcionam bem. Elas terão o melhor desempenho.

Ligação de fitas LED RGB com controladores LED
Ligue a tira RGB ao controlador, certificando-se de que cada fio colorido está ligado à cor adequada.
terminal. Os controladores RGB permitem vários efeitos de iluminação, tais como mudança de cor, intermitência e padrões personalizados. Certifique-se de que o controlador é compatível com a tira RGB e a fonte de alimentação. Fixar corretamente as ligações e seguir as orientações do fabricante ajudará a garantir um funcionamento fiável e a evitar potenciais problemas.
Sem amplificador PWM
Com amplificador PWM

Ligação de fitas LED RGB com descodificador DMX512
Utilize um descodificador DMX512 para tiras RGB em configurações complexas. Siga o diagrama de cablagem para garantir uma instalação correta. Os descodificadores DMX512 fornecem um controlo preciso sobre cada canal de cor, permitindo efeitos de iluminação complexos e uma mistura de cores precisa. Esta configuração é normalmente utilizada em aplicações de iluminação profissional, como iluminação de palco e iluminação arquitetónica. Certifique-se de que o descodificador DMX512 está corretamente configurado. Ligue-o ao controlador DMX para obter o melhor desempenho.

Como ligar as fitas LED RGBW
Ligação de fitas LED RGBW com accionadores LED reguláveis
Ligue a tira RGBW ao controlador regulável, certificando-se de que todos os fios coloridos (vermelho, verde, azul, branco) estão corretamente ligados. Os controladores reguláveis para tiras RGBW permitem-lhe ajustar o brilho de toda a tira. No entanto, o controlo da cor requer um controlador RGBW adicional. Certifique-se de que todas as ligações estão seguras e que o controlador é compatível com a sua faixa RGBW para um funcionamento fiável.
Controlador de LED DALI DT8 RGBW
Para um controlo RGBW avançado, utilize um controlador DALI DT8. Siga as instruções de cablagem do fabricante. Os controladores DALI DT8 permitem um controlo separado de cada cor. Isto permite efeitos de iluminação complexos e uma mistura de cores precisa. Este controlo avançado é excelente para aplicações. Estas necessitam de uma iluminação dinâmica e personalizável. O controlador DT8 deve ser corretamente instalado e configurado. Isto garante um desempenho suave e ótimo das suas tiras de LED RGBW.

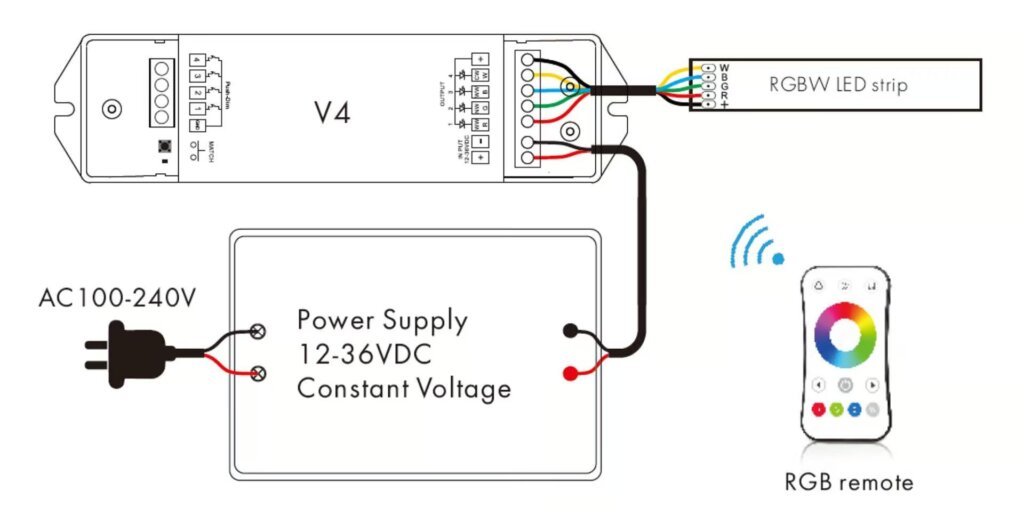
Ligação de fitas LED RGBW com controladores LED
Ligue a tira RGBW ao controlador, fazendo corresponder todos os fios coloridos aos terminais corretos. Os controladores RGBW permitem vários efeitos de iluminação, tais como mudança de cor, intermitência e padrões personalizados. Certifique-se de que o controlador é compatível com a faixa RGBW e a fonte de alimentação. Fixar corretamente as ligações e seguir as diretrizes do fabricante será útil. Assegurará um funcionamento fiável e evitará problemas.
Sem amplificador PWM
Com amplificador PWM

Ligação de fitas LED RGBW com descodificador DMX512
Utilize um descodificador DMX512 para tiras RGBW em configurações avançadas. Siga o diagrama de cablagem para uma instalação correta. Os descodificadores DMX512 proporcionam um controlo preciso sobre cada canal de cor. Permitem efeitos de iluminação complexos e uma mistura de cores exacta. Esta configuração é comum na iluminação profissional. É utilizada para iluminação de palco e arquitetónica. Certifique-se de que o descodificador DMX512 está configurado e ligado ao controlador DMX. Isto é necessário para um melhor desempenho.

Como ligar as fitas LED RGB e CCT
Ligação de fitas LED RGBW com accionadores LED reguláveis
Siga o esquema elétrico para ligar a tira RGBW a um controlador regulável, assegurando que todas as ligações estão seguras. Os controladores reguláveis para tiras RGBW permitem-lhe ajustar o brilho de toda a tira. No entanto, o controlo da cor requer um controlador RGBW adicional. Certifique-se de que todas as ligações estão seguras e que o controlador é compatível com a sua faixa RGBW para um funcionamento fiável.
Ligação de fitas LED RGBW com controladores LED
Ligue a tira ao controlador, fazendo corresponder os fios aos terminais adequados. Os controladores RGBW permitem vários efeitos de iluminação, tais como mudança de cor, intermitência e padrões personalizados. Certifique-se de que o controlador é compatível com a sua faixa RGBW e com a fonte de alimentação. Fixar corretamente as ligações e seguir as orientações do fabricante ajudará a garantir um funcionamento fiável e a evitar potenciais problemas.
Sem amplificador PWM

Com amplificador PWM

Ligação de fitas LED RGBW com descodificador DMX512
Utilize um descodificador DMX512 para configurações complexas. Siga o diagrama de cablagem para garantir uma instalação correta. Os descodificadores DMX512 fornecem um controlo preciso sobre cada canal de cor. Permitem efeitos de iluminação complexos e uma mistura de cores exacta. Esta configuração é normalmente utilizada em aplicações de iluminação profissional, como iluminação de palco e iluminação arquitetónica. Certifique-se de que o descodificador DMX512 está corretamente configurado. Ligue-o ao controlador DMX para obter o melhor desempenho.

Como ligar fitas LED endereçáveis
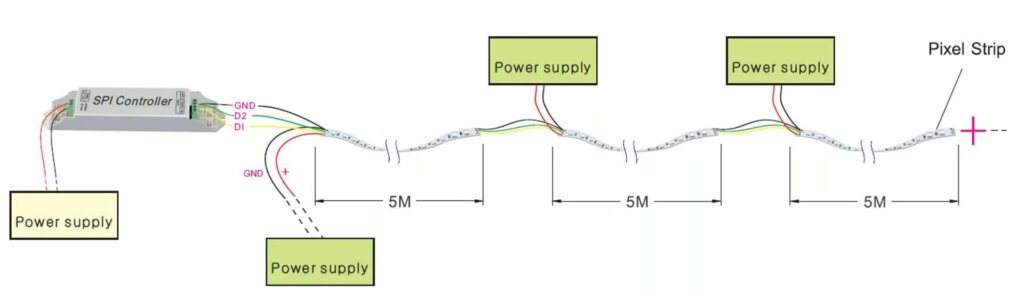
Como ligar fitas LED endereçáveis SPI
Ligue os fios de dados e de alimentação da faixa endereçável SPI ao controlador, seguindo o esquema de ligações fornecido. As fitas de LED endereçáveis permitem o controlo individual de cada LED, possibilitando efeitos e padrões de iluminação complexos. Certifique-se de que o controlador é compatível com a sua faixa endereçável SPI e que todas as ligações estão seguras. Configurar corretamente o controlador e seguir as instruções do fabricante ajudará a garantir um funcionamento fiável e a evitar potenciais problemas.
Fita LED endereçável SPI apenas com canal de dados
Certifique-se de que o fio de dados está ligado de forma segura ao controlador. Esta configuração permite o controlo básico de LEDs endereçáveis. Permite-lhe criar efeitos de iluminação personalizados. Fixar corretamente o fio de dados e seguir o diagrama de ligações ajudará a garantir um funcionamento fiável e a evitar potenciais problemas.

Fita LED endereçável SPI com canais de dados e de relógio
Ligue os fios de dados e de relógio ao controlador, assegurando ligações seguras. Esta configuração permite um controlo mais preciso dos LEDs endereçáveis, possibilitando efeitos e padrões de iluminação complexos. Configurar corretamente o controlador e seguir as instruções do fabricante ajudará a garantir um funcionamento fiável e a evitar potenciais problemas.

Fita LED endereçável SPI com canais de dados e de dados de reserva
Siga o diagrama de cablagem para ligar os fios de dados, relógio e dados de reserva ao controlador. Esta configuração proporciona redundância, garantindo um funcionamento fiável mesmo que um canal de dados falhe. É fundamental fixar corretamente todas as ligações. Seguir as instruções do fabricante ajudará. Garante um funcionamento fiável e evita potenciais problemas.
Como ligar tiras de luzes LED endereçáveis DMX512
Utilize um descodificador DMX512 para tiras endereçáveis. Siga o diagrama de cablagem para uma instalação correta. Os descodificadores DMX512 fornecem um controlo preciso sobre cada LED, permitindo efeitos e padrões de iluminação complexos. Esta configuração é normalmente utilizada em aplicações de iluminação profissional, como iluminação de palco e iluminação arquitetónica. Certifique-se de que o descodificador DMX512 está corretamente configurado. Ligue-o ao controlador DMX. Isto é fundamental para um desempenho de topo.

Perguntas frequentes
- Como é que as tiras de LED são ligadas?
- Para cada segmento, os LEDs são ligados em série, o que significa que as tensões de funcionamento são somadas, dando a tensão mais elevada necessária. Todos os segmentos são ligados em paralelo, pelo que recebem a mesma tensão, mas o consumo de corrente aumenta com o comprimento da tira. A compreensão deste método de ligação ajuda a manter um brilho consistente e evita problemas como iluminação irregular ou cintilação.
- Quais são as cores dos fios das tiras de luz LED?
- A fita luminosa RGB tem uma ligação de 4 fios: verde, vermelho, azul para os LEDs e preto/branco para a ligação comum de +12V. A correspondência adequada destes fios com os terminais correspondentes no controlador ou na fonte de alimentação garante o funcionamento correto e a mistura de cores.
- O que são 4 fios numa fita LED?
- Para as tiras RGB, são necessários 4 fios: um neutro (amarelo) e os restantes controlam as 3 cores dos LED (vermelho, verde e azul). A ligação correta destes fios garante o controlo das cores e o funcionamento correto da fita.
- Quantos fios tem uma fita LED?
- A fita LED RGBW tem cinco fios: vermelho, verde, azul, branco e positivo. Ligue a tira de luz LED à marca correspondente no controlador de luz LED RGBW. Assegurar que todas as ligações estão seguras e seguir o diagrama de ligações fornecido pelo fabricante ajudará a evitar potenciais problemas e a garantir um funcionamento fiável.
Conclusão
Ligar as luzes de fita LED não tem de ser intimidante. Com este guia, tem agora os conhecimentos necessários para lidar com vários tipos de fitas LED, garantindo uma instalação segura e bem sucedida. Boa iluminação!
Encerramento
A seleção dos controladores LED reguláveis sem cintilação adequados é fundamental para otimizar a sua iluminação, melhorando assim o seu bem-estar e conforto gerais. A ausência de cintilação é crucial para o nível de conforto percepcionado nos seus espaços habitacionais.
Neste artigo, analisamos os seguintes aspectos para o guiar na seleção dos controladores LED de escurecimento sem cintilação ideais:
Iremos explorar características essenciais como especificações, compatibilidade e eficiência para contornar qualquer cintilação na iluminação. Além disso, discutiremos a importância da frequência PWM elevada para obter resultados sem cintilação na série de controladores LED reguláveis.
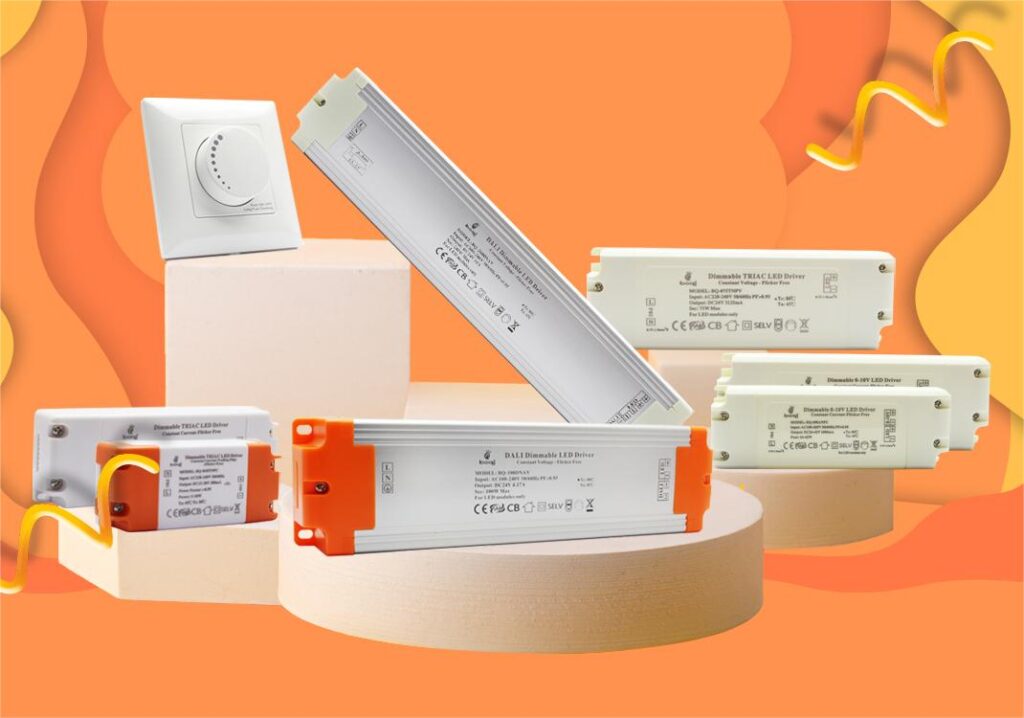
Comprar Drivers de LED reguláveis de boqi
Estar informado sobre as causas predominantes da cintilação da luz é essencial, mas a tarefa de selecionar o controlador LED regulável adequado ainda está em curso. Para obter os efeitos de iluminação e de regulação desejados, é imperativo contactar um fabricante de controladores LED de renome. A boqi destaca-se como um fabricante de renome de controladores LED reguláveis, oferecendo uma gama de controladores, reguladores de intensidade luminosa e controladores sem cintilação. A gama de produtos inclui controladores TRIAC, 0-10V e DALI LED, reguladores de intensidade luminosa e controladores.
Operando com bases de fabrico na China, a empresa está sintonizada com as necessidades e especificações distintas da sua clientela. Para questões relacionadas com as suas necessidades em termos de controladores ou controladores LED, não hesite em contactar-nos, permitindo-nos ajudá-lo a refinar as suas selecções.